
利用Nginx给原神游戏服务端做负载均衡
仅供学习交流使用,如果侵犯到你的合法权利,请联系邮件删除,或评论。我将会在24h内删除
本教程使用Ansible自动化部署工具部署,仅适用机器不超过10-20台左右的机器
一、环境准备
| 系统版本 | 主机名 | IP | 软件 |
|---|---|---|---|
| Centos7.9 | nginx.linux.com | 192.168.140.10 | Nginx、Ansible |
| Centos7.9 | server1.linux.com | 192.168.140.11 | jdk17、Grasscutter |
| Centos7.9 | server2.linux.com | 192.168.140.12 | jdk17、Grasscutter |
| Centos7.9 | db.linux.com | 192.168.140.13 | MongoDB |
1.关闭防火墙、SElinux配置时间同步
过程省略
2.配置SSH免密
所有机器关闭SSH配置文件中的DNS解析
这一步优化
SSH连接的速度,后续需要用到Ansible统一部署
[root@nginx ~]# sed -ri 's|#UseDNS yes|UseDNS no|' /etc/ssh/sshd_config
[root@server1 ~]# sed -ri 's|#UseDNS yes|UseDNS no|' /etc/ssh/sshd_config
[root@server2 ~]# sed -ri 's|#UseDNS yes|UseDNS no|' /etc/ssh/sshd_config
[root@db ~]# sed -ri 's|#UseDNS yes|UseDNS no|' /etc/ssh/sshd_config
[root@nginx ~]# systemctl restart sshd
[root@server1 ~]# systemctl restart sshd
[root@server2 ~]# systemctl restart sshd
[root@db ~]# systemctl restart sshd
配置免密SSH
[root@nginx ~]# ssh-keygen -t rsa

Generating public/private rsa key pair.
Enter file in which to save the key (/root/.ssh/id_rsa):
Created directory '/root/.ssh'.
Enter passphrase (empty for no passphrase):
Enter same passphrase again:
Your identification has been saved in /root/.ssh/id_rsa.
Your public key has been saved in /root/.ssh/id_rsa.pub.
The key fingerprint is:
SHA256:m+9ZOtUfzxDyvTaiHYXuAzrTlFCHawHPqYiFVEetMZU root@nginx.linux.com
The key's randomart image is:
+---[RSA 2048]----+
|     ....++.o    |
|    . . .ooE..   |
|     . .  =++    |
|      o .o.o. o  |
|     . .S.o .= + |
|         o +o =..|
|        o +.oo ++|
|         =.=oo.++|
|         .Bo.o+ .|
+----[SHA256]-----+
[root@nginx ~]# ssh-copy-id root@192.168.140.11
[root@nginx ~]# ssh-copy-id root@192.168.140.12
[root@nginx ~]# ssh-copy-id root@192.168.140.13
连接测试
登录的时候,不需要输入密码
[root@nginx ~]# for i in 11 12 13 \
do \
ssh root@192.168.140.$i hostname \
done

#查询结果
server1.linux.com
server2.linux.com
db.linux.com
二、配置Ansible
此软件在
nginx.linux.com上安装
关于Ansible更多详细教程:https://www.wsjj.top/archives/115
1.安装Ansible
[root@nginx ~]# yum install -y ansible
2.配置主机名解析
我这只是测试环境,请根据您的真实环境做修改
[root@nginx ~]# vim /etc/hosts
#把以下内容加入文件末行
192.168.140.10 nginx.linux.com nginx
192.168.140.11 server1.linux.com server1
192.168.140.12 server2.linux.com server2
192.168.140.13 db.linux.com db
[root@nginx ~]# ping server1
PING server1.linux.com (192.168.140.11) 56(84) bytes of data.
64 bytes from server1.linux.com (192.168.140.11): icmp_seq=1 ttl=64 time=0.140 ms
[root@nginx ~]# ping server2
PING server2.linux.com (192.168.140.12) 56(84) bytes of data.
64 bytes from server2.linux.com (192.168.140.12): icmp_seq=1 ttl=64 time=0.451 ms
[root@nginx ~]# ping db
PING db.linux.com (192.168.140.13) 56(84) bytes of data.
64 bytes from db.linux.com (192.168.140.13): icmp_seq=1 ttl=64 time=0.117 ms
拷贝hosts文件给其他机器
[root@nginx ~]# for i in 11 12 13 \
do \
scp -r /etc/hosts root@192.168.140.$i:/etc/ \
done
3.修改ansible配置文件
[root@nginx ~]# vim /etc/ansible/ansible.cfg
remote_user= root		#指定远程用户为root
host_key_checking= False		#免除远程yes操作
4.配置Ansible清单文件(重要)
[root@nginx ~]# vim /etc/ansible/hosts
#找个地方,加入以下内容
[gcserver]
server1
server2

[dbserver]
db

[all:vars]
ansible_password=centos	#此配置用于配置密码,我这里所有机器的登录密码都是centos
5.测试
[root@nginx ~]# ansible all -m shell -a 'hostname'
server1 | CHANGED | rc=0 >>
server1.linux.com
server2 | CHANGED | rc=0 >>
server2.linux.com
db | CHANGED | rc=0 >>
db.linux.com
-m模块名称-a要执行的操作
更多关于
Ansible模块说明请看:https://www.wsjj.top/archives/115
三、使用Ansible给db.linux.com安装MongoDB
1.配置MongoDB安装源
[root@nginx ~]# vim /etc/yum.repos.d/mongodb.repo
[mongodb42]
name=mongodb42
baseurl=https://repo.mongodb.org/yum/redhat/7/mongodb-org/4.2/x86_64/
enabled=1
gpgcheck=1
gpgkey=https://pgp.mongodb.com/server-4.2.asc
2.编写platybook剧本
[root@nginx ~]# vim mongodb.yaml
- hosts: dbserver #指定群组
  user: root  #指定用户
  tasks:
    - name: copy mongodb repo #拷贝MongoDB安装源
      copy: src=/etc/yum.repos.d/mongodb.repo dest=/etc/yum.repos.d/mongodb.repo

    - name: install mongodb #安装MongoDB
      yum: name=mongodb-org state=present

    - name: revise mongodb.conf #修改MongoDB配置文件
      shell: "sed -ri 's|bindIp: 127.0.0.1|bindIp: 0.0.0.0|' /etc/mongod.conf"

    - name: start mongodb #启动MongoDB服务,并设置开机自启动
      service: name=mongod state=started enabled=yes
3.执行剧本
[root@nginx ~]# ansible-playbook /root/mongodb.yaml
4.检查数据库是否启动成功
如果您的系统没有
netstat命令,请安装yum install -y net-tools
[root@nginx ~]# ssh root@192.168.140.13 netstat -tunlp | grep mongod
tcp        0      0 0.0.0.0:27017           0.0.0.0:*               LISTEN      2669/mongod
四、使用Ansible配置grasscutter服务器
先捋一下思路:
1.准备jdk17环境
2.拷贝gc本体
3.解压gc本体
4.准备config.j2的jinjia模板,调用setup模块
5.替换config.json配置文件
1.准备数据目录和用到的文件
[root@nginx ~]# mkdir -p /gc
[root@nginx ~]# mv /gc/config.json /gc/config.j2
[root@nginx ~]# ls /gc
config.j2  Grasscutter3.7.zip
2.准备jinjia模板
[root@nginx ~]# vim /gc/config.j2
#仅展示修改的地方
"databaseInfo": {
    "server": {
      "connectionUri": "mongodb://192.168.140.13:27017",	#指定数据库连接地址
      "collection": "grasscutter"
    },
    "game": {
      "connectionUri": "mongodb://192.168.140.13:27017",	#指定数据库连接地址
      "collection": "grasscutter"
http": {
      "bindAddress": "0.0.0.0",
      "bindPort": 444,
      "accessAddress": "{{ ansible_default_ipv4.address }}",	#ansible中的setup模块会自动帮我们替换IP地址
"game": {
      "bindAddress": "0.0.0.0",
      "bindPort": 22102,
      "accessAddress": "{{ ansible_default_ipv4.address }}",	#ansible中的setup模块会自动帮我们替换IP地址
3.编写playbook剧本
[root@nginx ~]# vim /gc/gc.yaml
- hosts: gcserver #指定群组
  user: root  #指定用户
  tasks:
    - name: install jdk17 #安装jdk17
      shell: "yum install -y https://download.oracle.com/java/17/latest/jdk-17_linux-x64_bin.rpm"

    - name: mkdir gc  #创建用到的目录
      file: path=/gc state=directory

    - name: copy grasscutter  #拷贝gc本体
      copy: src=/gc/Grasscutter3.7.zip dest=/gc/Grasscutter3.7.zip

    - name: install unzip #安装unzip命令
      yum: name=unzip state=present

    - name: unzip Grasscutter #解压gc
      shell: chdir=/gc unzip Grasscutter3.7.zip

    - name: remove config.json  #删除自带的config
      shell: chdir=/gc/Grasscutter3.7 rm -rf config.json

    - name: copy config #拷贝config模板
      template: src=/gc/config.j2 dest=/gc/Grasscutter3.7/config.json
4.执行剧本
[root@nginx gc]# ansible-playbook /gc/gc.yaml
检查GC本体
[root@server1 ~]# cd /gc/Grasscutter3.7/
[root@server1 Grasscutter3.7]# java -jar grasscutter.jar
21:02:24 <INFO:Grasscutter> Starting Grasscutter...
21:02:24 <INFO:Grasscutter> Game version: 3.7.0
21:02:24 <INFO:Grasscutter> Grasscutter version: 1.5.0-10e99ba
21:02:24 <INFO:ResourceLoader> Loading resources...
21:02:29 <INFO:ResourceLoader> Finished loading resources.
21:02:29 <INFO:Language> Loading cached 'TextMaps'...
21:02:33 <INFO:PluginManager> Loading plugin: CharacterBuilder
21:02:33 <INFO:PluginManager> Loading plugin: MobWave
21:02:33 <INFO:PluginManager> Loading plugin: QuickER
21:02:33 <INFO:PluginManager> Loading plugin: setLevel
21:02:33 <INFO:PluginManager> Loading plugin: Switch Element Plugin
21:02:33 <INFO:Switchele> The SwitchElement has been loaded.
21:02:34 <INFO:HttpServer> [Dispatch] Dispatch server started at 192.168.140.11:444
21:02:34 <INFO:GameServer> Grasscutter is FREE software. If you have paid for this, you may have been scammed. Homepage: https://github.com/Grasscutters/Grasscutter
21:02:34 <INFO:GameServer> Game Server started at 192.168.140.11:22102
21:02:34 <INFO:PluginManager> Enabling plugin: CharacterBuilder
21:02:34 <INFO:CharacterBuilder> The CharacterBuilder plugin has been enabled.
21:02:34 <INFO:PluginManager> Enabling plugin: MobWave
21:02:34 <INFO:MobWave> The MobWave plugin has been enabled.
21:02:34 <INFO:PluginManager> Enabling plugin: QuickER
21:02:34 <INFO:QuickER> QuickER has been enabled
21:02:34 <INFO:PluginManager> Enabling plugin: setLevel
21:02:34 <INFO:setLevel> The setLevel plugin has been enabled.
21:02:34 <INFO:PluginManager> Enabling plugin: Switch Element Plugin
21:02:34 <INFO:Switchele> The SwitchElement has been enabled.
21:02:34 <INFO:Grasscutter> Done! For help, type "help"
>
[root@server2 ~]# cd /gc/Grasscutter3.7/
[root@server2 Grasscutter3.7]# java -jar grasscutter.jar
21:02:40 <INFO:Grasscutter> Starting Grasscutter...
21:02:40 <INFO:Grasscutter> Game version: 3.7.0
21:02:40 <INFO:Grasscutter> Grasscutter version: 1.5.0-10e99ba
21:02:40 <INFO:ResourceLoader> Loading resources...
21:02:45 <INFO:ResourceLoader> Finished loading resources.
21:02:45 <INFO:Language> Loading cached 'TextMaps'...
21:02:49 <INFO:PluginManager> Loading plugin: CharacterBuilder
21:02:49 <INFO:PluginManager> Loading plugin: MobWave
21:02:49 <INFO:PluginManager> Loading plugin: QuickER
21:02:49 <INFO:PluginManager> Loading plugin: setLevel
21:02:49 <INFO:PluginManager> Loading plugin: Switch Element Plugin
21:02:49 <INFO:Switchele> The SwitchElement has been loaded.
21:02:50 <INFO:HttpServer> [Dispatch] Dispatch server started at 192.168.140.12:444
21:02:50 <INFO:GameServer> Grasscutter is FREE software. If you have paid for this, you may have been scammed. Homepage: https://github.com/Grasscutters/Grasscutter
21:02:50 <INFO:GameServer> Game Server started at 192.168.140.12:22102
21:02:50 <INFO:PluginManager> Enabling plugin: CharacterBuilder
21:02:50 <INFO:CharacterBuilder> The CharacterBuilder plugin has been enabled.
21:02:50 <INFO:PluginManager> Enabling plugin: MobWave
21:02:50 <INFO:MobWave> The MobWave plugin has been enabled.
21:02:50 <INFO:PluginManager> Enabling plugin: QuickER
21:02:50 <INFO:QuickER> QuickER has been enabled
21:02:50 <INFO:PluginManager> Enabling plugin: setLevel
21:02:50 <INFO:setLevel> The setLevel plugin has been enabled.
21:02:50 <INFO:PluginManager> Enabling plugin: Switch Element Plugin
21:02:50 <INFO:Switchele> The SwitchElement has been enabled.
21:02:50 <INFO:Grasscutter> Done! For help, type "help"
>
5.关于后续的升级维护
jinjia模板可以不用更改,在未来升级版本的时候,还是同样的操作,在拷贝文件的时候,修改文件名即可,可以增加删除旧版本的操作
关于文件管理模块:https://www.wsjj.top/archives/115
关于Playbook教程:https://www.wsjj.top/archives/116
五、配置Nginx负载均衡
在
nginx.linux.com主机上操作
1.安装Nginx
关于
Nginx更详细的安装教程:https://www.wsjj.top/archives/83
注意:本教程在编译Nginx的时候和之前的教程略有不同!
[root@nginx ~]# wget http://nginx.org/download/nginx-1.20.2.tar.gz
[root@nginx ~]# yum install -y gcc openssl-devel pcre-devel zlib-devel
[root@nginx ~]# mkdir -p /var/tmp/nginx/{client,proxy,fastcgi,uwsgi,scgi}
[root@nginx ~]# useradd -s /sbin/nologin nginx
[root@nginx ~]# tar xf nginx-1.20.2.tar.gz
[root@nginx ~]# cd nginx-1.20.2/
编译安装Nginx
注意一定要有
--with-stream模块,后续我们需要这个模块做负载均衡
[root@nginx nginx-1.20.2]# ./configure --prefix=/usr/local/nginx --user=nginx --group=nginx --with-http_ssl_module --with-stream --with-http_flv_module --with-http_stub_status_module --with-http_gzip_static_module --with-pcre --with-file-aio --with-http_secure_link_module --with-threads --with-stream --http-client-body-temp-path=/var/tmp/nginx/client/ --http-proxy-temp-path=/var/tmp/nginx/proxy/ --http-fastcgi-temp-path=/var/tmp/nginx/fastcgi/ --http-uwsgi-temp-path=/var/tmp/nginx/uwsgi/ --http-scgi-temp-path=/var/tmp/nginx/scgi/
[root@nginx nginx-1.20.2]# make && make install
把Nginx加入开机启动项(可选)
[root@nginx nginx-1.20.2]# sed -ri '$a \/usr/local/nginx/sbin/nginx' /etc/rc.d/rc.local
[root@nginx nginx-1.20.2]# chmod a+x /etc/rc.d/rc.local
给命令创建一个软连接
[root@nginx nginx-1.20.2]# ln -s /usr/local/nginx/sbin/nginx /sbin/nginx
2.启动Nginx
[root@nginx nginx-1.20.2]# nginx
[root@nginx ~]# netstat -tunlp | grep nginx
tcp        0      0 0.0.0.0:80              0.0.0.0:*               LISTEN      24108/nginx: master
3.编写子配置文件
[root@nginx ~]# vim /gc/gc.conf

stream {
    upstream proxyserver {
	least_conn;	#最少连接调度算法
        server 192.168.140.11:444 weight=1 max_fails=2 fail_timeout=2;	#后端真实服务器
        server 192.168.140.12:444 weight=1 max_fails=2 fail_timeout=2;	#后端真实服务器
    }

    server {
        listen 54321;	#监听地址

        proxy_pass proxyserver;
    }

    upstream gameserver {
	least_conn;	#最少连接调度算法
        server 192.168.140.11:22102 weight=1 max_fails=2 fail_timeout=2;	#后端真实服务器
        server 192.168.140.12:22102 weight=1 max_fails=2 fail_timeout=2;	#后端真实服务器
    }

    server {
        listen 22102 udp;	#基于udp服务的监听地址

        proxy_pass gameserver;
        proxy_timeout 3s;
        proxy_responses 1;
        proxy_bind 0.0.0.0:22102;
    }
}
- 关于调度算法:
least_conn最少连接nginx会计算哪个服务器的连接最少,优先把新的请求调度到最少连接的服务器上
rr轮询nginx会按照权重依次调度服务器上,当然权重越高,收到的请求也就越多
4.加载子配置文件到主配置文件中
[root@nginx ~]# vim /usr/local/nginx/conf/nginx.conf
#配置文件不完整,仅展示修改的部分
events {
    worker_connections  1024;
}
    include /gc/gc.conf;	#加载子配置文件,一定要写在events模块的下面,http模块的上面!

http {
    include       mime.types;
    default_type  application/octet-stream;
5.Nginx重新加载配置文件
[root@nginx ~]# nginx -t	#检查配置文件是否有问题
nginx: the configuration file /usr/local/nginx/conf/nginx.conf syntax is ok
nginx: configuration file /usr/local/nginx/conf/nginx.conf test is successful
[root@nginx ~]# nginx -s reload
6.检查Nginx是否开启负载均衡
[root@nginx ~]# netstat -tunlp | grep nginx
tcp        0      0 0.0.0.0:80              0.0.0.0:*               LISTEN      24108/nginx: master
tcp        0      0 0.0.0.0:54321           0.0.0.0:*               LISTEN      24108/nginx: master
udp        0      0 0.0.0.0:22102           0.0.0.0:*                           24108/nginx: master
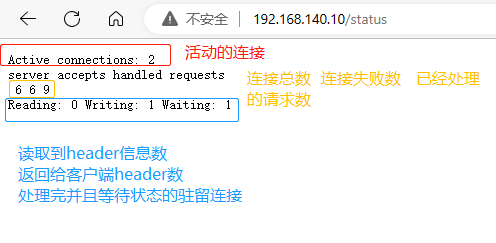
7.增加状态页面(用于监控Nginx)
此页面可以配合
Zabbix监控Nginx
修改Nginx主配置文件
[root@nginx ~]# vim /usr/local/nginx/conf/nginx.conf
http {
    include       mime.types;
    default_type  application/octet-stream;

    log_format  main  '$remote_addr - $remote_user [$time_local] "$request" '	#删除注释,启用日志功能
                      '$status $body_bytes_sent "$http_referer" '	#删除注释,启用日志功能
                      '"$http_user_agent" "$http_x_forwarded_for"';	#删除注释,启用日志功能

    access_log  logs/access.log  main;	#删除注释,启用日志功能

server {
        listen       80;
        server_name  localhost;
location / {
            root   html;
            index  index.html index.htm;
        }
        #新的location要配合Nginx文件,写到指定位置,必须是server的下面
        location /status {	#新增status状态页面,当用户访问status的时候,就可以看到状态页面了
            stub_status on;	#此段为新增内容
            access_log on;	#此段为新增内容
        }	#此段为新增内容
重新加载Nginx配置文件
[root@nginx ~]# nginx -t
nginx: the configuration file /usr/local/nginx/conf/nginx.conf syntax is ok
nginx: configuration file /usr/local/nginx/conf/nginx.conf test is successful

[root@nginx ~]# nginx -s reload
浏览器访问测试
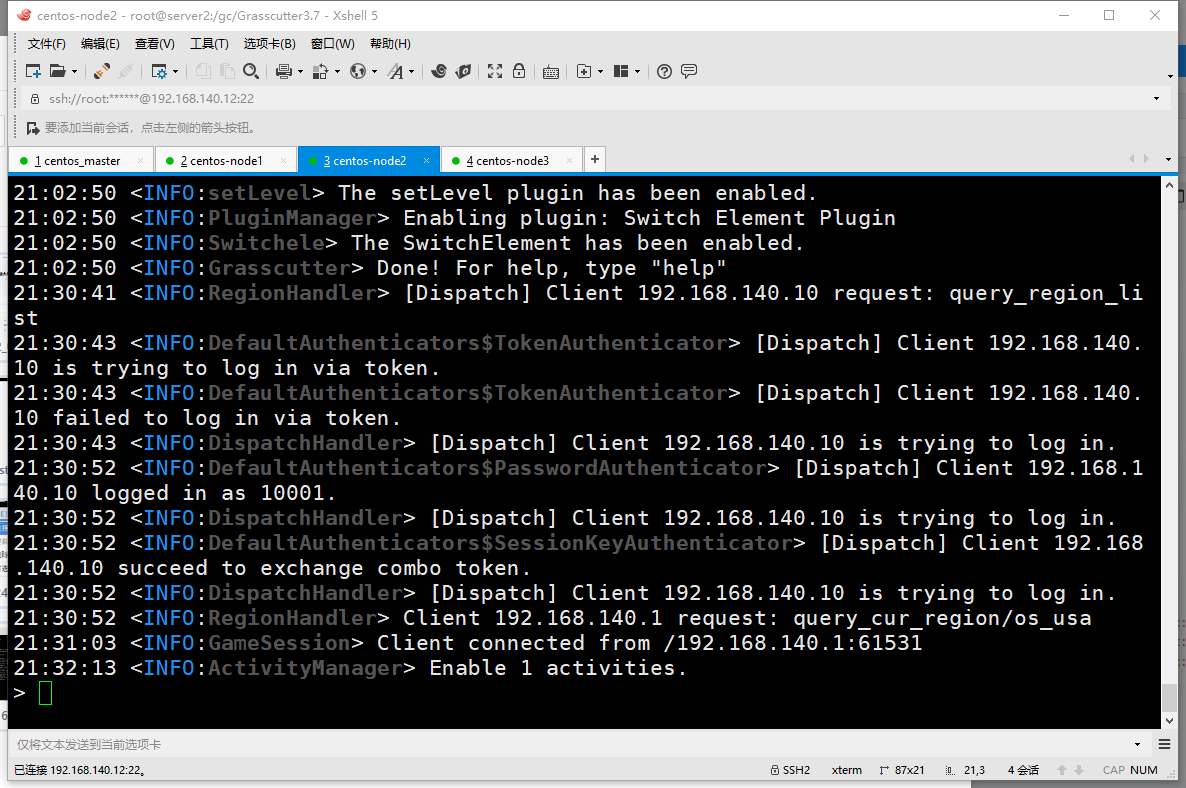
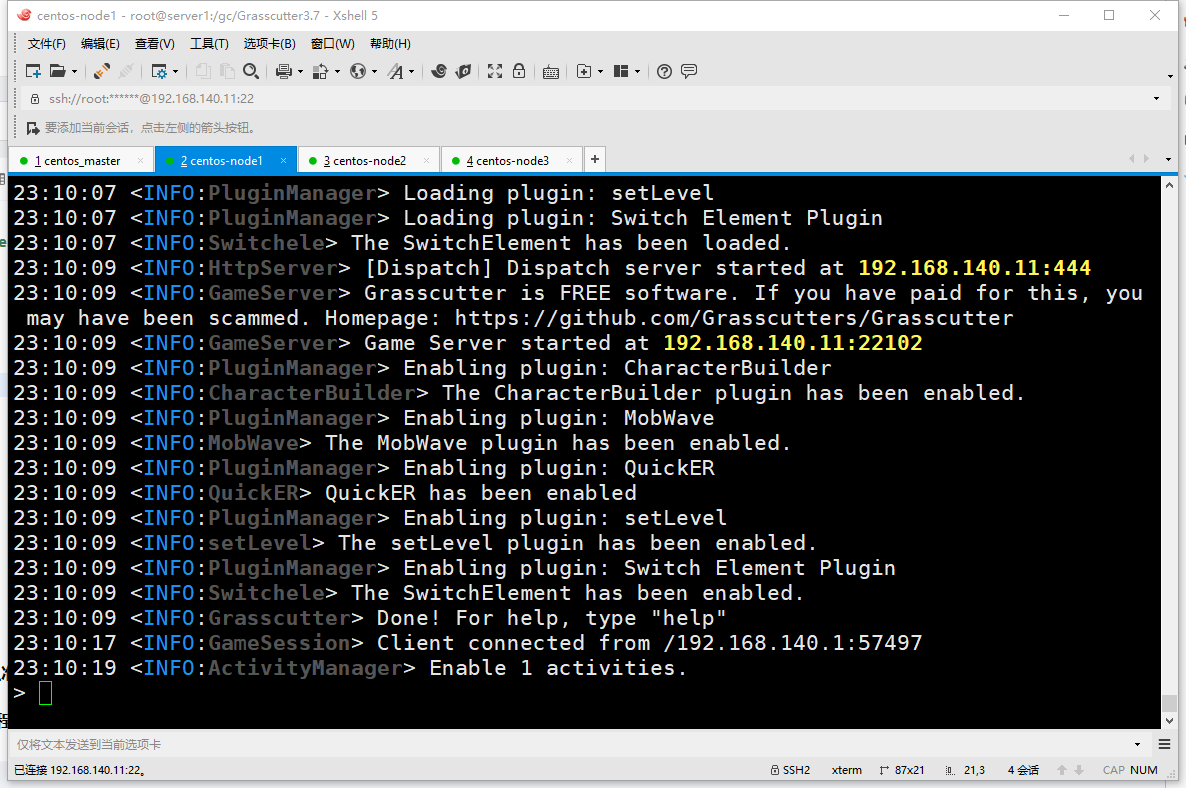
8.Windows连接测试
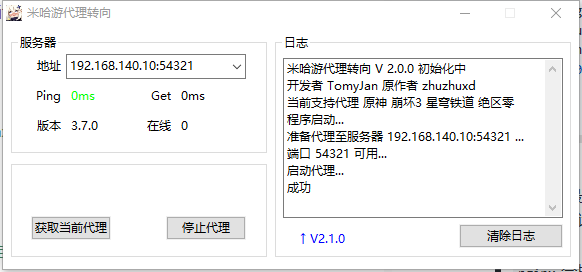

后台可以看到Nginx自动把我的请求转到了server2上面
9.模拟其中一个服务器挂掉
故意关掉正在连接的服务器
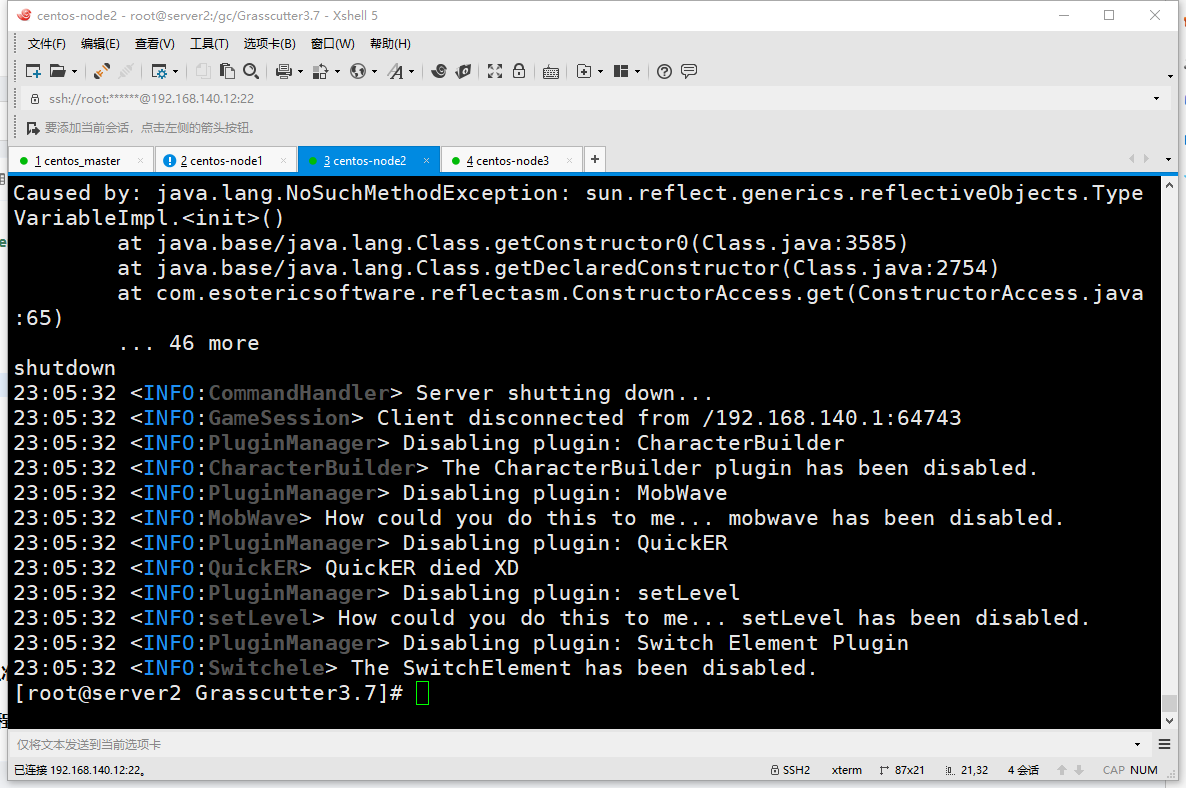
可以看到Nginx成功把我们的请求转到了另外一个服务器上
缺点
可能需要重新登录才会登录新的服务器,教程有待完善,欢迎前来补充!
10.进阶
利用keepalived实现Nginx的高可用集群
除了可以使用
Nginx实现负载均衡,同样也可以准备2个Nginx服务器,再配和keepalived可以实现Nginx的高可用
关于Nginx配合keepalived实现高可用集群教程:https://www.wsjj.top/archives/100
利用Nginx给原神游戏服务端做负载均衡
https://www.wsjj.top/archives/gc
评论