

【Linux安全系列教程】iptables防火墙
下一期教程:Firewalld防火墙
一、防火墙的类型
- 硬件防火墙
- 软件防火墙
netfilter内核模块Centos7.xfirewall-cmd命令firewalld服务iptables命令
二、防火墙的作用
- 数据过滤
- 根据数据基本五元素
源IP、目的IP、协议、源端口、目的端口
- 根据数据基本五元素
三、关于四表五链

1.filler表中的链
INPUT、FORWARD、OUTPUT
2.NAT表中的链
PREROUTING、INPUT、OUTPUT、POSTROUTING
3.mangle表中的链
PREROUTING、INPUT、FORWARD、OUTPUT、POSTROUTING
4.raw表中的链
PREROUTING、OUTPUT
编写规则注意事项
- 自上而下,依次匹配
- 允许在要拒绝上面
- 访问频率高的服务规则尽量放在上面
- 链的默认行为
四、数据过滤规则管理(filter表)
1.关闭防火墙
Centos7有2个防火墙,一个现在的iptables,还有一个是基于firewalld服务的firewall防火墙
[root@node4 ~]# systemctl stop firewalld
[root@node4 ~]# systemctl disable firewalld
[root@node4 ~]# systemctl mask firewalld
2.查看防火墙规则
A.查看规则
-L列出规则
-n以阿拉伯数字显示
[root@node4 ~]# iptables -nL
Chain INPUT (policy ACCEPT)	#防火墙默认规则,允许所有通过
target     prot opt source               destination
#默认是没有规则的
Chain FORWARD (policy ACCEPT)
target     prot opt source               destination

Chain OUTPUT (policy ACCEPT)
target     prot opt source               destination
-t<表名>查看指定表规则
如果不加
-t参数,默认查看的是filter表
[root@node4 ~]# iptables -nL -t nat
Chain PREROUTING (policy ACCEPT)
target     prot opt source               destination

Chain INPUT (policy ACCEPT)
target     prot opt source               destination

Chain OUTPUT (policy ACCEPT)
target     prot opt source               destination

Chain POSTROUTING (policy ACCEPT)
target     prot opt source               destination
--line-number显示行号
[root@node4 ~]# iptables -nL -t filter -v --line-number
Chain INPUT (policy ACCEPT 0 packets, 0 bytes)
num   pkts bytes target     prot opt in     out     source               destination
1     4247  374K ACCEPT     tcp  --  *      *       192.168.140.1        192.168.140.14       tcp dpt:22
2        0     0 DROP       all  --  *      *       0.0.0.0/0            0.0.0.0/0

Chain FORWARD (policy ACCEPT 0 packets, 0 bytes)
num   pkts bytes target     prot opt in     out     source               destination

Chain OUTPUT (policy ACCEPT 4028 packets, 647K bytes)
num   pkts bytes target     prot opt in     out     source               destination
-v查看详细信息
[root@node4 ~]# iptables -nL -t nat -v
Chain PREROUTING (policy ACCEPT 56 packets, 3092 bytes)
 pkts bytes target     prot opt in     out     source               destination

Chain INPUT (policy ACCEPT 8 packets, 424 bytes)
 pkts bytes target     prot opt in     out     source               destination

Chain OUTPUT (policy ACCEPT 216 packets, 16757 bytes)
 pkts bytes target     prot opt in     out     source               destination

Chain POSTROUTING (policy ACCEPT 216 packets, 16757 bytes)
 pkts bytes target     prot opt in     out     source               destination
3.删除规则
A.删除单条规则
命令格式
# iptables -D 链名 行号
查看所有规则
我这里加了
2条测试规则
可以添加--line-number参数,显示行号
[root@node4 ~]# iptables -nL -t filter -v --line-number
Chain INPUT (policy ACCEPT 0 packets, 0 bytes)
num   pkts bytes target     prot opt in     out     source               destination
1     4247  374K ACCEPT     tcp  --  *      *       192.168.140.1        192.168.140.14       tcp dpt:22
2        0     0 DROP       all  --  *      *       0.0.0.0/0            0.0.0.0/0

Chain FORWARD (policy ACCEPT 0 packets, 0 bytes)
num   pkts bytes target     prot opt in     out     source               destination

Chain OUTPUT (policy ACCEPT 4028 packets, 647K bytes)
num   pkts bytes target     prot opt in     out     source               destination
例:我想删除第2条数据
如果不添加
-t参数,默认删除filter表中的规则
[root@node4 ~]# iptables -t filter -D INPUT 2
[root@node4 ~]# iptables -D INPUT 2	#这是另外一种写法
查看规则
[root@node4 ~]# iptables -nL -t filter -v --line-number

Chain INPUT (policy ACCEPT 0 packets, 0 bytes)
num   pkts bytes target     prot opt in     out     source               destination
1     7339  647K ACCEPT     tcp  --  *      *       192.168.140.1        192.168.140.14       tcp dpt:22

Chain FORWARD (policy ACCEPT 0 packets, 0 bytes)
num   pkts bytes target     prot opt in     out     source               destination

Chain OUTPUT (policy ACCEPT 72 packets, 12372 bytes)
num   pkts bytes target     prot opt in     out     source               destination
B.删除所有规则
[root@node4 ~]# iptables -F
查看规则
[root@node4 ~]# iptables -nL

Chain INPUT (policy ACCEPT)
target     prot opt source               destination
#表中没有规则了
Chain FORWARD (policy ACCEPT)
target     prot opt source               destination

Chain OUTPUT (policy ACCEPT)
target     prot opt source               destination
4.添加规则
A.命令格式
如果不写
-t参数指定表名,默认添加到filter表中
# iptables -t <表名> {-A|-I} <链名> [匹配数据的条件] -j <行为>
iptables规则查询有默认的策略
从写的第一条匹配规则开始,一直向后匹配。
如果从第一条开始就匹配到了相应的规则,那么后面的规则都不会继续匹配,而是直接应用第一条规则,所以合理的规则是必要的!
-A新的规则连续向后插入,也就是会插入到已有规则的后面-I新的规则永远插入到第一个,当然-I参数也可以指定你想插入到哪一行
行为
ACCEPT允许DROP拒绝REJECT拒绝
匹配数据条件的常用选项
-s源IP地址-s 192.168.1.1单独的IP-s 192.168.1.0/24网段! -s 192.168.2.1取反
-d目的IP地址-d 10.1.1.1-d 10.1.1.0/24! -d 10.1.1.1
-i流入网卡-i ens33网卡名
-o流出网卡-o ens33
-p {tcp|udp|icmp}#icmp用于授权ping--sport源端口--sport 22--sport 22:80连续的端口
--dport目的端口--dport 80--dport 80:3306连续的端口
--icmp-type {8|0}8:ping请求0:ping响应
B.几个例子
a.仅允许Windows访问服务器上的ssh服务,并且拒绝其他所有服务
我的
windows地址是192.168.140.1,众所周知SSH服务依靠TCP协议的22号端口
关于SSH服务的教程:https://www.wsjj.top/archives/58
[root@node4 ~]# iptables -t filter -A INPUT -s 192.168.140.1 -d 192.168.140.14 -p tcp --dport 22 -j ACCEPT
拒绝所有服务,不需要指定源
IP和目的IP,也不需要指定协议和端口
[root@node4 ~]# iptables -t filter -A INPUT -j DROP #执行这条命令有风险,请确认上面的规则完全匹配你的环境
可以看到
2条已经生效的规则
[root@node4 ~]# iptables -nL
Chain INPUT (policy ACCEPT)
target     prot opt source               destination
ACCEPT     tcp  --  192.168.140.1        192.168.140.14       tcp dpt:22
DROP       all  --  0.0.0.0/0            0.0.0.0/0

Chain FORWARD (policy ACCEPT)
target     prot opt source               destination

Chain OUTPUT (policy ACCEPT)
target     prot opt source               destination
测试其他机器能否通过SSH连接服务器
[root@node5 ~]# ssh root@192.168.140.14
^C	#可以看到无法建立连接
b.仅允许Windows可以ping通服务器,拒绝其他连接
-I<链名> 行号用于插入规则到指定行数
--icmp-type {8|0}
8:ping请求
0:ping响应
[root@node4 ~]# iptables -t filter -I INPUT 2 -s 192.168.140.1 -d 192.168.140.14 -p icmp --icmp-type 8 -j ACCEPT
查询规则
[root@node4 ~]# iptables -nL

Chain INPUT (policy ACCEPT)
target     prot opt source               destination
ACCEPT     tcp  --  192.168.140.1        192.168.140.14       tcp dpt:22
ACCEPT     icmp --  192.168.140.1        192.168.140.14       icmptype 8
DROP       all  --  0.0.0.0/0            0.0.0.0/0
Windows测试
在添加规则之前,
Widnows是无法ping通服务器的
C:\Users\wangshengjj>ping 192.168.140.14

正在 Ping 192.168.140.14 具有 32 字节的数据:
来自 192.168.140.14 的回复: 字节=32 时间<1ms TTL=64
来自 192.168.140.14 的回复: 字节=32 时间<1ms TTL=64
来自 192.168.140.14 的回复: 字节=32 时间<1ms TTL=64
来自 192.168.140.14 的回复: 字节=32 时间<1ms TTL=64
c.允许服务器ping通其他主机,而其他主机(比如Windows)无法ping通服务器
删除之前的ping规则
[root@node4 ~]# iptables -t filter -D INPUT 2
新增规则
[root@node4 ~]# iptables -t filter -I INPUT 2 -d 192.168.140.14 -p icmp --icmp-type 0 -j ACCEPT
Windows测试
C:\Users\wangshengjj>ping 192.168.140.14

正在 Ping 192.168.140.14 具有 32 字节的数据:
请求超时。
请求超时。
服务器这边测试
[root@node4 ~]# ping 192.168.140.1
PING 192.168.140.1 (192.168.140.1) 56(84) bytes of data.
64 bytes from 192.168.140.1: icmp_seq=1 ttl=128 time=0.104 ms
64 bytes from 192.168.140.1: icmp_seq=2 ttl=128 time=0.144 ms
64 bytes from 192.168.140.1: icmp_seq=3 ttl=128 time=0.159 ms
d.要求能ping通自己
以目前的规则来说,我们是无法
ping通自己的
添加规则
指定网卡为
io
Centos7中,io网卡为自己和自己通信的时候会用到
[root@node4 ~]# iptables -t filter -I INPUT 2 -i lo -p icmp -j ACCEPT
查看所有规则
[root@node4 ~]# iptables -t filter -nL -v --line-number
Chain INPUT (policy ACCEPT 0 packets, 0 bytes)
num   pkts bytes target     prot opt in     out     source               destination
1    42850 3781K ACCEPT     tcp  --  *      *       192.168.140.1        192.168.140.14       tcp dpt:22
2        6   504 ACCEPT     icmp --  lo     *       0.0.0.0/0            0.0.0.0/0
3        6   504 ACCEPT     icmp --  *      *       0.0.0.0/0            192.168.140.14       icmptype 0
4       91  7300 DROP       all  --  *      *       0.0.0.0/0            0.0.0.0/0
ping测试
[root@node4 ~]# ping 192.168.140.14
PING 192.168.140.14 (192.168.140.14) 56(84) bytes of data.
64 bytes from 192.168.140.14: icmp_seq=1 ttl=64 time=0.015 ms
64 bytes from 192.168.140.14: icmp_seq=2 ttl=64 time=0.025 ms
64 bytes from 192.168.140.14: icmp_seq=3 ttl=64 time=0.026 ms
[root@node4 ~]# ping 127.0.0.1
PING 127.0.0.1 (127.0.0.1) 56(84) bytes of data.
64 bytes from 127.0.0.1: icmp_seq=1 ttl=64 time=0.015 ms
64 bytes from 127.0.0.1: icmp_seq=2 ttl=64 time=0.061 ms
e.要求服务器可以正常上网,比如访问baidu
以目前的规则,服务器是无法正常
ping通互联网服务器的,并且无法正常上网
添加规则,先能ping通
众所周知,我们服务器想要
ping通互联网上某个域名,需要依靠DNS服务器把域名转换成公网地址
[root@node4 ~]# iptables -t filter -I INPUT -d 192.168.140.14 -p udp --sport 53 -j ACCEPT
[root@node4 ~]# iptables -t filter -I INPUT -d 192.168.140.14 -p tcp --sport 53 -j ACCEPT	#有一部分DNS服务器基于TCP服务
测试ping通baidu
[root@node4 ~]# ping baidu.com
PING baidu.com (39.156.66.10) 56(84) bytes of data.
64 bytes from 39.156.66.10 (39.156.66.10): icmp_seq=1 ttl=128 time=7.16 ms
64 bytes from 39.156.66.10 (39.156.66.10): icmp_seq=2 ttl=128 time=6.78 ms
继续添加规则,用于访问web服务
开放源端口
80和443端口的访问
[root@node4 ~]# iptables -t filter -I INPUT -d 192.168.140.14 -p tcp --sport 80 -j ACCEPT
[root@node4 ~]# iptables -t filter -I INPUT -d 192.168.140.14 -p tcp --sport 443 -j ACCEP
使用curl命令测试
[root@node4 ~]# curl www.baidu.com #正常访问
<!DOCTYPE html>
<!--STATUS OK--><html> <head><meta http-equiv=content-type content=text/html;charset=utf-8><meta http-equiv=X-UA-Compatible content=IE=Edge><meta content=always name=referrer><link rel=stylesheet type=text/css href=http://s1.bdstatic.com/r/www/cache/bdorz/baidu.min.css><title>百度一下,你就知道</title></head> <body link=#0000cc> <div id=wrapper> <div id=head> <div class=head_wrapper> <div class=s_form> <div class=s_form_wrapper> <div id=lg> <img hidefocus=true src=//www.baidu.com/img/bd_logo1.png width=270 height=129> </div> <form id=form name=f action=//www.baidu.com/s class=fm> <input type=hidden name=bdorz_come value=1> <input type=hidden name=ie value=utf-8> <input type=hidden name=f value=8> <input type=hidden name=rsv_bp value=1> <input type=hidden name=rsv_idx value=1> <input type=hidden name=tn value=baidu><span class="bg s_ipt_wr"><input id=kw name=wd class=s_ipt value maxlength=255 autocomplete=off autofocus></span><span class="bg s_btn_wr"><input type=submit id=su value=百度一下 class="bg s_btn"></span> </form> </div> </div> <div id=u1> <a href=http://news.baidu.com name=tj_trnews class=mnav>新闻</a> <a href=http://www.hao123.com name=tj_trhao123 class=mnav>hao123</a> <a href=http://map.baidu.com name=tj_trmap class=mnav>地图</a> <a href=http://v.baidu.com name=tj_trvideo class=mnav>视频</a> <a href=http://tieba.baidu.com name=tj_trtieba class=mnav>贴吧</a> <noscript> <a href=http://www.baidu.com/bdorz/login.gif?login&tpl=mn&u=http%3A%2F%2Fwww.baidu.com%2f%3fbdorz_come%3d1 name=tj_login class=lb>登录</a> </noscript> <script>document.write('<a href="http://www.baidu.com/bdorz/login.gif?login&tpl=mn&u='+ encodeURIComponent(window.location.href+ (window.location.search === "" ? "?" : "&")+ "bdorz_come=1")+ '" name="tj_login" class="lb">登录</a>');</script> <a href=//www.baidu.com/more/ name=tj_briicon class=bri style="display: block;">更多产品</a> </div> </div> </div> <div id=ftCon> <div id=ftConw> <p id=lh> <a href=http://home.baidu.com>关于百度</a> <a href=http://ir.baidu.com>About Baidu</a> </p> <p id=cp>©2017 Baidu <a href=http://www.baidu.com/duty/>使用百度前必读</a> <a href=http://jianyi.baidu.com/ class=cp-feedback>意见反馈</a> 京ICP证030173号 <img src=//www.baidu.com/img/gs.gif> </p> </div> </div> </div> </body> </html>
5.模块
-m <模块名><参数>使用模块
A.multiport模块
-m multiport指定多个端口--sportsport1,port2,port3源端口--dportsport1,port2,port3目的端口
可以优化一下上面的规则
可以发现前面的三条规则,除了端口不一样,其他参数都是一样的,那么就可以调用这个模块
[root@node4 ~]# iptables -nL
Chain INPUT (policy ACCEPT)
target     prot opt source               destination
ACCEPT     tcp  --  0.0.0.0/0            192.168.140.14       tcp spt:443
ACCEPT     tcp  --  0.0.0.0/0            192.168.140.14       tcp spt:53
ACCEPT     tcp  --  0.0.0.0/0            192.168.140.14       tcp spt:80
ACCEPT     udp  --  0.0.0.0/0            192.168.140.14       udp spt:53
ACCEPT     tcp  --  192.168.140.1        192.168.140.14       tcp dpt:22
ACCEPT     icmp --  0.0.0.0/0            0.0.0.0/0
ACCEPT     icmp --  0.0.0.0/0            192.168.140.14       icmptype 0
DROP       all  --  0.0.0.0/0            0.0.0.0/0
先删除旧的规则
[root@node4 ~]# iptables -t filter -D INPUT 1
[root@node4 ~]# iptables -t filter -D INPUT 1
[root@node4 ~]# iptables -t filter -D INPUT 1	#执行三遍,当删除第一条的时候,第二条会自动上位变成第一条,以此类推
[root@node4 ~]# iptables -nL
Chain INPUT (policy ACCEPT)
target     prot opt source               destination
ACCEPT     udp  --  0.0.0.0/0            192.168.140.14       udp spt:53
ACCEPT     tcp  --  192.168.140.1        192.168.140.14       tcp dpt:22
ACCEPT     icmp --  0.0.0.0/0            0.0.0.0/0
ACCEPT     icmp --  0.0.0.0/0            192.168.140.14       icmptype 0
DROP       all  --  0.0.0.0/0            0.0.0.0/0
添加规则
[root@node4 ~]# iptables -t filter -I INPUT 2 -d 192.168.140.14 -p tcp -m multiport --sports 53,80,443 -j ACCEPT
[root@node4 ~]# iptables -nL
Chain INPUT (policy ACCEPT)
target     prot opt source               destination
ACCEPT     udp  --  0.0.0.0/0            192.168.140.14       udp spt:53
ACCEPT     tcp  --  0.0.0.0/0            192.168.140.14       multiport sports 53,80,443
ACCEPT     tcp  --  192.168.140.1        192.168.140.14       tcp dpt:22
ACCEPT     icmp --  0.0.0.0/0            0.0.0.0/0
ACCEPT     icmp --  0.0.0.0/0            192.168.140.14       icmptype 0
DROP       all  --  0.0.0.0/0            0.0.0.0/0
B.iprange模块
-m iprange指定多个IP地址--src-range [ip-ip]源地址--dst-range [ip-ip]目的地址
允许
Windows和node5主机ping通服务器
添加规则
[root@node4 ~]# iptables -t filter -I INPUT -m iprange --src-range 192.168.140.1-192.168.140.15 -d 192.168.140.14 -p icmp --icmp-type 8 -j ACCEPT
测试
C:\Users\wangshengjj>ping 192.168.140.14

正在 Ping 192.168.140.14 具有 32 字节的数据:
来自 192.168.140.14 的回复: 字节=32 时间<1ms TTL=64
来自 192.168.140.14 的回复: 字节=32 时间<1ms TTL=64
[root@node5 ~]# ping 192.168.140.14
PING 192.168.140.14 (192.168.140.14) 56(84) bytes of data.
64 bytes from 192.168.140.14: icmp_seq=1 ttl=64 time=0.157 ms
64 bytes from 192.168.140.14: icmp_seq=2 ttl=64 time=0.180 ms
64 bytes from 192.168.140.14: icmp_seq=3 ttl=64 time=0.212 ms
C.state状态模块
--stateNEW- 首次访问
ESTABLISHED- 服务后续所有访问
- 响应数据
RELATED【FTP】- 相关联的连接
a.首次访问和后续访问
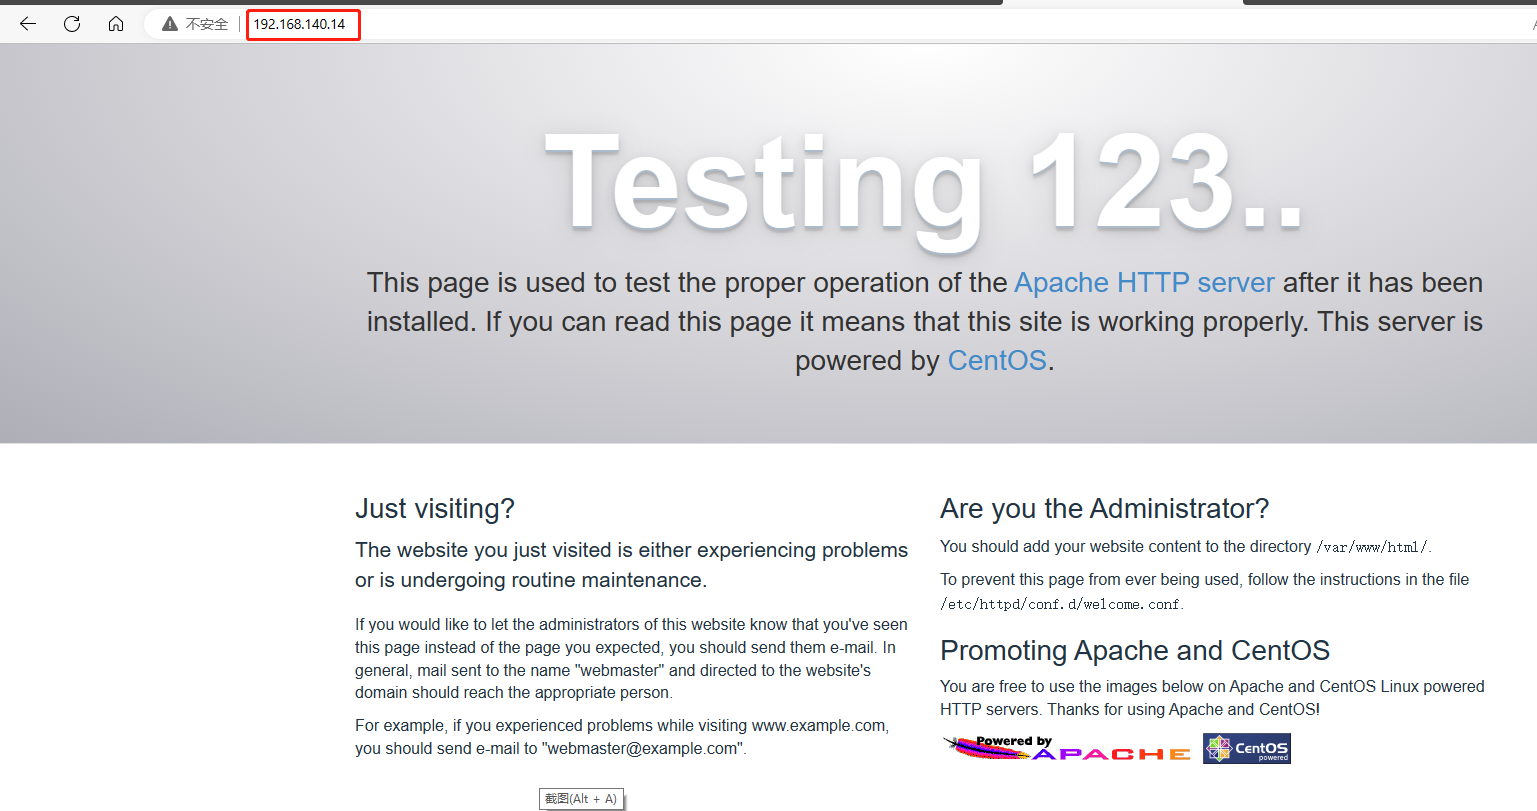
安装httpd软件并启用
[root@node4 ~]# yum install -y httpd
[root@node4 ~]# systemctl enable --now httpd
编写防火墙规则
允许所有客户端首次访问和后续所有访问
[root@node4 ~]# iptables -t filter -I INPUT -d 192.168.140.14 -p tcp --dport 80 -m state --state NEW,ESTABLISHED -j ACCEPT
Windows测试
b.相关联的连接(FTP为例子)
安装FTP软件并启用
关于
FTP服务教程:https://www.wsjj.top/archives/61
[root@node4 ~]# yum install -y vsftpd
[root@node4 ~]# systemctl enable --now vsftpd
随便放几个测试文件
[root@node4 ~]# touch /var/ftp/{1..5}.jpg
[root@node4 ~]# touch /var/ftp/{1..5}.mp3
[root@node4 ~]# ls /var/ftp/
1.jpg  1.mp3  2.jpg  2.mp3  3.jpg  3.mp3  4.jpg  4.mp3  5.jpg  5.mp3  pub
先释放TCP协议21号端口
[root@node4 ~]# iptables -t filter -I INPUT -d 192.168.140.14 -p tcp --dport 21 -j ACCEPT
使用node5连接FTP服务器
[root@node5 ~]# yum install -y ftp
[root@node5 ~]# ftp 192.168.140.14
Connected to 192.168.140.14 (192.168.140.14).
220 (vsFTPd 3.0.2)
Name (192.168.140.14:root): ftp	#默认匿名用户是ftp
331 Please specify the password.
Password:	#没有密码
关于
FTP的默认行为
使用21号端口传输命令,大于1024以上的随机端口传输数据
我们并没有开放相应的端口,所以看不到数据
但是开放1024以上的所有端口,并不合理
ftp> ls
227 Entering Passive Mode (192,168,140,14,199,133).
ftp: connect: 连接超时	#没有数据的
回到服务器配置防火墙规则
还是
FTP默认行为
每次执行命令后,FTP给我们返回结果的时候,每一次使用的端口都是大于1024以上的随机端口
所以除了授权相关连的连接,还要保持后续的连接
[root@node4 ~]# iptables -t filter -I INPUT -d 192.168.140.14 -m state --state RELATED,ESTABLISHED -j ACCEPT
临时加载内核模块
没错,放行了相应的规则也不行
还需要让Linux系统加载模块
[root@node4 ~]# modprobe ip_nat_ftp
[root@node4 ~]# modprobe ip_conntrack_ftp
回到node5测试
[root@node5 ~]# ftp 192.168.140.14
Connected to 192.168.140.14 (192.168.140.14).
220 (vsFTPd 3.0.2)
Name (192.168.140.14:root): ftp
331 Please specify the password.
Password:
230 Login successful.
这次终于看到了,我们想要的数据
ftp> ls
227 Entering Passive Mode (192,168,140,14,165,81).
150 Here comes the directory listing.
-rw-r--r--    1 0        0               0 May 24 12:35 1.jpg
-rw-r--r--    1 0        0               0 May 24 12:35 1.mp3
-rw-r--r--    1 0        0               0 May 24 12:35 2.jpg
-rw-r--r--    1 0        0               0 May 24 12:35 2.mp3
-rw-r--r--    1 0        0               0 May 24 12:35 3.jpg
-rw-r--r--    1 0        0               0 May 24 12:35 3.mp3
-rw-r--r--    1 0        0               0 May 24 12:35 4.jpg
-rw-r--r--    1 0        0               0 May 24 12:35 4.mp3
-rw-r--r--    1 0        0               0 May 24 12:35 5.jpg
-rw-r--r--    1 0        0               0 May 24 12:35 5.mp3
drwxr-xr-x    2 0        0               6 Jun 09  2021 pub
226 Directory send OK.
6.保存、恢复规则
默认防火墙规则都是临时的,重启以后失效
[root@node4 ~]# iptables-save > /opt/iptables.rules
[root@node4 ~]# iptables-restore < /opt/iptables.rules
7.修改规则
-R修改规则
[root@node4 ~]# iptables -R INPUT 2 -s 192.168.140.11 -d 192.168.140.14 -p tcp -m multiport --dports 3306,22 -j ACCEPT
8.修改默认规则
-P修改默认规则
iptables默认的链规则是允许
A.命令格式
iptables -t <表名> -P <链名> <行为>
行为
ACCEPT允许DROP拒绝REJECT拒绝
B.修改默认output链,默认允许改为拒绝
请确保已经添加的
SSH出口规则!
[root@node4 ~]# iptables -t filter -A OUTPUT -p tcp --sport 22 -j ACCEPT	#出口允许22号端口
[root@node4 ~]# iptables -P OUTPUT DROP
C.再次查看规则
[root@node4 ~]# iptables -nL
Chain OUTPUT (policy DROP)	#这里的默认行为已经变更为拒绝
target     prot opt source               destination
ACCEPT     tcp  --  0.0.0.0/0            0.0.0.0/0            tcp spt:22
[root@node4 ~]# ping baidu.com
ping: baidu.com: 未知的名称或服务	#已经断网了

[root@node4 ~]# ping 114.114.114.114
PING 114.114.114.114 (114.114.114.114) 56(84) bytes of data.
ping: sendmsg: 不允许的操作
ping: sendmsg: 不允许的操作
D.恢复默认允许策略
[root@node4 ~]# iptables -P OUTPUT ACCEPT
五、NAT表管理
1.NAT的工作原理

- 转换源
IP地址-j SNAT --to-source <公网地址>-j MASQUERADE
- 转换目的
IP地址-j DNAT --to-destination <内网地址>
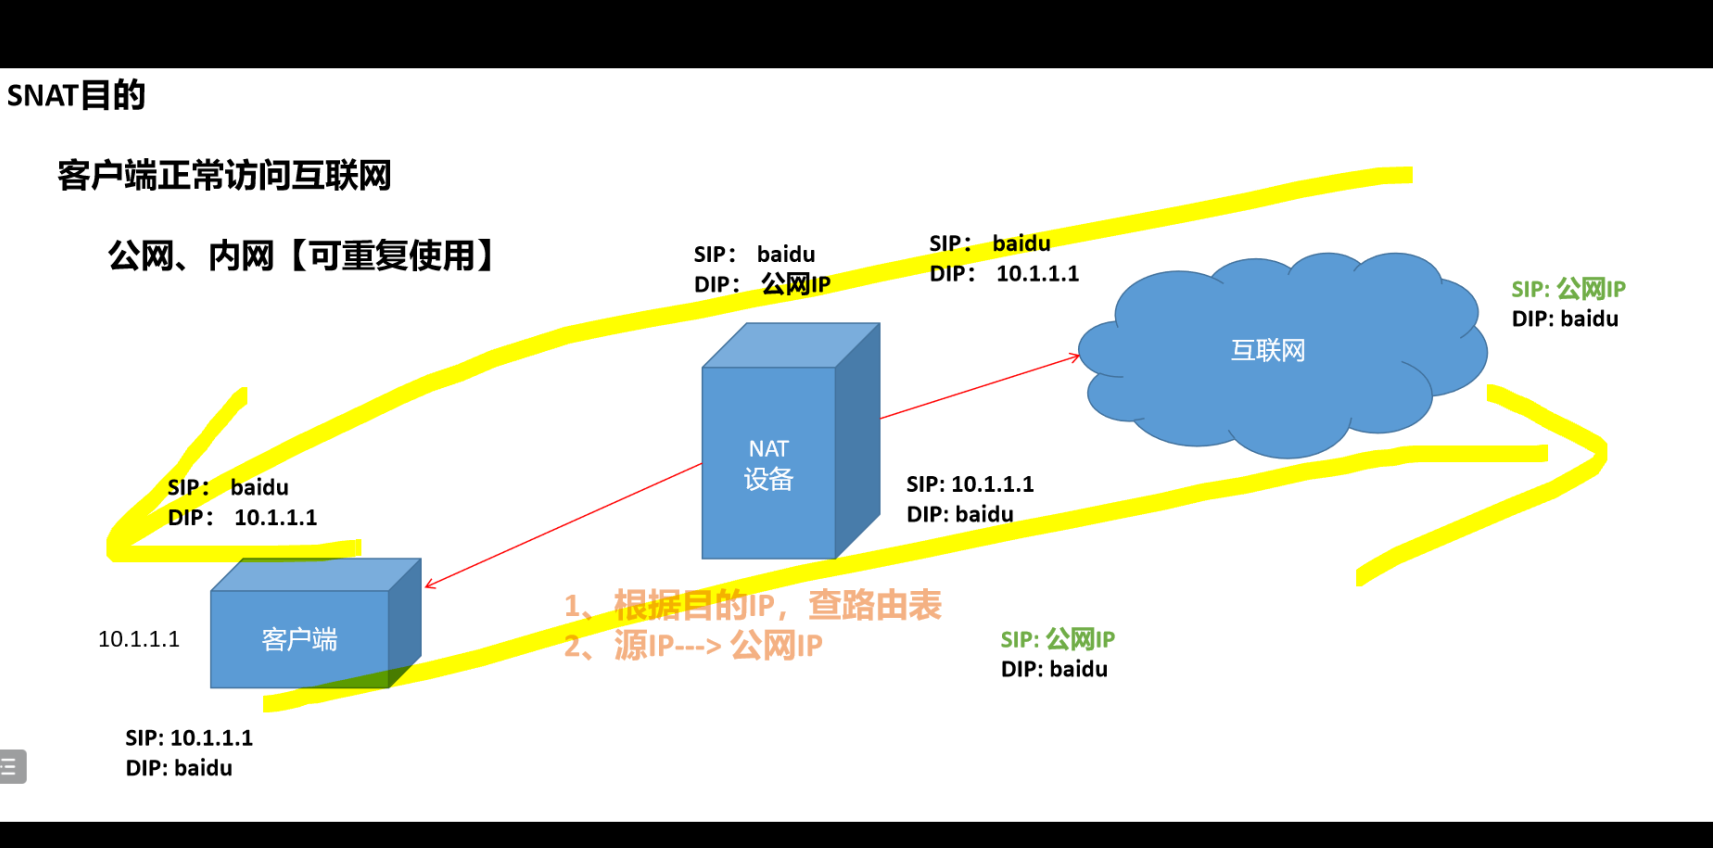
2.SNAT源地址转换
作用: 普通主机可以访问互联网
正常,内网IP是无法直接访问互联网的,都是通过NAT的网络地址转换技术,把我们的内网IP地址临时转换成公网IP。
这一点,有点像家用的路由器一样,它会自动的把我们的内网IP转换成拨号上号的那个公网IP
实验
| 主机名 | IP地址 | 作用 |
|---|---|---|
| client.linux.com | 192.168.233.10 | 模拟客户端 |
| nat.linux.com | 192.168.233.100、30.30.30.128 | 模拟NAT |
| server.linux.com | 30.30.30.10 | 模拟公网服务器 |
在配置之前,请提前准备好
httpd的服务
A.先给NAT主机添加一块网卡
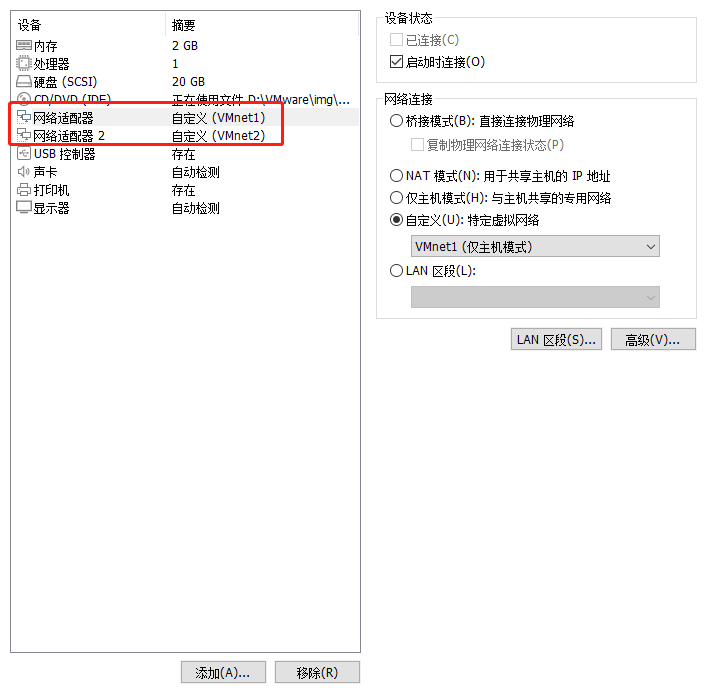
B.修改另外2台主机的网卡


C.配置IP地址和网关地址
[root@client ~]# cat /etc/sysconfig/network-scripts/ifcfg-ens33
TYPE="Ethernet"
BROWSER_ONLY="no"
BOOTPROTO="none"
DEFROUTE="yes"
NAME="ens33"
DEVICE="ens33"
ONBOOT="yes"
ETHTOOL_OPTS="autoneg on"
IPADDR=192.168.233.10
NETMASK=255.255.255.0
GATEWAY=192.168.233.100
[root@nat ~]# cat /etc/sysconfig/network-scripts/ifcfg-ens33
TYPE="Ethernet"
BROWSER_ONLY="no"
BOOTPROTO="none"
DEFROUTE="yes"
NAME="ens33"
DEVICE="ens33"
ONBOOT="yes"
ETHTOOL_OPTS="autoneg on"
IPADDR=192.168.233.100
#NETMASK=255.255.255.0
#GATEWAY=192.168.140.2
#DNS1=114.114.114.114
#DNS2=8.8.8.8
[root@nat ~]# cat /etc/sysconfig/network-scripts/ifcfg-ens36
TYPE="Ethernet"
BROWSER_ONLY="no"
BOOTPROTO="none"
DEFROUTE="yes"
NAME="ens33"
DEVICE="ens33"
ONBOOT="yes"
ETHTOOL_OPTS="autoneg on"
IPADDR=30.30.30.128
[root@server ~]# cat /etc/sysconfig/network-scripts/ifcfg-ens33
TYPE="Ethernet"
BROWSER_ONLY="no"
BOOTPROTO="none"
DEFROUTE="yes"
NAME="ens33"
DEVICE="ens33"
ONBOOT="yes"
ETHTOOL_OPTS="autoneg on"
IPADDR=30.30.30.10
NETMASK=255.255.255.0
D.在服务器上发布测试网页
[root@server ~]# rm -rf /etc/httpd/conf.d/welcome.conf
[root@server ~]# echo "<h1>30.30.30.10 webserver</h1>" > /var/www/html/index.html
[root@server ~]# systemctl enable --now httpd
E.配置NAT
先修改内核参数,开启路由地址转发功能
[root@nat ~]# sed -ri '$a \net.ipv4.ip_forward = 1' /etc/sysctl.conf
[root@nat ~]# sysctl -p
net.ipv4.ip_forward = 1
添加到规则到防火墙
指定网段的所有请求,都会被
NAT转换成Wan口的IP也就是30.30.30.128
[root@nat ~]# iptables -t nat -A POSTROUTING -s 192.168.233.0/24 -j SNAT --to-source 30.30.30.128
或
指定网段的所有请求,都会被
NAT自动转换成Wan口的IP
[root@nat ~]# iptables -t nat -A POSTROUTING -s 192.168.233.0/24 -j MASQUERADE
[root@nat ~]# iptables -t nat -nL -v
Chain PREROUTING (policy ACCEPT 5 packets, 300 bytes)
 pkts bytes target     prot opt in     out     source               destination

Chain INPUT (policy ACCEPT 0 packets, 0 bytes)
 pkts bytes target     prot opt in     out     source               destination

Chain OUTPUT (policy ACCEPT 0 packets, 0 bytes)
 pkts bytes target     prot opt in     out     source               destination

Chain POSTROUTING (policy ACCEPT 0 packets, 0 bytes)
 pkts bytes target     prot opt in     out     source               destination
    5   300 MASQUERADE  all  --  *      *       192.168.233.0/24     0.0.0.0/0
F.客户端测试访问
[root@client ~]# curl 30.30.30.10
<h1>30.30.30.10 webserver</h1>
可以查看
server端的访问日志
[root@server ~]# tail -f /var/log/httpd/access_log
30.30.30.128 - - [29/May/2023:14:18:35 +0800] "GET / HTTP/1.1" 200 31 "-" "curl/7.29.0"
30.30.30.128 - - [29/May/2023:14:20:50 +0800] "GET / HTTP/1.1" 200 31 "-" "curl/7.29.0"
30.30.30.128 - - [29/May/2023:14:20:50 +0800] "GET / HTTP/1.1" 200 31 "-" "curl/7.29.0"
30.30.30.128 - - [29/May/2023:14:20:51 +0800] "GET / HTTP/1.1" 200 31 "-" "curl/7.29.0"
30.30.30.128 - - [29/May/2023:14:20:52 +0800] "GET / HTTP/1.1" 200 31 "-" "curl/7.29.0"
这个
IP很明显是NAT上的wan口IP,相对于client端就是他的公网IP
3.DNAT发布服务(端口映射)
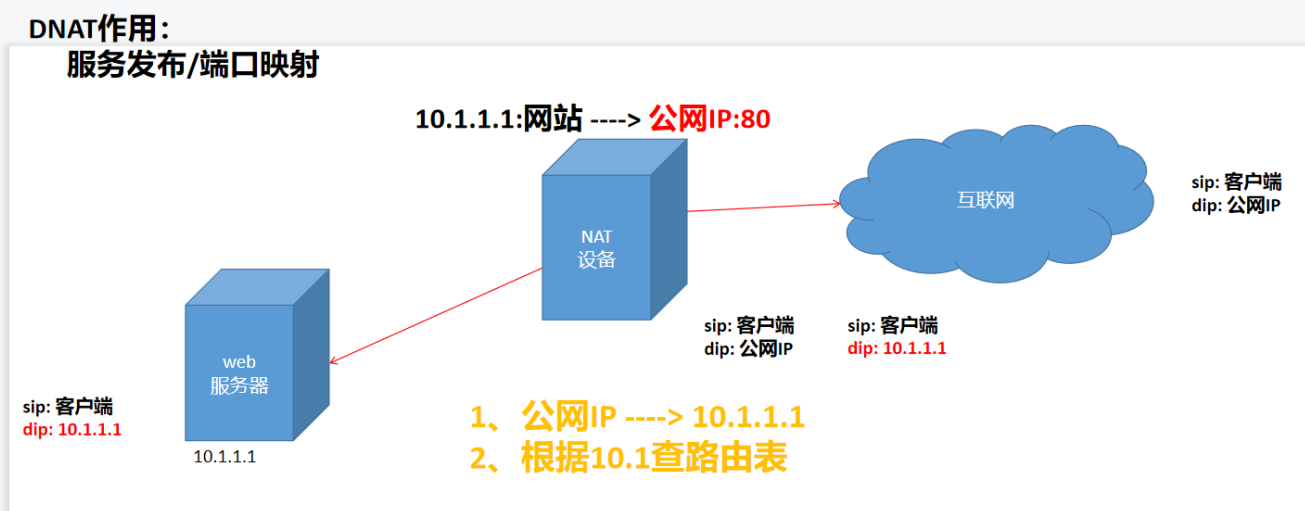
实验
模拟公网客户端,访问内网的服务器
注意:NAT上面wan口绑定的IP必须是公网IP
端口映射的端口不可以冲突!
| 主机名 | IP地址 | 作用 |
|---|---|---|
| server.linux.com | 192.168.233.10 | 模拟服务端 |
| nat.linux.com | 192.168.233.100、30.30.30.128 | 模拟NAT |
| client.linux.com | 30.30.30.10 | 模拟客户端 |
A.服务端发布测试页面
[root@client ~]# rm -rf /etc/httpd/conf.d/welcome.conf
[root@client ~]# echo "192.168.233.10 webserver" > /var/www/html/index.html
[root@client ~]# systemctl enable --now httpd
B.公网客户端测试
[root@server ~]# curl 30.30.30.128	#这是正常现象,我们还没有做端口映射
curl: (7) Failed connect to 30.30.30.128:80; 拒绝连接
C.回到NAT服务器,配置防火墙策略
把内网
192.168.233.10上的80端口,映射到公网30.30.30.128的8080端口
[root@nat ~]# iptables -t nat -I PREROUTING -d 30.30.30.128 -p tcp --dport 8080 -j DNAT --to-destination 192.168.233.10:80
D.再次测试
[root@server ~]# curl 30.30.30.128:8080	#这次访问正常了
192.168.233.10 webserver
【Linux安全系列教程】iptables防火墙
https://www.wsjj.top/archives/124
评论