【Linux安全系列教程】Firewalld防火墙
上期教程:iptables防火墙
一、关于firewalld防火墙
- 管理工具:
firewall-cmd命令行工具firewall-config图形化工具- 依赖于
firewalld服务
一共有9个域
[root@client ~]# firewall-cmd --get-zones
block dmz drop external home internal public trusted work
public默认域trusted白名单域drop黑名单域block黑名单域
二、数据过滤
1.开启firewalld服务
如果您已经开启,请忽略此步骤
[root@client ~]# systemctl unmask firewalld
Removed symlink /etc/systemd/system/firewalld.service.
[root@client ~]# systemctl start firewalld
2.查看区域
[root@client ~]# firewall-cmd --get-zones
block dmz drop external home internal public trusted work
3.查看默认区域
[root@client ~]# firewall-cmd --get-default-zone
public
4.查看区域详细信息
[root@client ~]# firewall-cmd --list-all --zone=public
public (active)
  target: default
  icmp-block-inversion: no	#是否禁止icmp协议
  interfaces: ens33
  sources:
  services: dhcpv6-client ssh	#允许通过防火墙的服务名
  ports: 	#允许通过防火墙的端口
  protocols:
  masquerade: no	#开启网络地址自动转换
  forward-ports:
  source-ports: 	#源端口
  icmp-blocks:
  rich rules:
5.放行http服务(基于服务名)
启动httpd
[root@client ~]# systemctl start httpd
测试访问
可以看到访问报错
[root@nat ~]# curl 192.168.233.10
curl: (7) Failed connect to 192.168.233.10:80; 没有到主机的路由
防火墙添加规则
[root@client ~]# firewall-cmd --permanent --add-service=http --zone=public
success
[root@client ~]# firewall-cmd --reload	#刷新防火墙规则
success
--permanent参数用于永久保存规则,如果不加此参数,重启后规则失效--add-service=服务名--zone=指定域--reload重新加载规则
查看区域详细信息
[root@client ~]# firewall-cmd --list-all --zone=public
public (active)
  target: default
  icmp-block-inversion: no
  interfaces: ens33
  sources:
  services: dhcpv6-client http ssh	#可以看到服务这里,多了http服务
  ports:
  protocols:
  masquerade: no
  forward-ports:
  source-ports:
  icmp-blocks:
  rich rules:
再次访问测试
[root@nat ~]# curl 192.168.233.10
192.168.233.10 webserver
6.删除规则(基于服务名)
删除刚刚的
http规则
[root@client ~]# firewall-cmd --permanent --zone=public --remove-service=http
success
[root@client ~]# firewall-cmd --reload
success
--permanent同样是持久删除,如果不加就是临时删除
7.放行http服务(基于端口)
[root@client ~]# firewall-cmd --permanent --zone=public --add-port=80/tcp
success
[root@client ~]# firewall-cmd --reload
success
--add-port=端口号/协议
[root@client ~]# firewall-cmd --list-all --zone=public
public (active)
  target: default
  icmp-block-inversion: no
  interfaces: ens33
  sources:
  services: dhcpv6-client ssh
  ports: 80/tcp	#刚刚我们添加的规则
  protocols:
  masquerade: no
  forward-ports:
  source-ports:
  icmp-blocks:
  rich rules:
8.删除规则(基于端口)
[root@client ~]# firewall-cmd --permanent --zone=public --remove-port=80/tcp
success
[root@client ~]# firewall-cmd --reload
success
[root@client ~]# firewall-cmd --list-all --zone=public
public (active)
  target: default
  icmp-block-inversion: no
  interfaces: ens33
  sources:
  services: dhcpv6-client ssh
  ports:
  protocols:
  masquerade: no
  forward-ports:
  source-ports:
  icmp-blocks:
  rich rules:
9.修改默认服务的开放端口
firewalld给我们提供了各式各样现成的开放相应服务的规则,同样也可以通过修改文件内容,修改默认的服务端口
例子:以下我将修改默认ssh服务的端口和防火墙规则
先修改sshd的端口
修改默认的
ssh的22号端口为54321
[root@client ~]# sed -ri 's|#Port 22|Port 54321|' /etc/ssh/sshd_config
[root@client ~]# systemctl restart sshd
修改防火墙提供服务的默认规则
在
/usr/lib/firewalld/services/下提供了很多服务的模板,修改之前,要把相应的服务复制到/etc/firewalld/services/目录下
[root@client ~]# cp /usr/lib/firewalld/services/ssh.xml /etc/firewalld/services/ssh.xml
修改默认规则
[root@client ~]# vim /etc/firewalld/services/ssh.xml
<?xml version="1.0" encoding="utf-8"?>
<service>
  <short>SSH</short>
  <description>Secure Shell (SSH) is a protocol for logging into and executing commands on remote machines. It provides secure encrypted communications. If you plan on accessing your machine remotely via SSH over a firewalled interface, enable this option. You need the openssh-server package installed for this option to be useful.</description>
  <port protocol="tcp" port="54321"/>	#这里的端口默认是22
</service>
让配置生效
[root@client ~]# firewall-cmd --reload
success
测试
随便找另外一台机器测试
[root@nat ~]# ssh root@192.168.233.10 -p 54321
[root@client ~]#
10.自定义服务
随便找个
xml文件作为模板,改改就可以了
[root@client ~]# cp /etc/firewalld/services/ssh.xml /etc/firewalld/services/serviceAA.xml
[root@client ~]# cat /etc/firewalld/services/serviceAA.xml
<?xml version="1.0" encoding="utf-8"?>
<service>
  <short>serviceAA</short>
  <description>This is a test service</description>
  <port protocol="tcp" port="33333"/>
</service>
--add-service=填写我们自定义的服务名即可
[root@server ~]# firewall-cmd --permanent --add-service=serviceAA
success
[root@server ~]# firewall-cmd --reload
三、NAT地址转换
1.源地址转换
| 主机名 | IP地址 | 作用 |
|---|---|---|
| client.linux.com | 192.168.233.10 | 模拟客户端 |
| nat.linux.com | 192.168.233.100、30.30.30.128 | 模拟NAT |
| server.linux.com | 30.30.30.10 | 模拟公网服务器 |
在配置之前,请提前准备好
httpd的服务
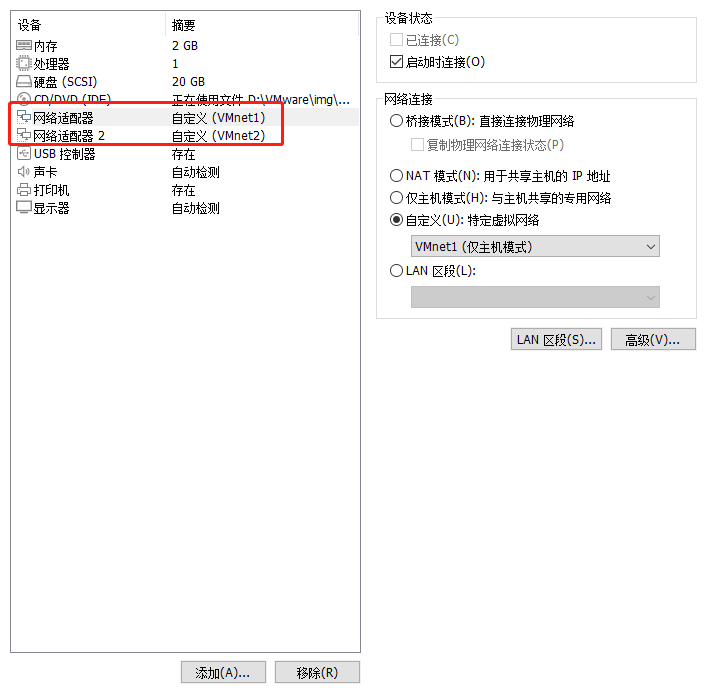
A.先给NAT主机添加一块网卡

B.修改另外2台主机的网卡


C.配置IP地址和网关地址
[root@client ~]# cat /etc/sysconfig/network-scripts/ifcfg-ens33
TYPE="Ethernet"
BROWSER_ONLY="no"
BOOTPROTO="none"
DEFROUTE="yes"
NAME="ens33"
DEVICE="ens33"
ONBOOT="yes"
ETHTOOL_OPTS="autoneg on"
IPADDR=192.168.233.10
NETMASK=255.255.255.0
GATEWAY=192.168.233.100
[root@nat ~]# cat /etc/sysconfig/network-scripts/ifcfg-ens33
TYPE="Ethernet"
BROWSER_ONLY="no"
BOOTPROTO="none"
DEFROUTE="yes"
NAME="ens33"
DEVICE="ens33"
ONBOOT="yes"
ETHTOOL_OPTS="autoneg on"
IPADDR=192.168.233.100
#NETMASK=255.255.255.0
#GATEWAY=192.168.140.2
#DNS1=114.114.114.114
#DNS2=8.8.8.8
[root@nat ~]# cat /etc/sysconfig/network-scripts/ifcfg-ens36
TYPE="Ethernet"
BROWSER_ONLY="no"
BOOTPROTO="none"
DEFROUTE="yes"
NAME="ens33"
DEVICE="ens33"
ONBOOT="yes"
ETHTOOL_OPTS="autoneg on"
IPADDR=30.30.30.128
[root@server ~]# cat /etc/sysconfig/network-scripts/ifcfg-ens33
TYPE="Ethernet"
BROWSER_ONLY="no"
BOOTPROTO="none"
DEFROUTE="yes"
NAME="ens33"
DEVICE="ens33"
ONBOOT="yes"
ETHTOOL_OPTS="autoneg on"
IPADDR=30.30.30.10
NETMASK=255.255.255.0
D.在服务器上发布测试网页
[root@server ~]# rm -rf /etc/httpd/conf.d/welcome.conf
[root@server ~]# echo "<h1>30.30.30.10 webserver</h1>" > /var/www/html/index.html
[root@server ~]# systemctl enable --now httpd
E.配置NAT
先修改内核参数,开启路由地址转发功能
[root@nat ~]# sed -ri '$a \net.ipv4.ip_forward = 1' /etc/sysctl.conf
[root@nat ~]# sysctl -p
net.ipv4.ip_forward = 1
F.配置防火墙规则
[root@nat ~]# firewall-cmd --permanent --add-masquerade
success
[root@nat ~]# firewall-cmd --reload
success
查看防火墙规则
[root@nat ~]# firewall-cmd --list-all --zone=public
public (active)
  target: default
  icmp-block-inversion: no
  interfaces: ens33 ens36
  sources:
  services: dhcpv6-client ssh
  ports:
  protocols:
  masquerade: yes	#可以看到已经开启地址自动转换了
  forward-ports:
  source-ports:
  icmp-blocks:
  rich rules:
G.client端测试访问
[root@client ~]# curl 30.30.30.10
<h1>30.30.30.10 webserver</h1>
H。查看server端访问日志
可以看到确确实实是
NAT转换的公网IP地址
[root@server ~]# tail -n3 /var/log/httpd/access_log
30.30.30.128 - - [29/May/2023:14:20:51 +0800] "GET / HTTP/1.1" 200 31 "-" "curl/7.29.0"
30.30.30.128 - - [29/May/2023:14:20:52 +0800] "GET / HTTP/1.1" 200 31 "-" "curl/7.29.0"
30.30.30.128 - - [29/May/2023:19:59:42 +0800] "GET / HTTP/1.1" 200 31 "-" "curl/7.29.0"
2.发布服务(端口映射)
模拟公网客户端,访问内网的服务器
注意:NAT上面wan口绑定的IP必须是公网IP
端口映射的端口不可以冲突!
| 主机名 | IP地址 | 作用 |
|---|---|---|
| server.linux.com | 192.168.233.10 | 模拟服务端 |
| nat.linux.com | 192.168.233.100、30.30.30.128 | 模拟NAT |
| client.linux.com | 30.30.30.10 | 模拟客户端 |
A.服务端发布测试页面
[root@client ~]# rm -rf /etc/httpd/conf.d/welcome.conf
[root@client ~]# echo "192.168.233.10 webserver" > /var/www/html/index.html
[root@client ~]# systemctl enable --now httpd
B.公网客户端测试
[root@server ~]# curl 30.30.30.128
curl: (7) Failed connect to 30.30.30.128:80; 没有到主机的路由	#这是正常现象,我们还没有做端口映射
C.回到NAT服务器,配置防火墙策略
把内网
192.168.233.10上的80端口,映射到公网30.30.30.128的8080端口
[root@nat ~]# firewall-cmd --permanent --add-forward-port=port=8080:proto=tcp:toport=80:toaddr=192.168.233.10
success
[root@nat ~]# firewall-cmd --reload
success
port=映射端口proto=协议toport=源端口toaddr=源地址
D.查看防火墙规则
[root@nat ~]# firewall-cmd --list-all --zone=public
public (active)
  target: default
  icmp-block-inversion: no
  interfaces: ens33 ens36
  sources:
  services: dhcpv6-client ssh
  ports:
  protocols:
  masquerade: yes
  forward-ports: port=8080:proto=tcp:toport=80:toaddr=192.168.233.10
  source-ports:
  icmp-blocks:
  rich rules:
E.测试
可以看到公网客户端,成功访问到了内网的服务器上
[root@server ~]# curl 30.30.30.128:8080
192.168.233.10 webserver
F.拓展
本地端口转发
刚刚的是远程端口转发
不用添加toaddr参数
[root@nat_device ~]# firewall-cmd --permanent --add-forward-port=port=8888:proto=tcp:toport=22
success
[root@nat_device ~]# firewall-cmd --reload
success
