

【Linux应用系列教程】Git分布式版本控制器
一、Git的作用
- 记录文本文件版本变化,便于回退
- 便于多人协同开发
二、安装Git工具
1.配置Yum源和Epel源
如果没有
wget命令,请安装yum install -y wget
[root@gitlab ~]# wget -O /etc/yum.repos.d/CentOS-Base.repo http://mirrors.aliyun.com/repo/Centos-7.repo
[root@gitlab ~]# wget -O /etc/yum.repos.d/epel.repo https://mirrors.aliyun.com/repo/epel-7.repo
[root@gitlab ~]# yum clean all && yum makecache
2.安装Git工具
[root@gitlab ~]# yum install -y git
3.Git初始化操作
不管在哪个平台安装的
Git,第一步都要进行的初始化操作
设置用户名和邮箱,就相当于给自己一个身份
[root@gitlab ~]# git config --global user.name "wangshengjj"
[root@gitlab ~]# git config --global user.email "wsjj@wangshengjj.work"
[root@gitlab ~]# git config --global color.ui true	#开启颜色显示,便于以后查看
三、Git常用操作
1.创建一个仓库
[root@gitlab ~]# mkdir /opt/work
[root@gitlab ~]# cd /opt/work
[root@gitlab work]# git init
初始化空的 Git 版本库于 /opt/work/.git/
可以看到,初始化完一个仓库后,会默认创建一个名为
git的隐藏目录
[root@gitlab work]# ls -a
.  ..  .git
2.提交修改
随便创建一个文件
[root@gitlab work]# touch file01
把文件添加到暂存区
[root@gitlab work]# git add file01
可以使用
git status命令查看状态
[root@gitlab work]# git status
# 位于分支 master
#
# 初始提交
#
# 要提交的变更:
#   (使用 "git rm --cached <file>..." 撤出暂存区)
#
#	新文件:    file01
#
提交修改(提交到本地仓库)
[root@gitlab work]# git commit -m "新增file01文件"	#说明信息是必填的
[master(根提交) f0eea8c] 新增file01文件
 1 file changed, 0 insertions(+), 0 deletions(-)
 create mode 100644 file01
3.查看仓库状态
[root@gitlab work]# git status
# 位于分支 master
无文件要提交,干净的工作区	#因为刚才我们已经提交修改了,所以是干净的
4.版本回退
查看所有历史版本
[root@gitlab work]# git reflog
f0eea8c HEAD@{0}: commit (initial): 新增file01文件
#因为我们只提交了一次,所以只有一个版本
再提交一个修改
[root@gitlab work]# touch file02
[root@gitlab work]# git add file02
[root@gitlab work]# git commit -m "新增file02文件"
[master fd50780] 新增file02文件
 1 file changed, 0 insertions(+), 0 deletions(-)
 create mode 100644 file02
[root@gitlab work]# ls
file01  file02
查看所有版本信息
[root@gitlab work]# git reflog
fd50780 HEAD@{0}: commit: 新增file02文件
f0eea8c HEAD@{1}: commit (initial): 新增file01文件
回退到上个版本
# git reset --hard <版本ID>
[root@gitlab work]# git reset --hard f0eea8c
HEAD 现在位于 f0eea8c 新增file01文件
[root@gitlab work]# ls
file01
[root@gitlab work]# git reflog
f0eea8c HEAD@{0}: reset: moving to f0eea8c
fd50780 HEAD@{1}: commit: 新增file02文件
f0eea8c HEAD@{2}: commit (initial): 新增file01文件
5.重命名文件
先回退版本
[root@gitlab work]# git reset --hard fd50780
HEAD 现在位于 fd50780 新增file02文件
重命名文件
[root@gitlab work]# git mv file02 file666
[root@gitlab work]# ls
file01  file666
提交修改
[root@gitlab work]# git commit -m "修改file02为file666"
[master 05b2fb6] 修改file02为file666
 1 file changed, 0 insertions(+), 0 deletions(-)
 rename file02 => file666 (100%)
[root@gitlab work]# git reflog
05b2fb6 HEAD@{0}: commit: 修改file02为file666
fd50780 HEAD@{1}: reset: moving to fd50780
f0eea8c HEAD@{2}: reset: moving to f0eea8c
fd50780 HEAD@{3}: commit: 新增file02文件
f0eea8c HEAD@{4}: commit (initial): 新增file01文件
6.删除文件
删除file666
[root@gitlab work]# git rm file666
rm 'file666'
[root@gitlab work]# ls
file01
提交修改
可以先看看仓库状态
[root@gitlab work]# git status
# 位于分支 master
# 要提交的变更:
#   (使用 "git reset HEAD <file>..." 撤出暂存区)
#
#	删除:      file666
#
[root@gitlab work]# git commit -m "删除file666"
[master 4d5e5f4] 删除file666
 1 file changed, 0 insertions(+), 0 deletions(-)
 delete mode 100644 file666
查看所有历史版本
[root@gitlab work]# git reflog
4d5e5f4 HEAD@{0}: commit: 删除file666
05b2fb6 HEAD@{1}: commit: 修改file02为file666
fd50780 HEAD@{2}: reset: moving to fd50780
f0eea8c HEAD@{3}: reset: moving to f0eea8c
fd50780 HEAD@{4}: commit: 新增file02文件
f0eea8c HEAD@{5}: commit (initial): 新增file01文件
7.暂存区、工作区
可以把暂存区理解为计算机的内存,工作区理解为计算机的硬盘
我们每次执行git add 文件名的时候,其实都是把文件存放到了暂存区
[root@gitlab work]# touch file03
[root@gitlab work]# git status	#还未提交的状态,查看状态
# 位于分支 master
# 未跟踪的文件:
#   (使用 "git add <file>..." 以包含要提交的内容)
#
#	file03
提交为空,但是存在尚未跟踪的文件(使用 "git add" 建立跟踪)
[root@gitlab work]# git add file03
[root@gitlab work]# git status	#可以看到已经放到暂存区了
# 位于分支 master
# 要提交的变更:
#   (使用 "git reset HEAD <file>..." 撤出暂存区)
#
#	新文件:    file03
#
A.撤销暂存区的修改
其实刚刚官方的提示信息,已经告诉了我们怎么撤出暂存区了
git reset HEAD <file>
[root@gitlab work]# git reset HEAD file03
B.撤销未提交的修改
其实我们把文件从暂存区撤回的时候,这个文件就属于未提交的状态了
已知我们的file01文件是没有任何内容的,现在我们随便写点什么
[root@gitlab work]# vim file01
[root@gitlab work]# cat file01
wangshengjj 666
欢迎来到网笙久久的博客
撤回未提交的修改
注意撤回未提交的修改之前,这个文件必须之前已经提交过了,
Git才可以根据上次的提交信息进行回退操作
如果您想直接回退file03,是不可能的,因为我们从创建它到最后也没有一次提交过它,所以Git并不知道它上次长什么样子
[root@gitlab work]# git checkout -- file01
查看file01文件
可以看到又回到了最初的版本,什么都没有
[root@gitlab work]# cat file01
[root@gitlab work]#
C.撤销工作区的修改
当我们执行完
git commit后,文件就会被存放到工作区,所以工作区的文件是无法撤销修改的
当然也有个简单粗暴的方法,那就是直接回退版本!
模拟我们提交了一个错误的文件
[root@gitlab work]# git add file03
[root@gitlab work]# git commit -m "新增file03文件"
[master 2fd49e2] 新增file03文件
 1 file changed, 2 insertions(+)
 create mode 100644 file03
[root@gitlab work]# git reflog
2fd49e2 HEAD@{0}: commit: 新增file03文件
4d5e5f4 HEAD@{1}: commit: 删除file666
05b2fb6 HEAD@{2}: commit: 修改file02为file666
fd50780 HEAD@{3}: reset: moving to fd50780
f0eea8c HEAD@{4}: reset: moving to f0eea8c
fd50780 HEAD@{5}: commit: 新增file02文件
f0eea8c HEAD@{6}: commit (initial): 新增file01文件
直接回退到上个版本即可
刚刚提交的错误文件
file03已经消失啦
[root@gitlab work]# git reset --hard 4d5e5f4
HEAD 现在位于 4d5e5f4 删除file666
[root@gitlab work]# ls
file01
突然我又想要file03文件了
直接再次回退到上一个版本即可
[root@gitlab work]# git reset --hard 2fd49e2
HEAD 现在位于 2fd49e2 新增file03文件
[root@gitlab work]# ls
file01  file03
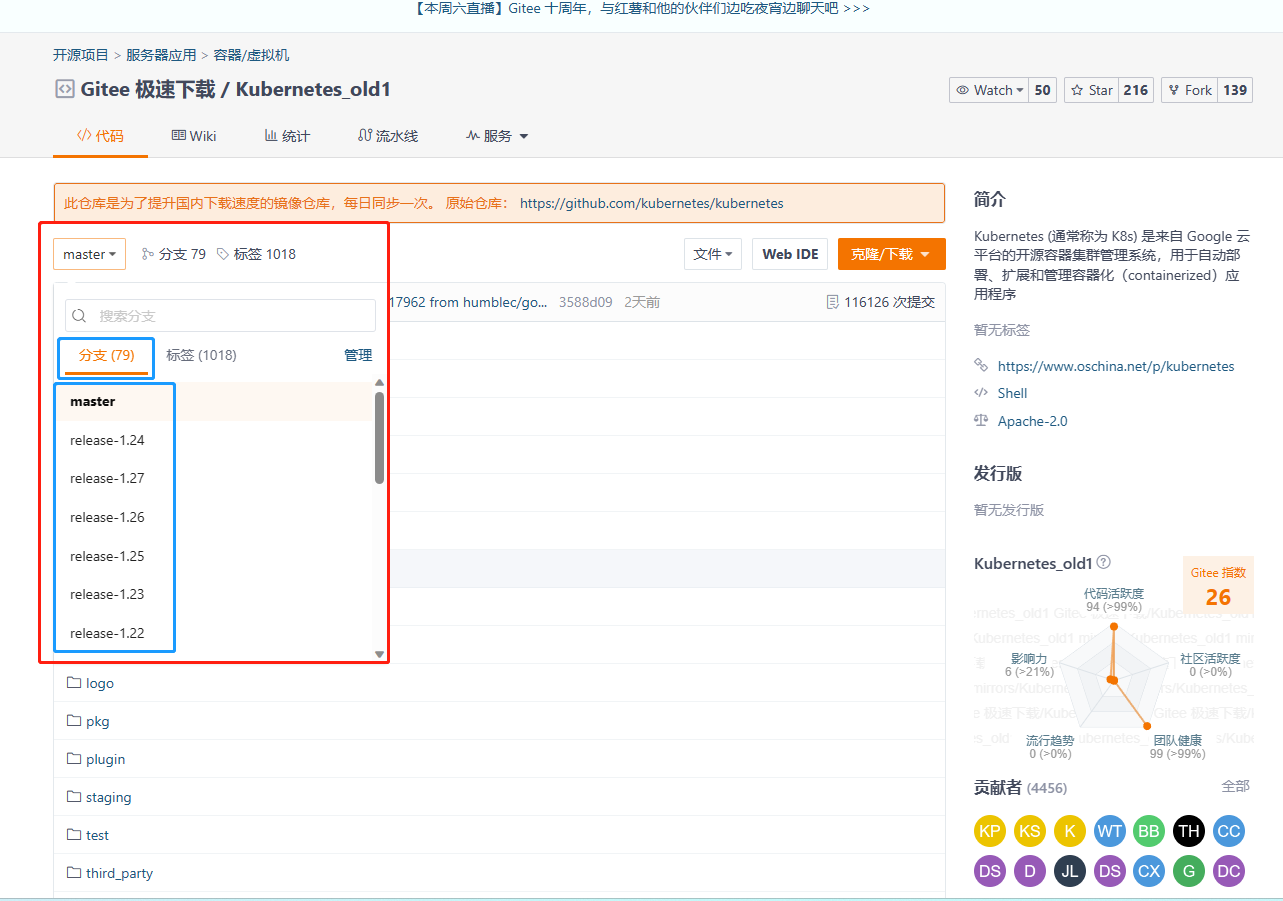
8.分支branch
- 注:分支间是隔离的
简单来说,每个分支都是独立的,分支之间互不干扰
最常见不同分支用来区别不同版本
就像下图,一共79个分支,代表79个版本
注意:Master是一个特殊分支(有的可能是Main),它永远都是最新版的,也就是说,每更新一次分支,Master(Main)也会一起更新,它永远都是最新版本!
A.查看分支
[root@gitlab work]# git branch
* master	#不同分支前面有个星号,代表当前正在使用的分支
B.创建分支
以下两个命令都可以创建分支,你能看出什么区别吗
[root@gitlab work]# git branch v0.1
[root@gitlab work]# git branch
* master
  v0.1
[root@gitlab work]# git checkout -b v0.1.1
切换到一个新分支 'v0.1.1'
[root@gitlab work]# git branch
  master
  v0.1
* v0.1.1
其实第二条命令,在创建分支的同时,也会自动帮我们切换到相应的分支
当然如果你是通过第一条命令创建的分支,也可以通过命令手动切换分支
C.切换分支
[root@gitlab work]# git checkout v0.1
切换到分支 'v0.1'
[root@gitlab work]# git branch
  master
* v0.1
  v0.1.1
D.删除分支
[root@gitlab work]# git branch -d v0.1.1
已删除分支 v0.1.1(曾为 2fd49e2)。
[root@gitlab work]# git branch
  master
* v0.1
E.合并分支
将指定的分支合并到当前分支
我们在v0.1分支随便写点什么
[root@gitlab work]# touch file{9..11}
[root@gitlab work]# ls
file01  file03  file10  file11  file9
然后提交修改
[root@gitlab work]# git add .	#一次性添加所有文件
[root@gitlab work]# git status
# 位于分支 v0.1
# 要提交的变更:
#   (使用 "git reset HEAD <file>..." 撤出暂存区)
#
#	新文件:    file10
#	新文件:    file11
#	新文件:    file9
#
[root@gitlab work]# git commit -m "v0.1版本更新内容"
[v0.1 4f88086] v0.1版本更新内容
 3 files changed, 0 insertions(+), 0 deletions(-)
 create mode 100644 file10
 create mode 100644 file11
 create mode 100644 file9
切换分支
[root@gitlab work]# git checkout master
切换到分支 'master'
[root@gitlab work]# ls
file01  file03	#可以看到这时候的Master分支和v0.1分支是不一样的!
合并分支
合并
v0.1分支到Master分支
[root@gitlab work]# git merge v0.1
更新 2fd49e2..4f88086
Fast-forward
 file10 | 0
 file11 | 0
 file9  | 0
 3 files changed, 0 insertions(+), 0 deletions(-)
 create mode 100644 file10
 create mode 100644 file11
 create mode 100644 file9
可以看到
v0.1分支上新建的那几个文件已经合并过来了
[root@gitlab work]# ls
file01  file03  file10  file11  file9
9.克隆、上传
克隆远程仓库
[root@gitlab work]# git clone 仓库地址
上传远程仓库
commit只是上传到本地仓库,如果想上传到远程仓库,需要push
[root@gitlab work]# git push -u origin 分支名
关于
clone和push下面有更详细的使用方法
四、部署本地Git服务器
1.常见的Git服务器
- 公共的
- 私人的
gitlab
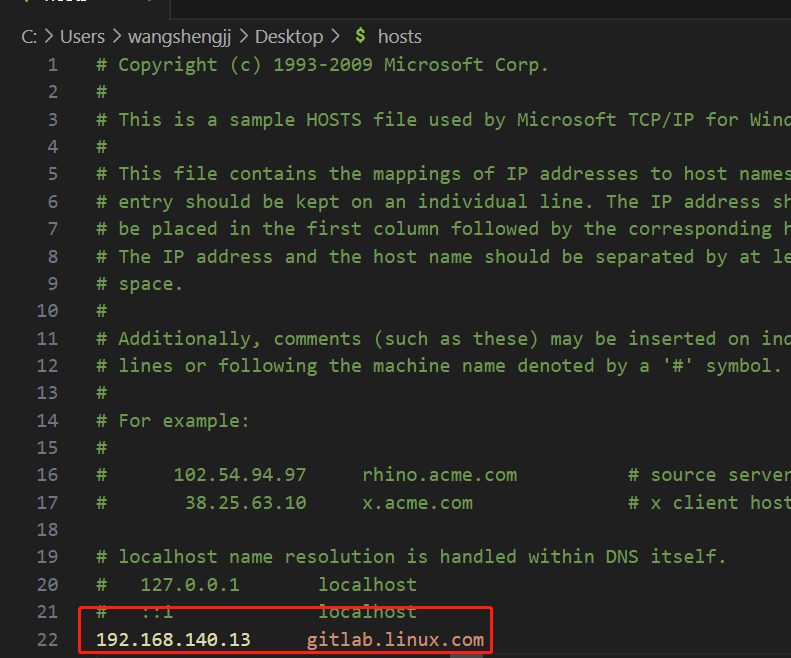
2.配置主机名解析
[root@gitlab ~]# hostnamectl set-hostname gitlab.linux.com
[root@gitlab ~]# vim /etc/hosts
127.0.0.1   localhost localhost.localdomain localhost4 localhost4.localdomain4
::1         localhost localhost.localdomain localhost6 localhost6.localdomain6
192.168.140.13 gitlab.linux.com
3.安装Gitlab
清华大学开源镜像站:https://mirrors.tuna.tsinghua.edu.cn/gitlab-ce/yum/el7/
[root@gitlab ~]# yum install -y https://mirrors.tuna.tsinghua.edu.cn/gitlab-ce/yum/el7/gitlab-ce-13.9.7-ce.0.el7.x86_64.rpm
4.编辑Gitlab配置文件
[root@gitlab ~]# vim /etc/gitlab/gitlab.rb
#配置文件并不完整,仅展示修改的地方
external_url 'http://gitlab.linux.com'	#这里修改为自己的主机名或者虚拟机IP
5.启动Gitlab
[root@gitlab ~]# gitlab-ctl reconfigure
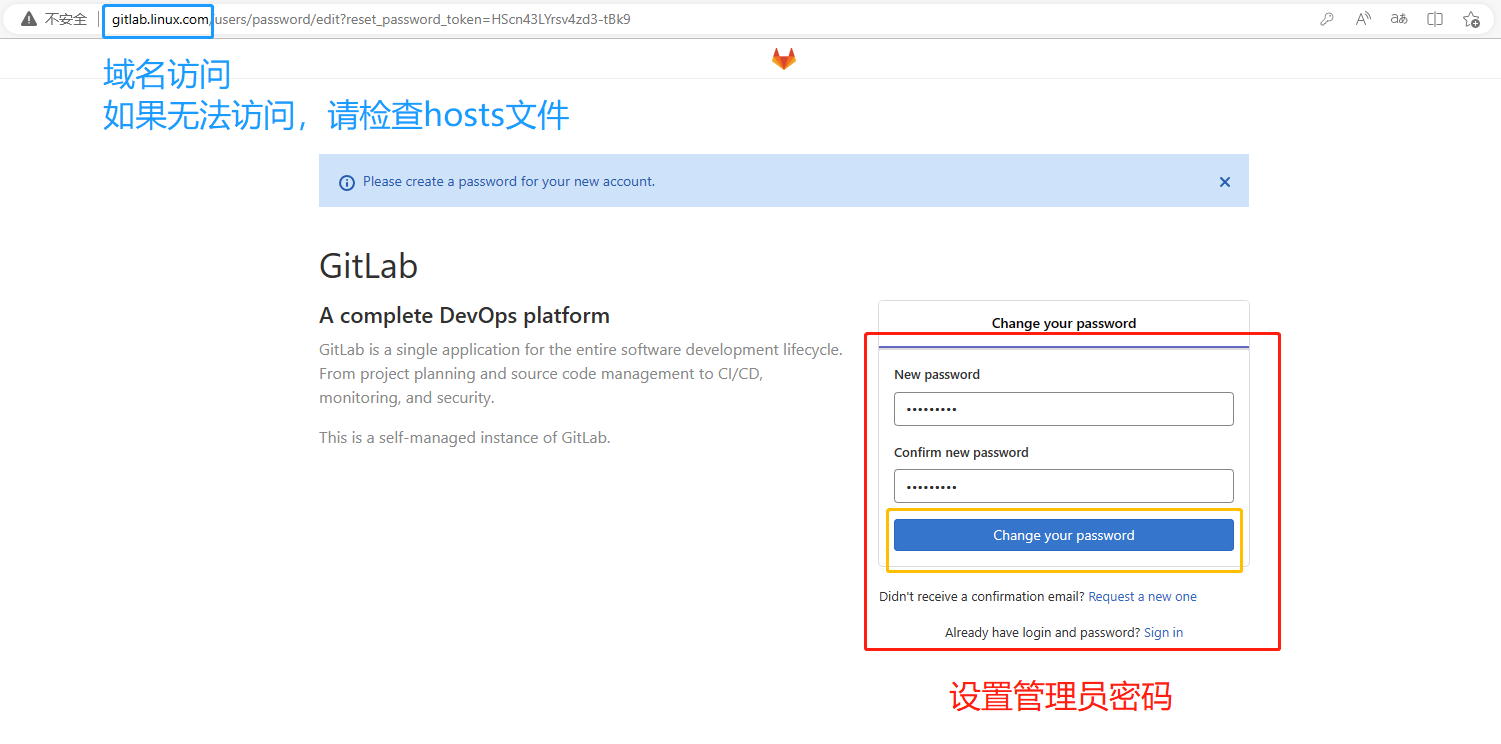
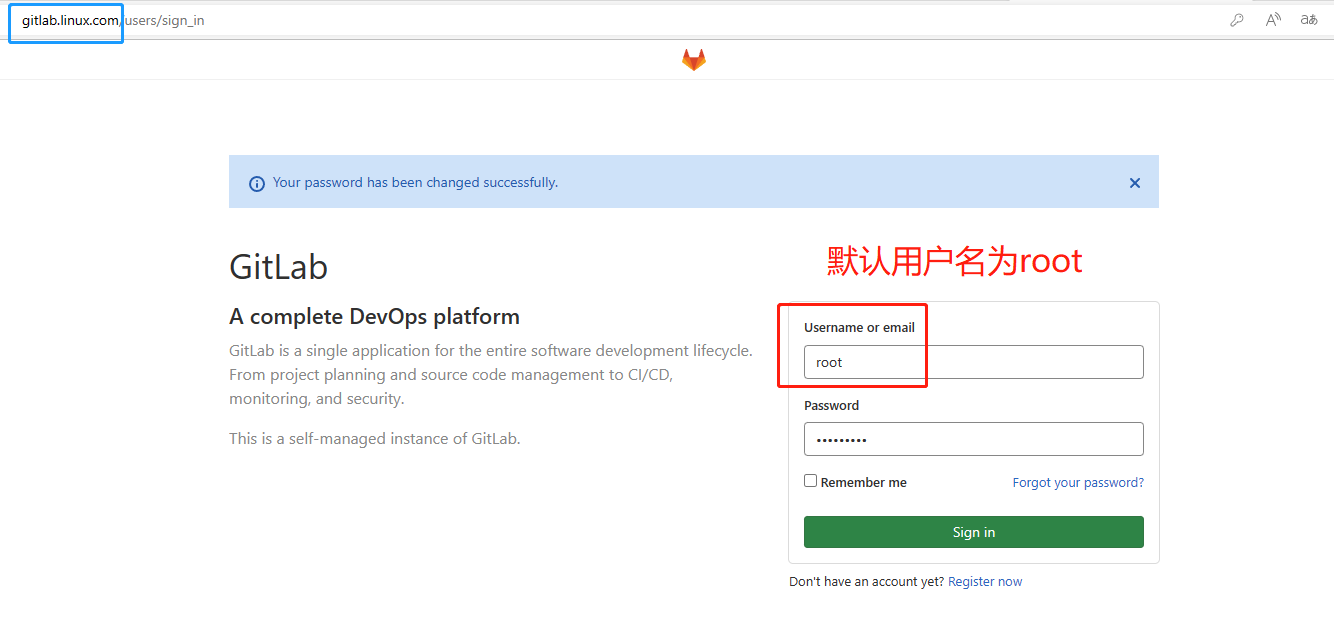
6.修改Windows的hosts文件
路径:
C:\Windows\System32\drivers\etc\hosts
7.配置Gitlab
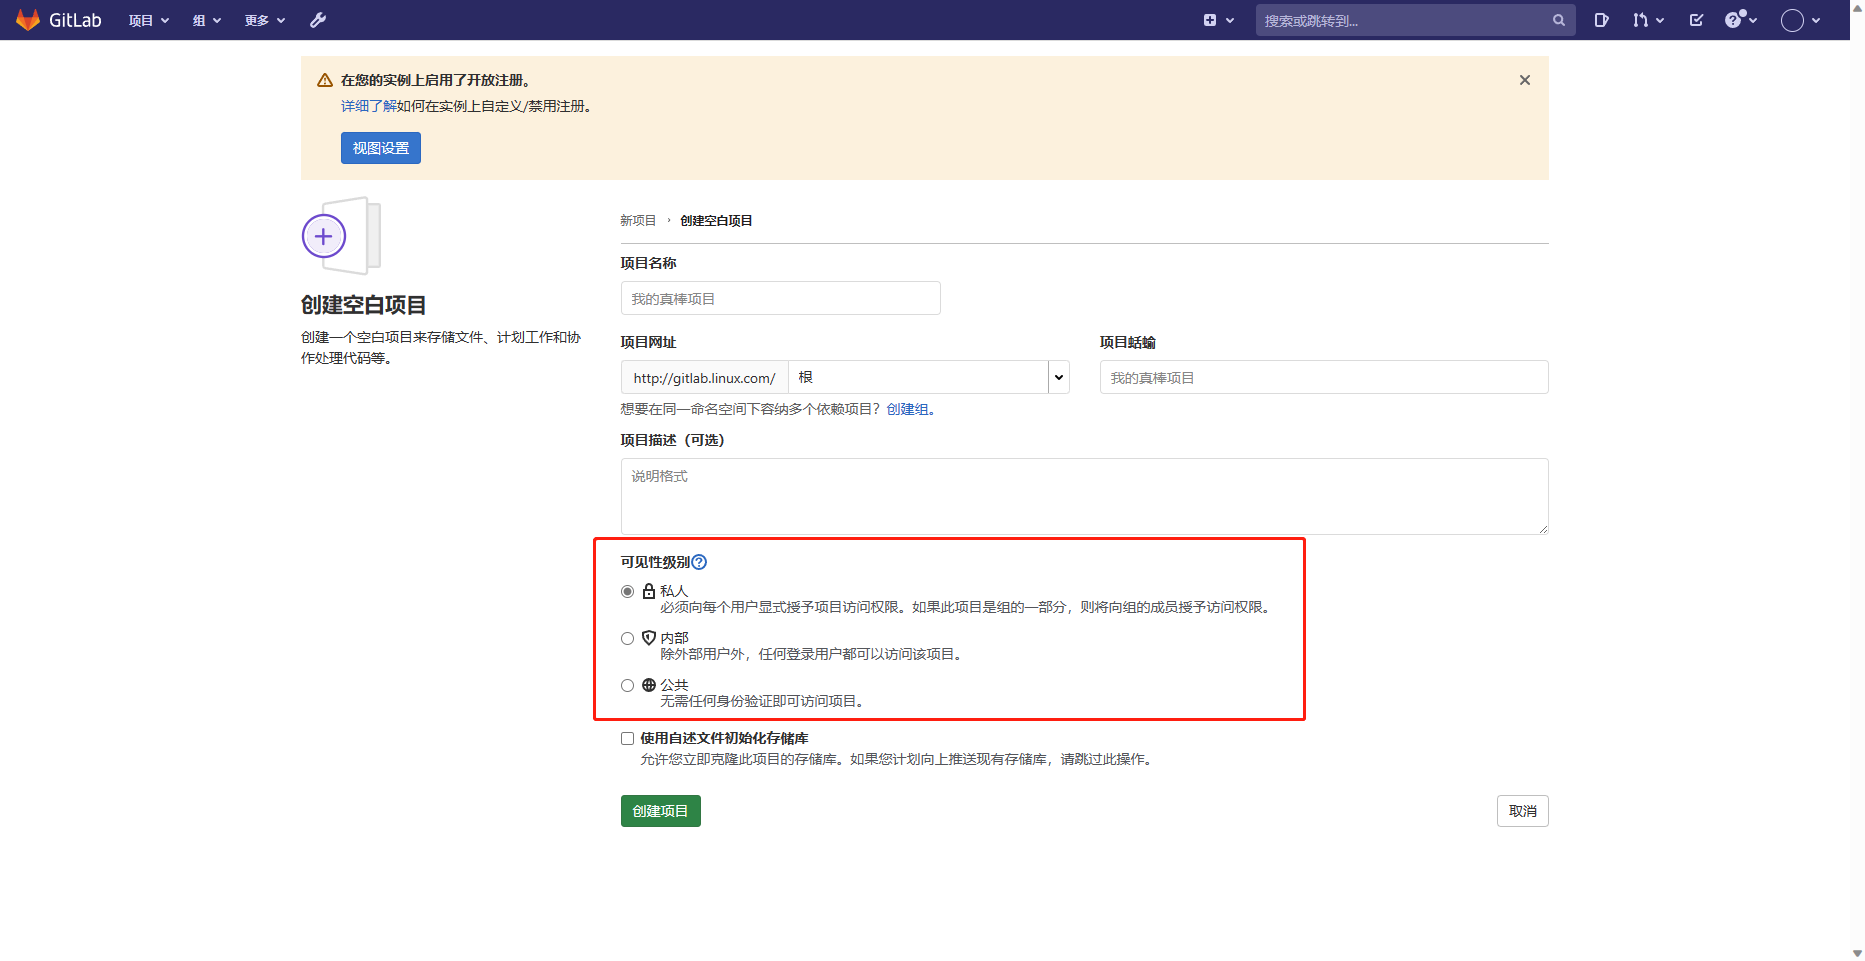
8.创建一个私人仓库
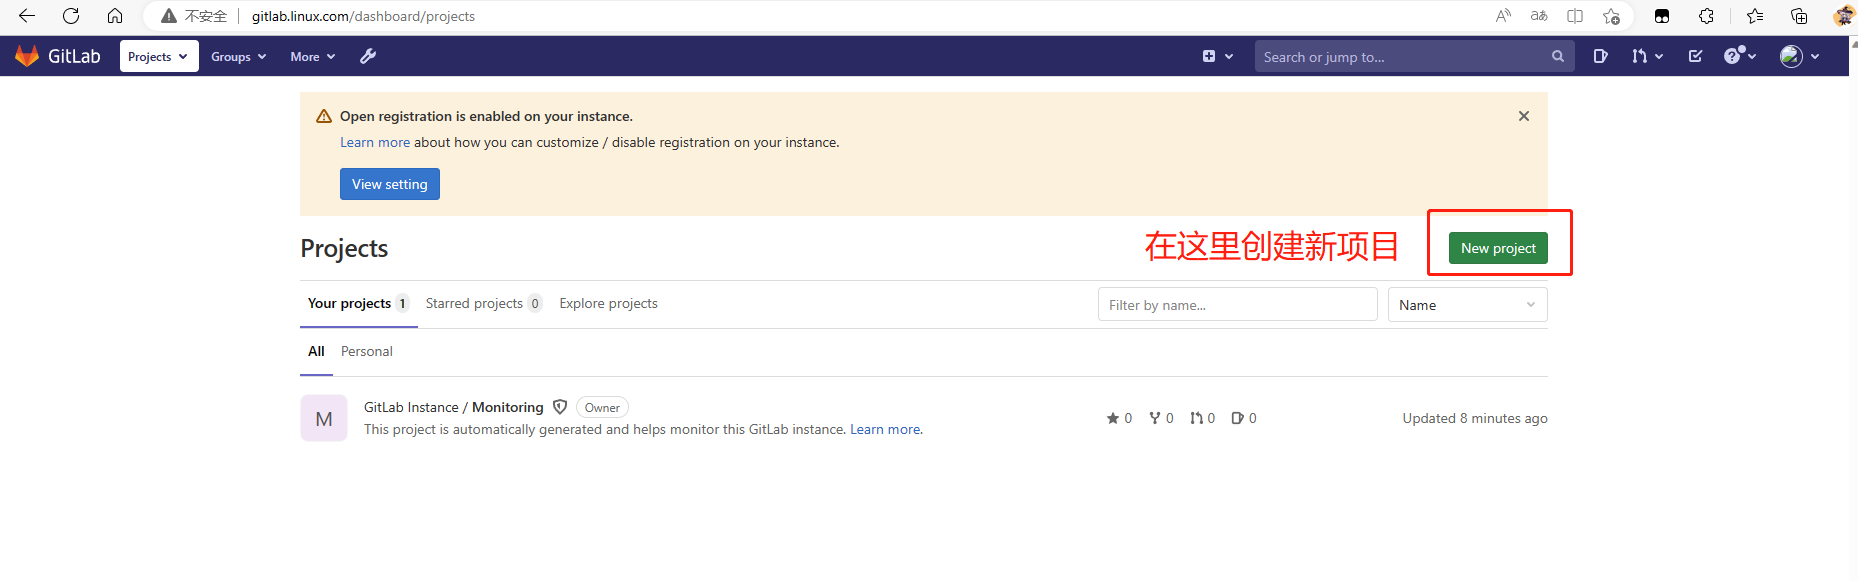
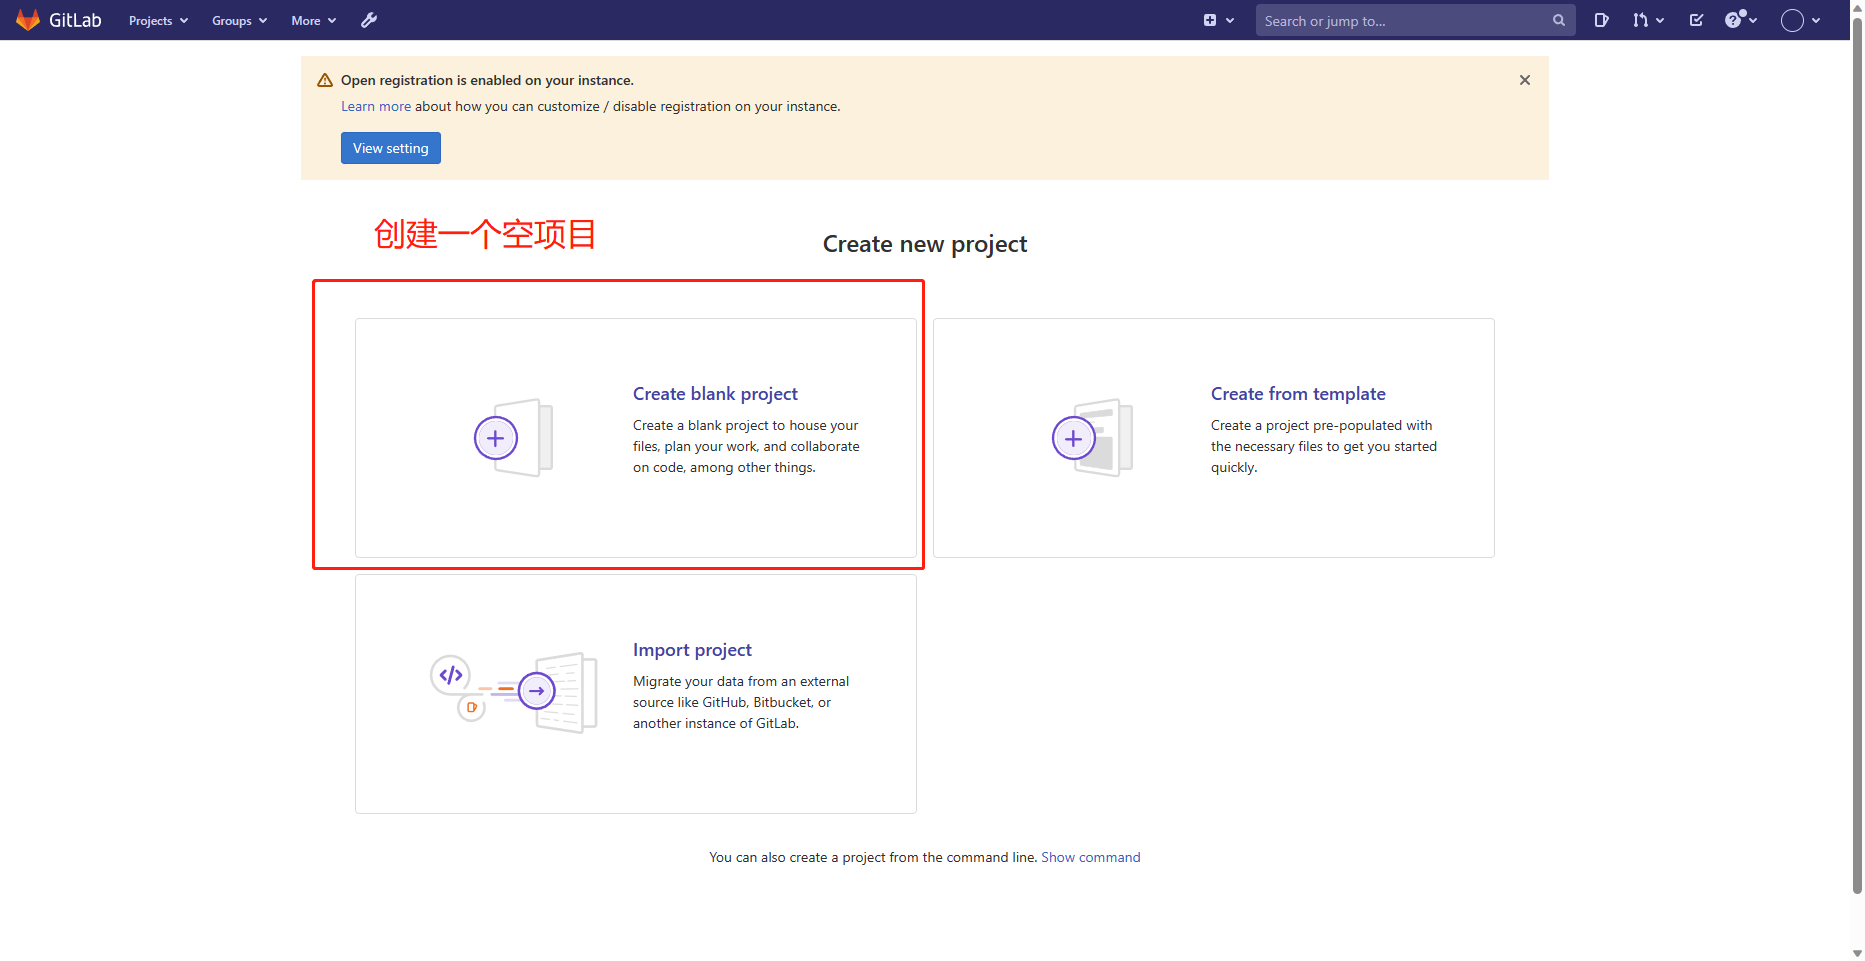
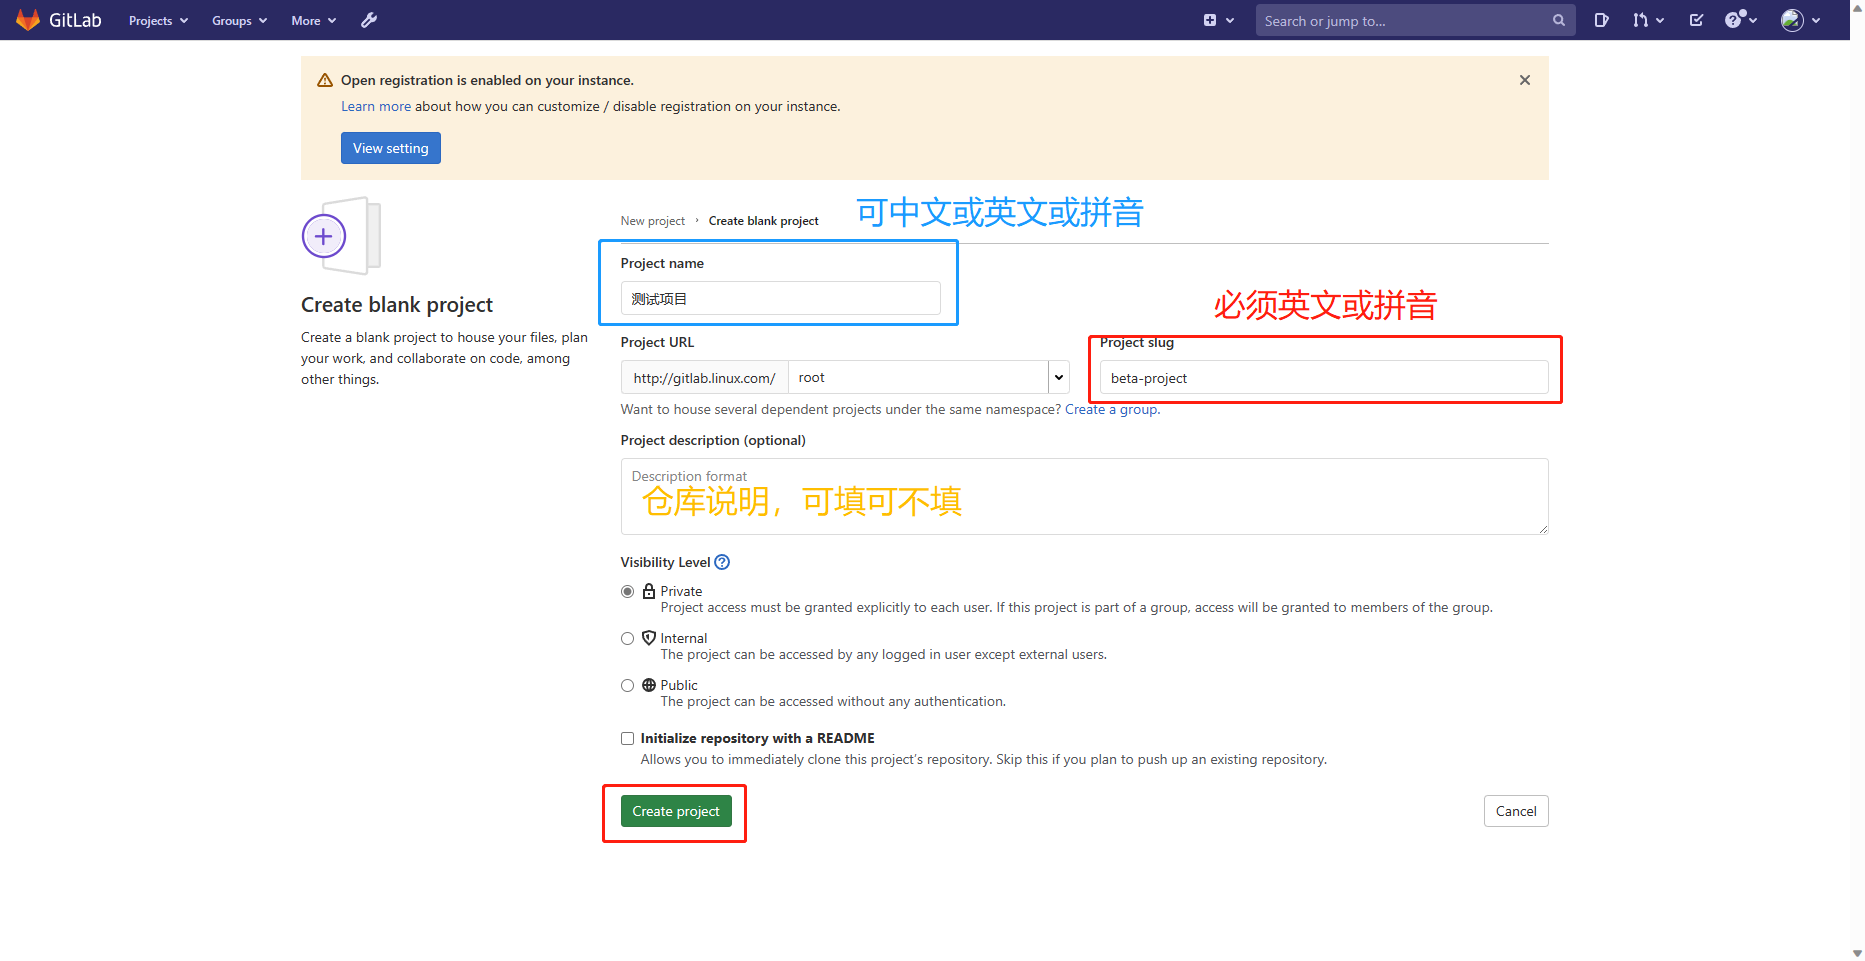
可以查看刚刚我们创建的仓库了
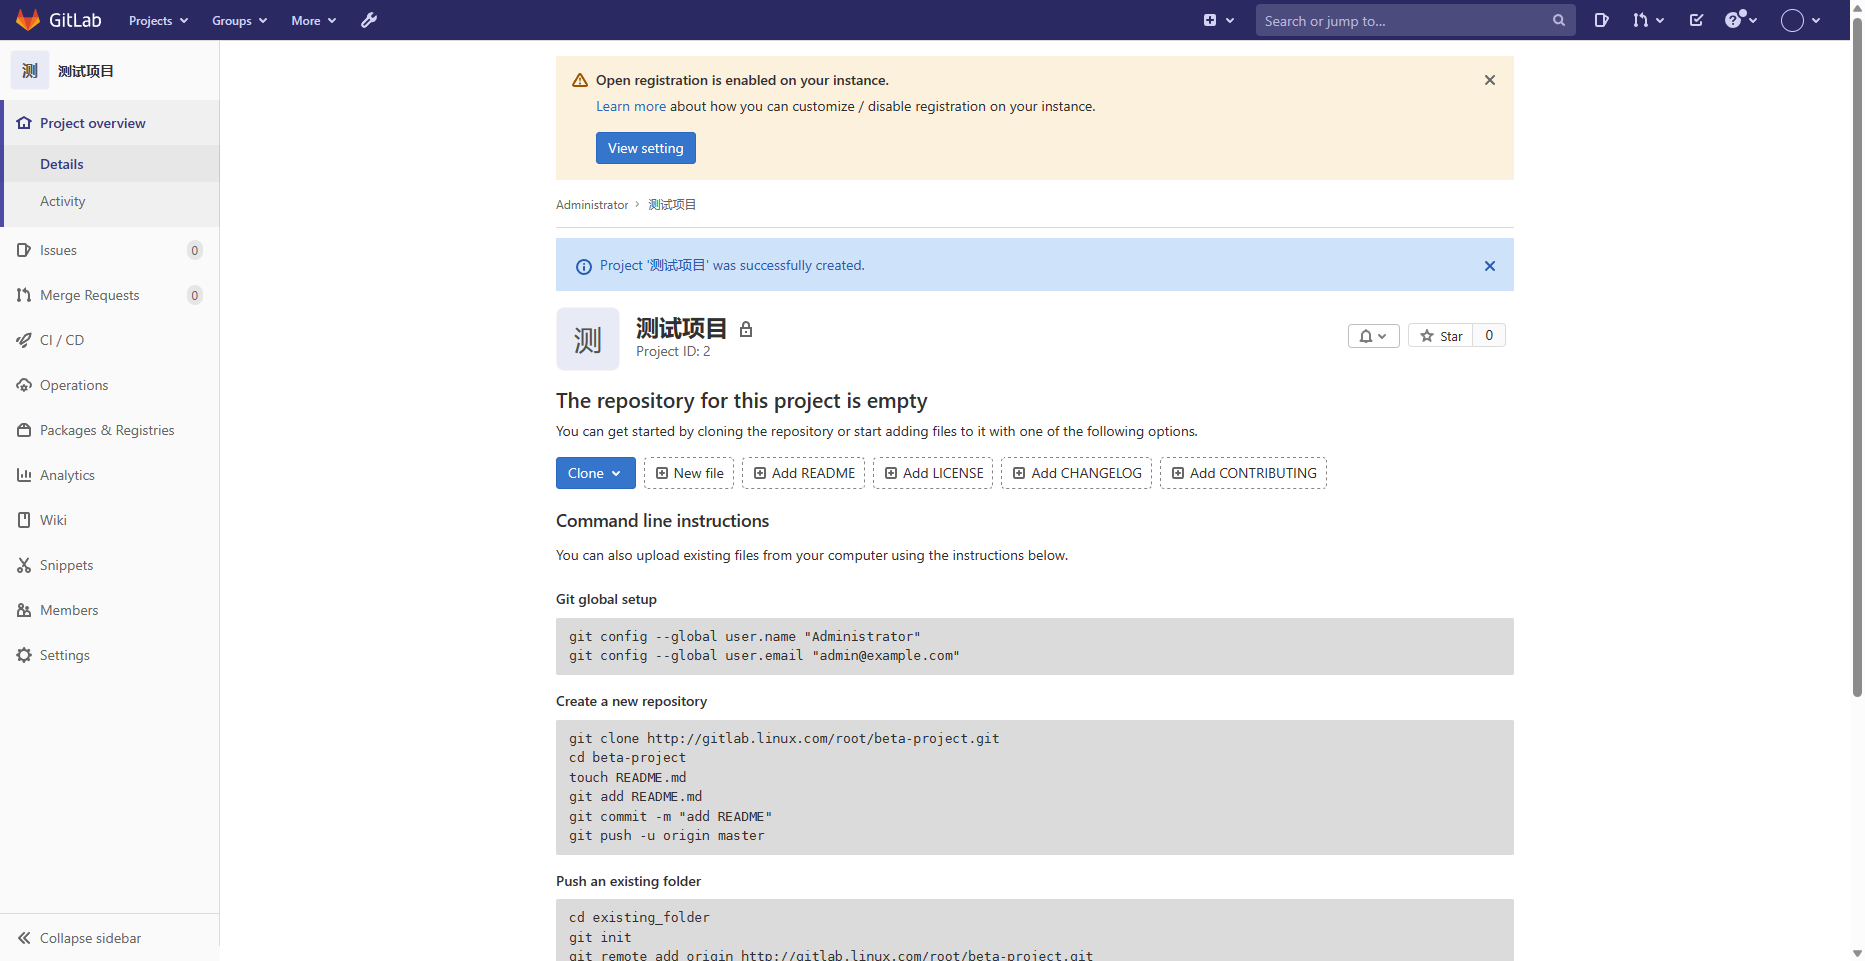
9.克隆仓库到本地
注意,在
Git clone之前要注意配置用户名和邮箱!
A.第二台主机修改hosts文件
[root@zabbix_server ~]# vim /etc/hosts
127.0.0.1   localhost localhost.localdomain localhost4 localhost4.localdomain4
::1         localhost localhost.localdomain localhost6 localhost6.localdomain6
192.168.140.13 gitlab.linux.com gitlab
B.克隆仓库到本地
[root@zabbix_server ~]# git clone http://gitlab.linux.com/root/beta-project.git
正克隆到 'beta-project'...
Username for 'http://gitlab.linux.com': root	#gitlab的用户名
Password for 'http://root@gitlab.linux.com': 	#gitlab的密码
warning: 您似乎克隆了一个空版本库。	#本来就是空的,正常提示
[root@zabbix_server ~]# cd beta-project/
[root@zabbix_server beta-project]#
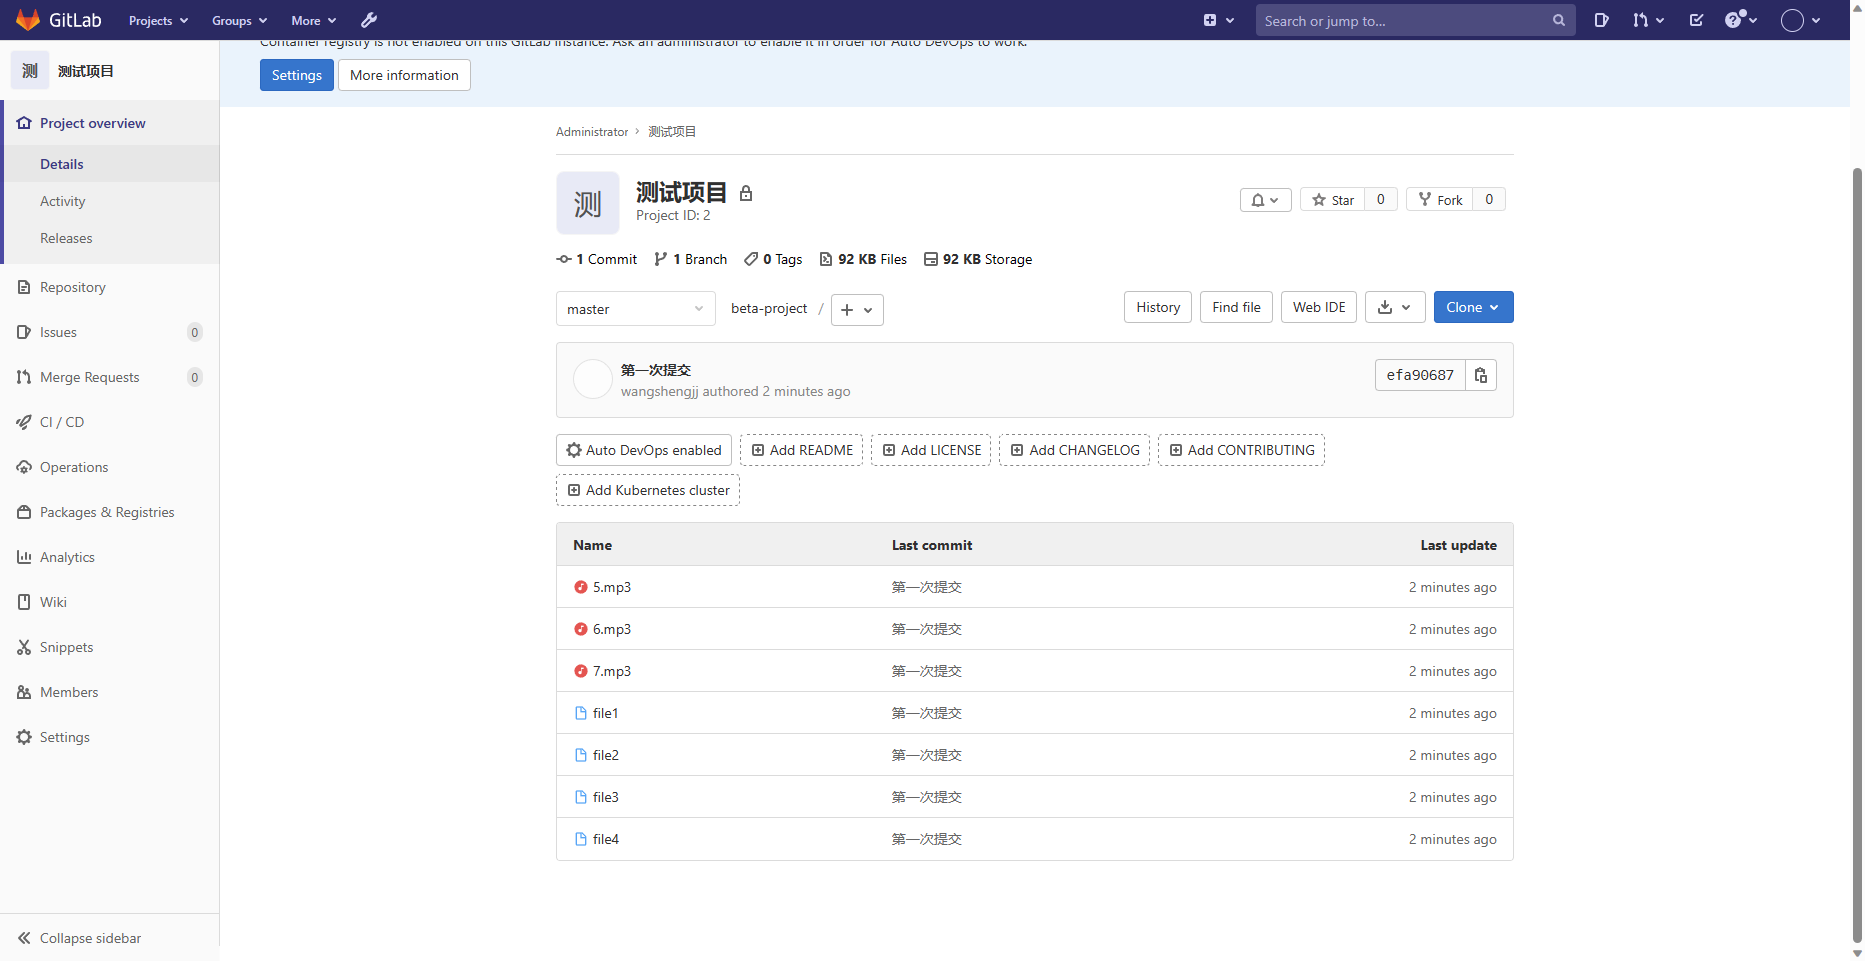
10.上传文件到远程仓库
A.先初始化
[root@zabbix_server beta-project]# git init
重新初始化现存的 Git 版本库于 /root/beta-project/.git/
B.随便创建一个测试文件
[root@zabbix_server beta-project]# touch file{1..4}
[root@zabbix_server beta-project]# touch {5..7}.mp3
[root@zabbix_server beta-project]# ls
5.mp3  6.mp3  7.mp3  file1  file2  file3  file4
C.先上传到本地仓库
[root@zabbix_server beta-project]# git add .
[root@zabbix_server beta-project]# git commit -m "第一次提交"
[master(根提交) efa9068] 第一次提交
 7 files changed, 0 insertions(+), 0 deletions(-)
 create mode 100644 5.mp3
 create mode 100644 6.mp3
 create mode 100644 7.mp3
 create mode 100644 file1
 create mode 100644 file2
 create mode 100644 file3
 create mode 100644 file4
D.上传到远程仓库
[root@zabbix_server beta-project]# git push -u origin master
Username for 'http://gitlab.linux.com': root	#gitlab的用户名
Password for 'http://root@gitlab.linux.com': 	#gitlab的密码
Counting objects: 3, done.
Compressing objects: 100% (2/2), done.
Writing objects: 100% (3/3), 267 bytes | 0 bytes/s, done.
Total 3 (delta 0), reused 0 (delta 0)
To http://gitlab.linux.com/root/beta-project.git
 * [new branch]      master -> master
分支 master 设置为跟踪来自 origin 的远程分支 master。
E.查看Gitlab远程仓库的web端
F.创建公开仓库
【Linux应用系列教程】Git分布式版本控制器
https://www.wsjj.top/archives/118
评论