

【Linux应用系列教程】ELK统一日志分析
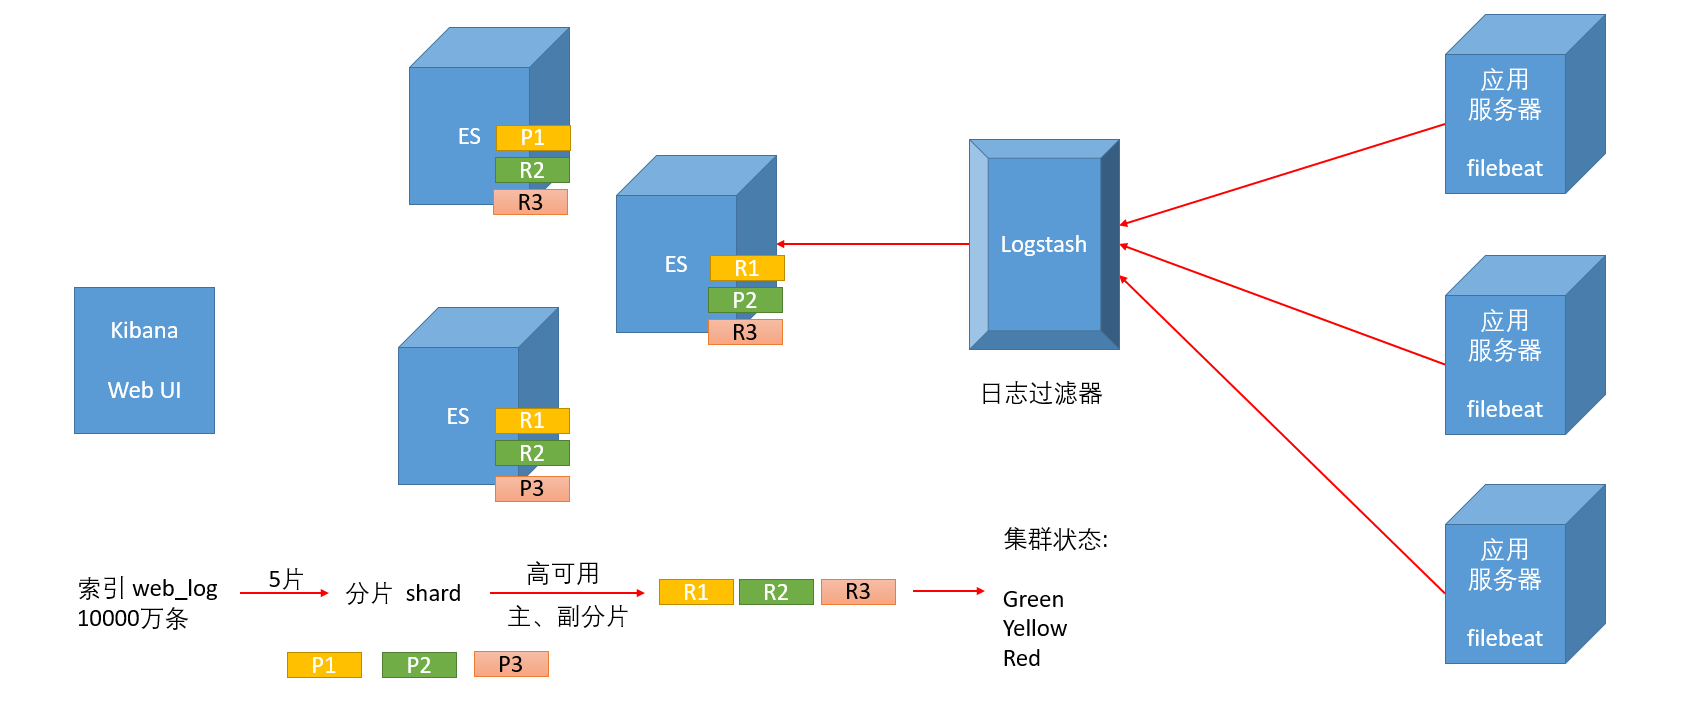
一、ELK核心组件介绍
Elasticsearch/ES- 分布式搜索引擎、存储引擎
- 作用: 提供存储日志、搜索日志
Logstash- 日志过滤器
- 根据特定的条件筛选日志
Kibana- 提供
web UI界面
- 提供
beats- 基于
golang语言开发 - 日志搜集器
filebeat- 适用于搜集应用程序的日志
topbeat- 适用于搜集系统级别的日志
winlogbeat- 适用于搜集windows服务器的日志
packetbeat- 适用于搜集网络设备的日志
- 基于
二、部署Elasticsearch
1.环境准备
为了防止遇到奇奇怪怪的
BUG,请务必增加master节点的配置!
| 主机名 | IP地址 | 安装的软件 | 推荐配置 |
|---|---|---|---|
| es-master.linux.com | 192.168.140.10 | jdk15、elasticsearch、kibana、logstash | 2c4g |
| es-node1.linux.com | 192.168.140.11 | jdk15、elasticsearch | 2c4g |
| es-node2.linux.com | 192.168.140.12 | jdk15、elasticsearch | 2c4g |
| webserver.linux.com | 192.168.140.13 | httpd、filebeat | 1c2g |
2.四台主机关闭防火墙和SElinux、配置时间同步
过程省略
3.配置免密SSH
[root@es-master ~]# ssh-keygen -t rsa
[root@es-master ~]# ssh-copy-id root@192.168.140.11
[root@es-master ~]# ssh-copy-id root@192.168.140.12
[root@es-master ~]# ssh-copy-id root@192.168.140.13
4.配置主机名解析
[root@es-master ~]# vim /etc/hosts
127.0.0.1   localhost localhost.localdomain localhost4 localhost4.localdomain4
::1         localhost localhost.localdomain localhost6 localhost6.localdomain6
192.168.140.10 es-master.linux.com es-master
192.168.140.11 es-node1.linux.com es-node1
192.168.140.12 es-node2.linux.com es-node2
192.168.140.13 webserver.linux.com webserver
把hosts文件拷贝给其他机器
[root@es-master ~]# for i in 11 12 13
> do
> scp /etc/hosts root@192.168.140.$i:/etc/
> done
hosts                                                     100%  334   288.0KB/s   00:00
hosts                                                     100%  334   225.5KB/s   00:00
hosts                                                     100%  334   318.0KB/s   00:00
5.在三台ES节点安装jdk15
A.下载jdk15
[root@es-master ~]# wget https://d6.injdk.cn/openjdk/openjdk/15/openjdk-15.0.2_linux-x64_bin.tar.gz
B.解压jdk15
[root@es-master ~]# tar xf openjdk-15.0.2_linux-x64_bin.tar.gz -C /usr/local
C.配置环境
[root@es-master ~]# vim /etc/profile
#在文件末尾添加以下内容
export JAVA_HOME=/usr/local/jdk-15.0.2
export PATH=$PATH:$JAVA_HOME/bin
[root@es-master ~]# source /etc/profile
[root@es-master ~]# java -version
openjdk version "15.0.2" 2021-01-19
OpenJDK Runtime Environment (build 15.0.2+7-27)
OpenJDK 64-Bit Server VM (build 15.0.2+7-27, mixed mode, sharing)
D.拷贝jdk环境给另外两台ES节点
[root@es-master ~]# for i in 11 12
> do
> scp -r /usr/local/jdk-15.0.2/ root@192.168.140.$i:/usr/local/
> scp -r /etc/profile root@192.168.140.$i:/etc/
> done
E.让环境生效,并测试jdk环境
[root@es-node1 ~]# source /etc/profile
[root@es-node1 ~]# java -version
openjdk version "15.0.2" 2021-01-19
OpenJDK Runtime Environment (build 15.0.2+7-27)
OpenJDK 64-Bit Server VM (build 15.0.2+7-27, mixed mode, sharing)
[root@es-node2 ~]# source /etc/profile
[root@es-node2 ~]# java -version
openjdk version "15.0.2" 2021-01-19
OpenJDK Runtime Environment (build 15.0.2+7-27)
OpenJDK 64-Bit Server VM (build 15.0.2+7-27, mixed mode, sharing)
6.三个ES节点优化系统参数
A.修改系统文件限制和进程限制
[root@es-master ~]# vim /etc/security/limits.conf
#在文件末尾添加以下内容
* soft nofile 65536
* hard nofile 65536
* soft noproc 2048
* hard noproc 4096
*是所有用户
* soft nofile 65536软限制系统最大打开文件数65536
* hard nofile 65536硬限制系统最大打开文件数65536
* soft noproc 2048软限制系统最大进程数2048
* hard noproc 4096硬限制系统最大进程数4096
B.修改系统内存限制和文件限制
[root@es-master ~]# vim /etc/sysctl.conf
vm.max_map_count=262144
fs.file-max=655360
vm.max_map_count=262144内存最大映射数262144
fs.file-max=655360文件系统最大文件数655360
C.让配置生效
[root@es-master ~]# sysctl -p
vm.max_map_count = 262144
fs.file-max = 655360
D.把修改好的文件拷贝给另外两台ES节点
[root@es-master ~]# for i in 11 12
> do
> scp -r /etc/security/limits.conf root@192.168.140.$i:/etc/security/
> scp -r /etc/sysctl.conf root@192.168.140.$i:/etc/
> ssh root@192.168.140.$i sysctl -p
> done

limits.conf                                                                           100% 2500   560.5KB/s   00:00
sysctl.conf                                                                           100%  492   430.9KB/s   00:00
vm.max_map_count = 262144
fs.file-max = 655360
limits.conf                                                                           100% 2500     3.1MB/s   00:00
sysctl.conf                                                                           100%  492   148.7KB/s   00:00
vm.max_map_count = 262144
fs.file-max = 655360
7.创建elk用户
因为
elk启动的时候需要普通用户
[root@es-master ~]# for i in 10 11 12
> do
> ssh root@192.168.140.$i useradd elk
> ssh root@192.168.140.$i id elk
> done

uid=1001(elk) gid=1001(elk) 组=1001(elk)
uid=1001(elk) gid=1001(elk) 组=1001(elk)
uid=1001(elk) gid=1001(elk) 组=1001(elk)
8.准备httpd服务器
提前准备好
httpd服务器,方便后续日志收集
关于httpd(Apache)搭建教程:https://www.wsjj.top/archives/69
A.前往webserver配置
[root@webserver ~]# yum install -y httpd
B.创建测试页面
删除默认的页面
[root@webserver ~]# rm -rf /etc/httpd/conf.d/welcome.conf
创建测试页面
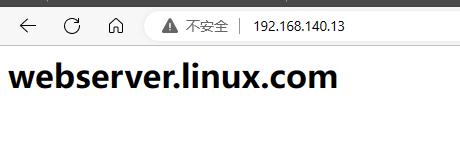
[root@webserver ~]# vim /var/www/html/index.html
<h1>webserver.linux.com</h1>
[root@webserver ~]# vim /var/www/html/music.html
<h1>music</h1>
启动服务,并测试
[root@webserver ~]# systemctl enable --now httpd

9.回到es-master节点规划软件安装目录
[root@es-master ~]# for i in 10 11 12
> do
> ssh root@192.168.140.$i mkdir -p /app/elk
> done
10.下载需要的软件包
A.下载软件包
如果没有
wget命令,请安装yum install -y wget
[root@es-master ~]# wget https://artifacts.elastic.co/downloads/elasticsearch/elasticsearch-7.17.10-linux-x86_64.tar.gz
[root@es-master ~]# wget https://artifacts.elastic.co/downloads/kibana/kibana-7.17.10-linux-x86_64.tar.gz
[root@es-master ~]# wget https://artifacts.elastic.co/downloads/logstash/logstash-7.17.10-linux-x86_64.tar.gz
B.解压软件
[root@es-master ~]# tar xf elasticsearch-7.17.10-linux-x86_64.tar.gz -C /app/elk/
[root@es-master ~]# tar xf kibana-7.17.10-linux-x86_64.tar.gz -C /app/elk/
[root@es-master ~]# tar xf logstash-7.17.10-linux-x86_64.tar.gz -C /app/elk/
[root@es-master ~]# ls /app/elk
elasticsearch-7.17.10  kibana-7.17.10-linux-x86_64  logstash-7.17.10
C.修改目录权限
因为
elk启动的时候需要普通用户,这个用户必须对目录拥有权限
[root@es-master ~]# chown -R elk.elk /app/elk
D.拷贝软件给另外两台ES节点
[root@es-master ~]# rsync -av /app/elk/elasticsearch-7.17.10/ root@192.168.140.11:/app/elk/elasticsearch-7.17.10
[root@es-master ~]# rsync -av /app/elk/elasticsearch-7.17.10/ root@192.168.140.12:/app/elk/elasticsearch-7.17.10
11.配置ES集群
A.必要的准备
[root@es-master ~]# su - elk #建议使用普通用户操作
创建数据目录
[elk@es-master ~]$ mkdir /app/elk/elasticsearch-7.17.10/data
[elk@es-master ~]$ cp /app/elk/elasticsearch-7.17.10/config/elasticsearch.yml /app/elk/elasticsearch-7.17.10/config/elasticsearch.yml.bak
B.修改配置文件
修改主节点配置文件
[elk@es-master ~]$ vim /app/elk/elasticsearch-7.17.10/config/elasticsearch.yml
#配置文件并不完整,仅展示修改的部分
cluster.name: es	#集群名字
node.name: es-master	#节点名字,建议和主机名一致
path.data: /app/elk/elasticsearch-7.17.10/data	#指定数据目录
path.logs: /app/elk/elasticsearch-7.17.10/logs	#指定日志存放目录

network.host: 192.168.140.10	#监听地址,本机IP
http.port: 9200	#监听端口,保持默认即可
transport.tcp.port: 9300	#指定集群之间的通信端口,此行需要自行添加
discovery.seed_hosts: ["192.168.140.10:9300", "192.168.140.11:9300","192.168.140.12:9300"]	#指定集群节点
cluster.initial_master_nodes: ["192.168.140.10:9300"]	#指定集群主节点

#以下内容配置文件中没有,请自行在文件末尾添加
node.master: true
node.data: true
node.ingest: false
node.ml: false
cluster.remote.connect: false

http.cors.enabled: true
http.cors.allow-origin: true
关于节点类型说明:
Master node- 负责集群自身的管理操作;例如创建索引、添加节点、删除节点
node.master: true
Data node- 负责数据读写
- 建议实际部署时,使用高内存、高硬盘的服务器
node.data: true
Ingest node- 预处理节点
- 负责数据预处理(解密、压缩、格式转换)
Client node- 负责路由用户的操作请求
node.master: falsenode.data: false
C.拷贝主配置文件给另外两个ES节点
[elk@es-master ~]$ exit
登出
[root@es-master ~]# rsync -av /app/elk/elasticsearch-7.17.10/ root@192.168.140.11:/app/elk/elasticsearch-7.17.10
[root@es-master ~]# rsync -av /app/elk/elasticsearch-7.17.10/ root@192.168.140.12:/app/elk/elasticsearch-7.17.10
D.修改另外2个ES节点的配置文件
es-node1.linux.com
[root@es-node1 ~]# su - elk
[elk@es-node1 ~]$ vim /app/elk/elasticsearch-7.17.10/config/elasticsearch.yml
#配置文件并不完整,仅展示修改的部分
cluster.name: es	#集群名字
node.name: es-node1	#节点名字,建议和主机名一致
path.data: /app/elk/elasticsearch-7.17.10/data	#指定数据目录
path.logs: /app/elk/elasticsearch-7.17.10/logs	#指定日志存放目录

network.host: 192.168.140.11	#监听地址,本机IP
http.port: 9200	#监听端口,保持默认即可
transport.tcp.port: 9300	#指定集群之间的通信端口,此行需要自行添加
discovery.seed_hosts: ["192.168.140.10:9300", "192.168.140.11:9300","192.168.140.12:9300"]	#指定集群节点
cluster.initial_master_nodes: ["192.168.140.10:9300"]	#指定集群主节点

#以下内容配置文件中没有,请自行在文件末尾添加
node.master: false
node.data: true
node.ingest: false
node.ml: false
cluster.remote.connect: false

http.cors.enabled: true
http.cors.allow-origin: "*"
es-node2.linux.com
[root@es-node2 ~]# su - elk
[elk@es-node2 ~]$ vim /app/elk/elasticsearch-7.17.10/config/elasticsearch.yml
#配置文件并不完整,仅展示修改的部分
cluster.name: es	#集群名字
node.name: es-node2	#节点名字,建议和主机名一致
path.data: /app/elk/elasticsearch-7.17.10/data	#指定数据目录
path.logs: /app/elk/elasticsearch-7.17.10/logs	#指定日志存放目录

network.host: 192.168.140.12	#监听地址,本机IP
http.port: 9200	#监听端口,保持默认即可
transport.tcp.port: 9300	#指定集群之间的通信端口,此行需要自行添加
discovery.seed_hosts: ["192.168.140.10:9300", "192.168.140.11:9300","192.168.140.12:9300"]	#指定集群节点
cluster.initial_master_nodes: ["192.168.140.10:9300"]	#指定集群主节点

#以下内容配置文件中没有,请自行在文件末尾添加
node.master: false
node.data: true
node.ingest: false
node.ml: false
cluster.remote.connect: false

http.cors.enabled: true
http.cors.allow-origin: "*"
12.启动ES集群
-d后台启动
防止奇奇怪怪的报错,再给一次权限
[root@es-master ~]# chown -R elk.elk /app/elk/	#一定要登录root用户改权限
[root@es-node1 ~]# chown -R elk.elk /app/elk/
[root@es-node2 ~]# chown -R elk.elk /app/elk/
[root@es-master ~]# su - elk	#启动需要普通用户
上一次登录:二 5月 23 13:21:25 CST 2023pts/0 上
[elk@es-master ~]$ /app/elk/elasticsearch-7.17.10/bin/elasticsearch -d
[elk@es-node1 ~]$ /app/elk/elasticsearch-7.17.10/bin/elasticsearch -d
[elk@es-node2 ~]$ /app/elk/elasticsearch-7.17.10/bin/elasticsearch -d
检查是否后台启动
[root@es-master ~]# netstat -tunlp | grep java
tcp6       0      0 192.168.140.10:9200     :::*                    LISTEN      25761/java
tcp6       0      0 192.168.140.10:9300     :::*                    LISTEN      25761/java
[elk@es-node1 ~]$ netstat -tunlp | grep java
(Not all processes could be identified, non-owned process info
 will not be shown, you would have to be root to see it all.)
tcp6       0      0 192.168.140.11:9300     :::*                    LISTEN      7776/java
tcp6       0      0 192.168.140.11:9200     :::*                    LISTEN      7776/java
[elk@es-node2 ~]$ netstat -tunlp | grep java
(Not all processes could be identified, non-owned process info
 will not be shown, you would have to be root to see it all.)
tcp6       0      0 192.168.140.12:9300     :::*                    LISTEN      4065/java
tcp6       0      0 192.168.140.12:9200     :::*                    LISTEN      4065/java
13.查看ES集群的状态
[elk@es-master ~]$ curl -X GET "http://192.168.140.10:9200/_cluster/health?pretty"
{
  "cluster_name" : "es",
  "status" : "green",
  "timed_out" : false,
  "number_of_nodes" : 3,
  "number_of_data_nodes" : 3,
  "active_primary_shards" : 3,
  "active_shards" : 6,
  "relocating_shards" : 0,
  "initializing_shards" : 0,
  "unassigned_shards" : 0,
  "delayed_unassigned_shards" : 0,
  "number_of_pending_tasks" : 0,
  "number_of_in_flight_fetch" : 0,
  "task_max_waiting_in_queue_millis" : 0,
  "active_shards_percent_as_number" : 100.0
}
三、部署Kibana
1.备份配置文件
[elk@es-master ~]$ cp /app/elk/kibana-7.17.10-linux-x86_64/config/kibana.yml /app/elk/kibana-7.17.10-linux-x86_64/config/kibana.yml.bak
2.修改配置文件
[elk@es-master ~]$ vim /app/elk/kibana-7.17.10-linux-x86_64/config/kibana.yml
#配置文件并不完整,仅展示修改的部分
server.port: 5601	#指定监听端口
server.host: "192.168.140.10"	#指定监听地址
elasticsearch.hosts: ["http://192.168.140.10:9200"]	#指定es服务端地址
3.启动服务
[elk@es-master ~]$ nohup /app/elk/kibana-7.17.10-linux-x86_64/bin/kibana &
[elk@es-master ~]$ netstat -tunlp | grep node
(Not all processes could be identified, non-owned process info
 will not be shown, you would have to be root to see it all.)
tcp        0      0 192.168.140.10:5601     0.0.0.0:*               LISTEN      64393/node
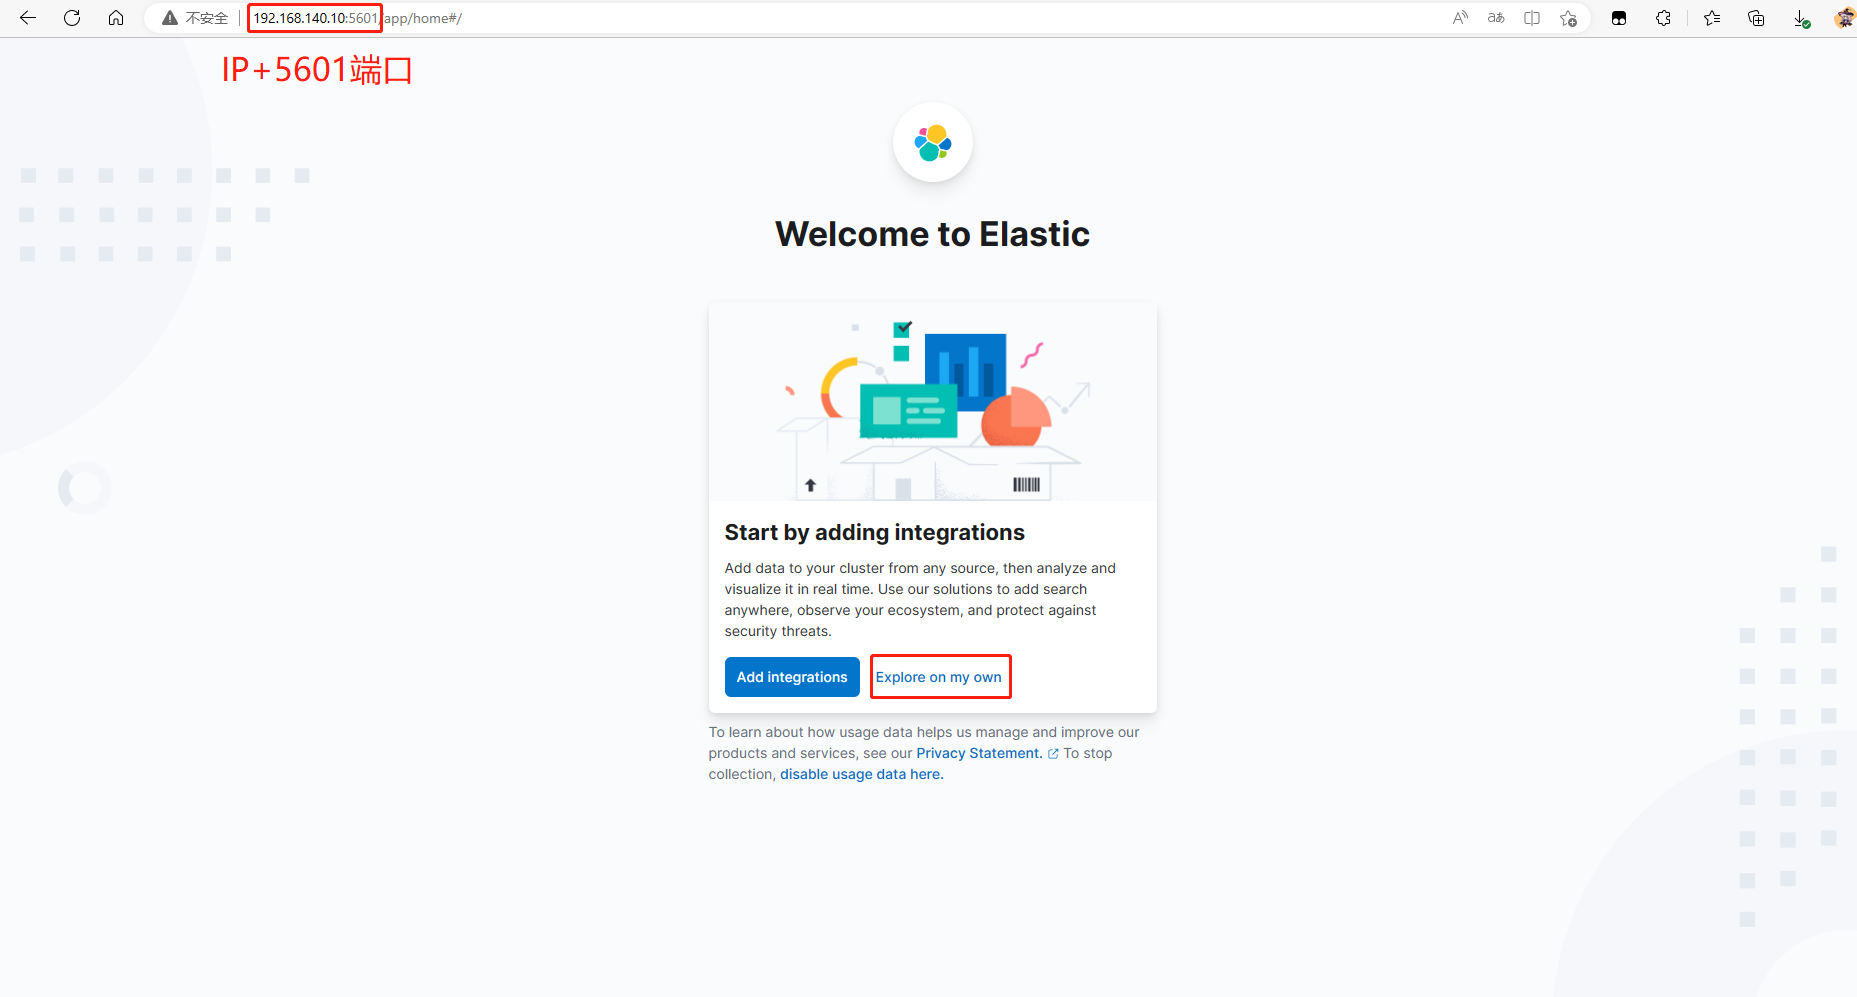
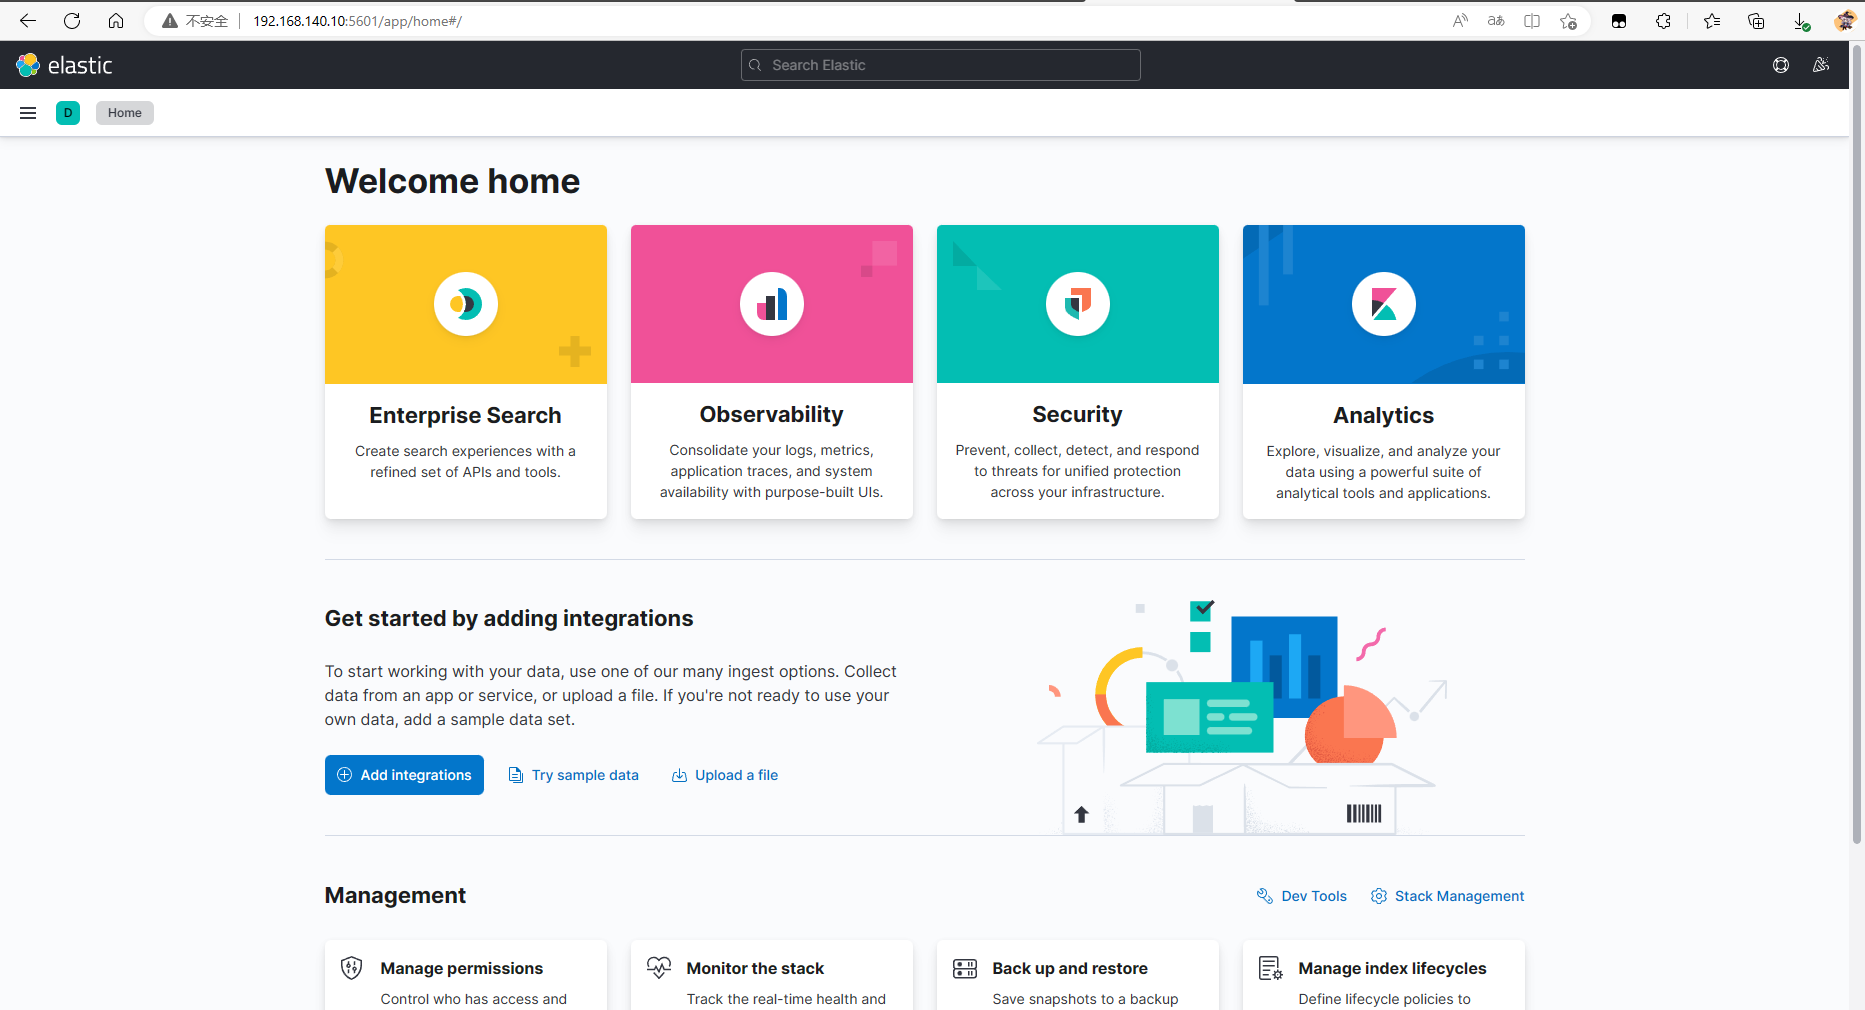
4.测试Web UI
四、配置Logstash
1.修改配置文件
[elk@es-master ~]$ cp /app/elk/logstash-7.17.10/config/logstash-sample.conf /app/elk/logstash-7.17.10/config/logstash.conf
[elk@es-master ~]$ vim /app/elk/logstash-7.17.10/config/logstash.conf
# Sample Logstash configuration for creating a simple
# Beats -> Logstash -> Elasticsearch pipeline.

input {
  beats {
    port => 5044
  }
}

filter {
   grok {
      match => { "message" => "%{COMBINEDAPACHELOG}" }	#开启日志过滤,详情在下面引用里
   }
}

output {
  elasticsearch {
    hosts => ["http://192.168.140.10:9200"]	#指定es服务器地址
    index => "httpd-access-%{YYYY.MM.dd}"	#名字自定义
    #user => "elastic"
    #password => "changeme"
  }
}
关于
Logstach内置的日志过滤
cat /app/elk/logstash-7.17.10/vendor/bundle/jruby/2.5.0/gems/logstash-patterns-core-4.3.4/patterns/legacy/
2.启动Logstach
A.关闭java的垃圾回收机制
[elk@es-master ~]$ vim /app/elk/logstash-7.17.10/config/jvm.options
#把以下三行注释掉
#8-13:-XX:+UseConcMarkSweepGC
#8-13:-XX:CMSInitiatingOccupancyFraction=75
#8-13:-XX:+UseCMSInitiatingOccupancyOnly
B.启动Logstach
-f指定配置文件路径
[elk@es-master ~]$ nohup /app/elk/logstash-7.17.10/bin/logstash -f /app/elk/logstash-7.17.10/config/logstash.conf &
C.检查服务状态
[elk@es-master ~]$ netstat -tunlp | grep java
(Not all processes could be identified, non-owned process info
 will not be shown, you would have to be root to see it all.)
tcp6       0      0 192.168.140.10:9200     :::*                    LISTEN      25761/java
tcp6       0      0 :::5044                 :::*                    LISTEN      116026/java
tcp6       0      0 192.168.140.10:9300     :::*                    LISTEN      25761/java
tcp6       0      0 127.0.0.1:9600          :::*                    LISTEN      116026/java
五、部署Filebeat
请在
webserver上操作
1.下载Filebeat
[root@webserver ~]# wget https://artifacts.elastic.co/downloads/beats/filebeat/filebeat-7.17.10-linux-x86_64.tar.gz
2.安装Filebeat
A.解压Filebeat
[root@webserver ~]# tar xf filebeat-7.17.10-linux-x86_64.tar.gz -C /usr/local
B.备份配置文件
[root@webserver ~]# cp /usr/local/filebeat-7.17.10-linux-x86_64/filebeat.yml /usr/local/filebeat-7.17.10-linux-x86_64/filebeat.yml.bak
C.修改配置文件
[root@webserver ~]# vim /usr/local/filebeat-7.17.10-linux-x86_64/filebeat.yml
#配置文件并不完整,请勿修改其他
# ============================== Filebeat inputs ===============================

filebeat.inputs:

- type: filestream
  id: my-filestream-id
  enabled: true	#启用
  paths:
    - /var/log/httpd/access_log	#指定日志
# ================================= Dashboards =================================
setup.dashboards.enabled: false	#删除注释,关闭本地的dashboards
# =================================== Kibana ===================================
setup.kibana:
  host: "192.168.140.10:5601"	#指定master节点
# ---------------------------- Elasticsearch Output ----------------------------
#output.elasticsearch:	#添加注释,不用本地的es
  # Array of hosts to connect to.
  #hosts: ["localhost:9200"]	#添加注释
# ------------------------------ Logstash Output -------------------------------
output.logstash:	#删除注释
  # The Logstash hosts
  hosts: ["192.168.140.10:5044"]	#填写master节点,指定远程logstach
D.启动Filebeat
[root@webserver ~]# nohup /usr/local/filebeat-7.17.10-linux-x86_64/filebeat -c /usr/local/filebeat-7.17.10-linux-x86_64/filebeat.yml &
E.检查是否启动
[root@webserver ~]# ps -aux | grep filebeat
root      10027  0.4  4.2 941320 78496 pts/0    Sl   16:45   0:00 /usr/local/filebeat-7.17.10-linux-x86_64/filebeat -c /usr/local/filebeat-7.17.10-linux-x86_64/filebeat.yml
六、浏览器测试
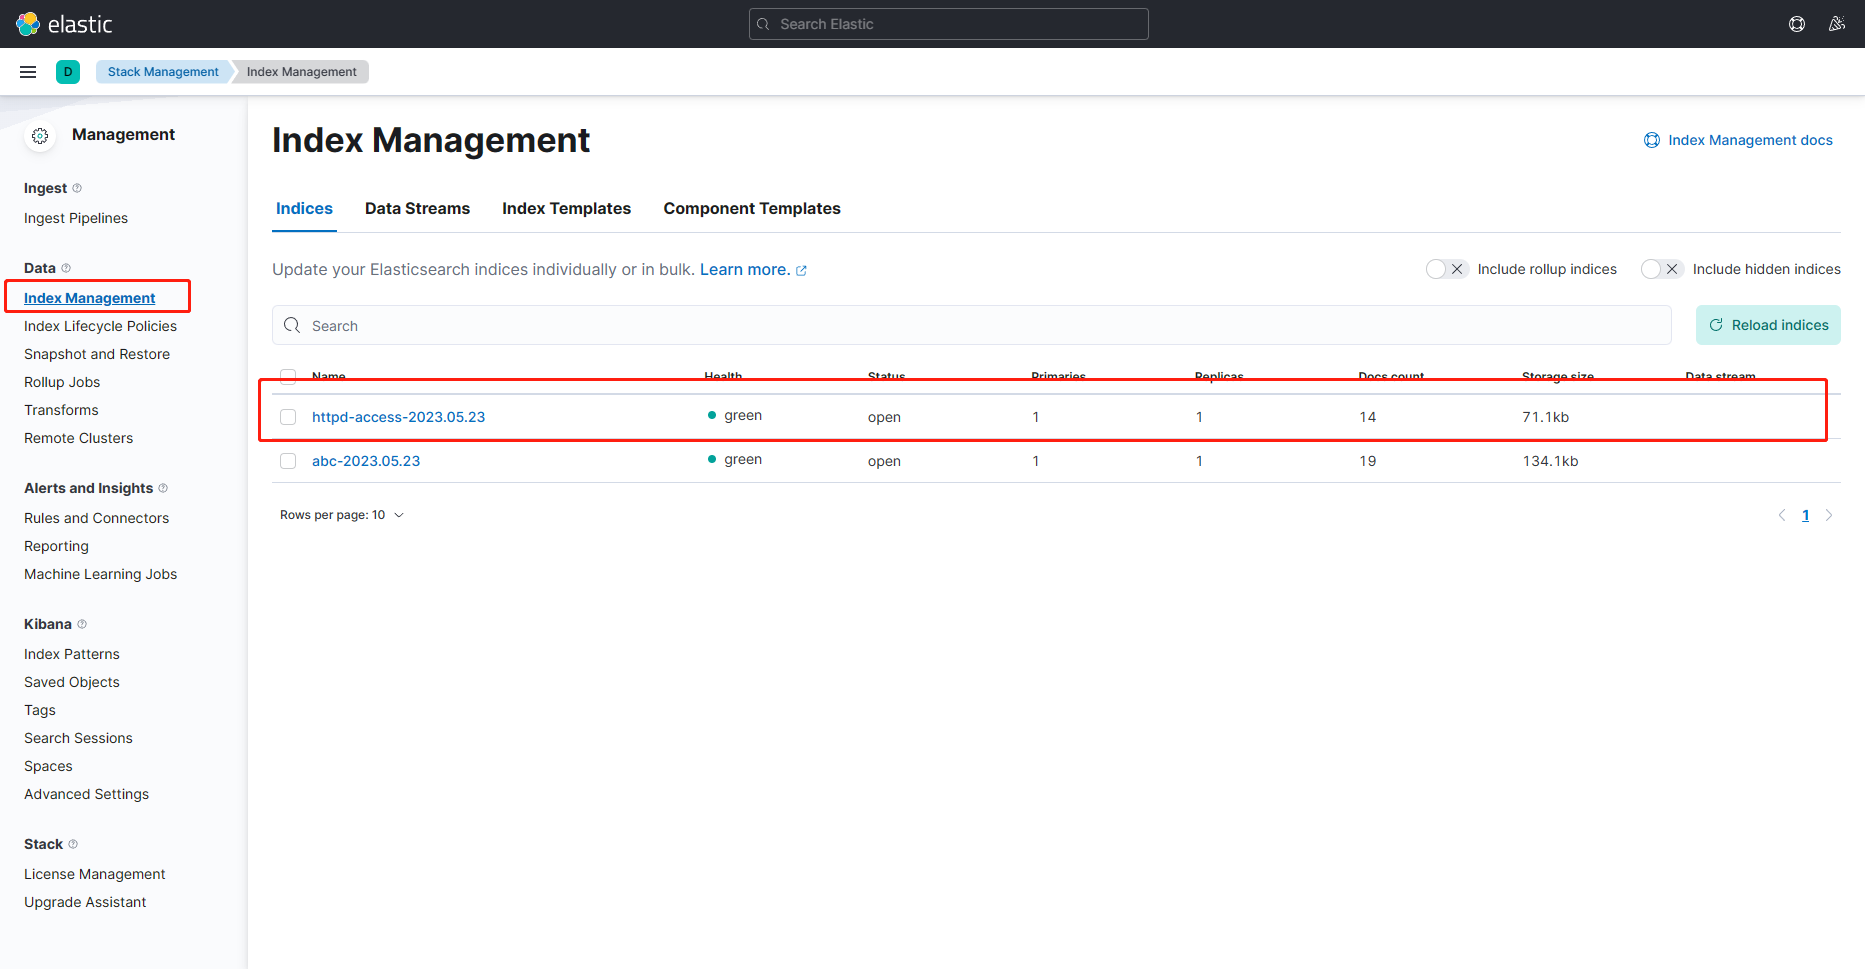
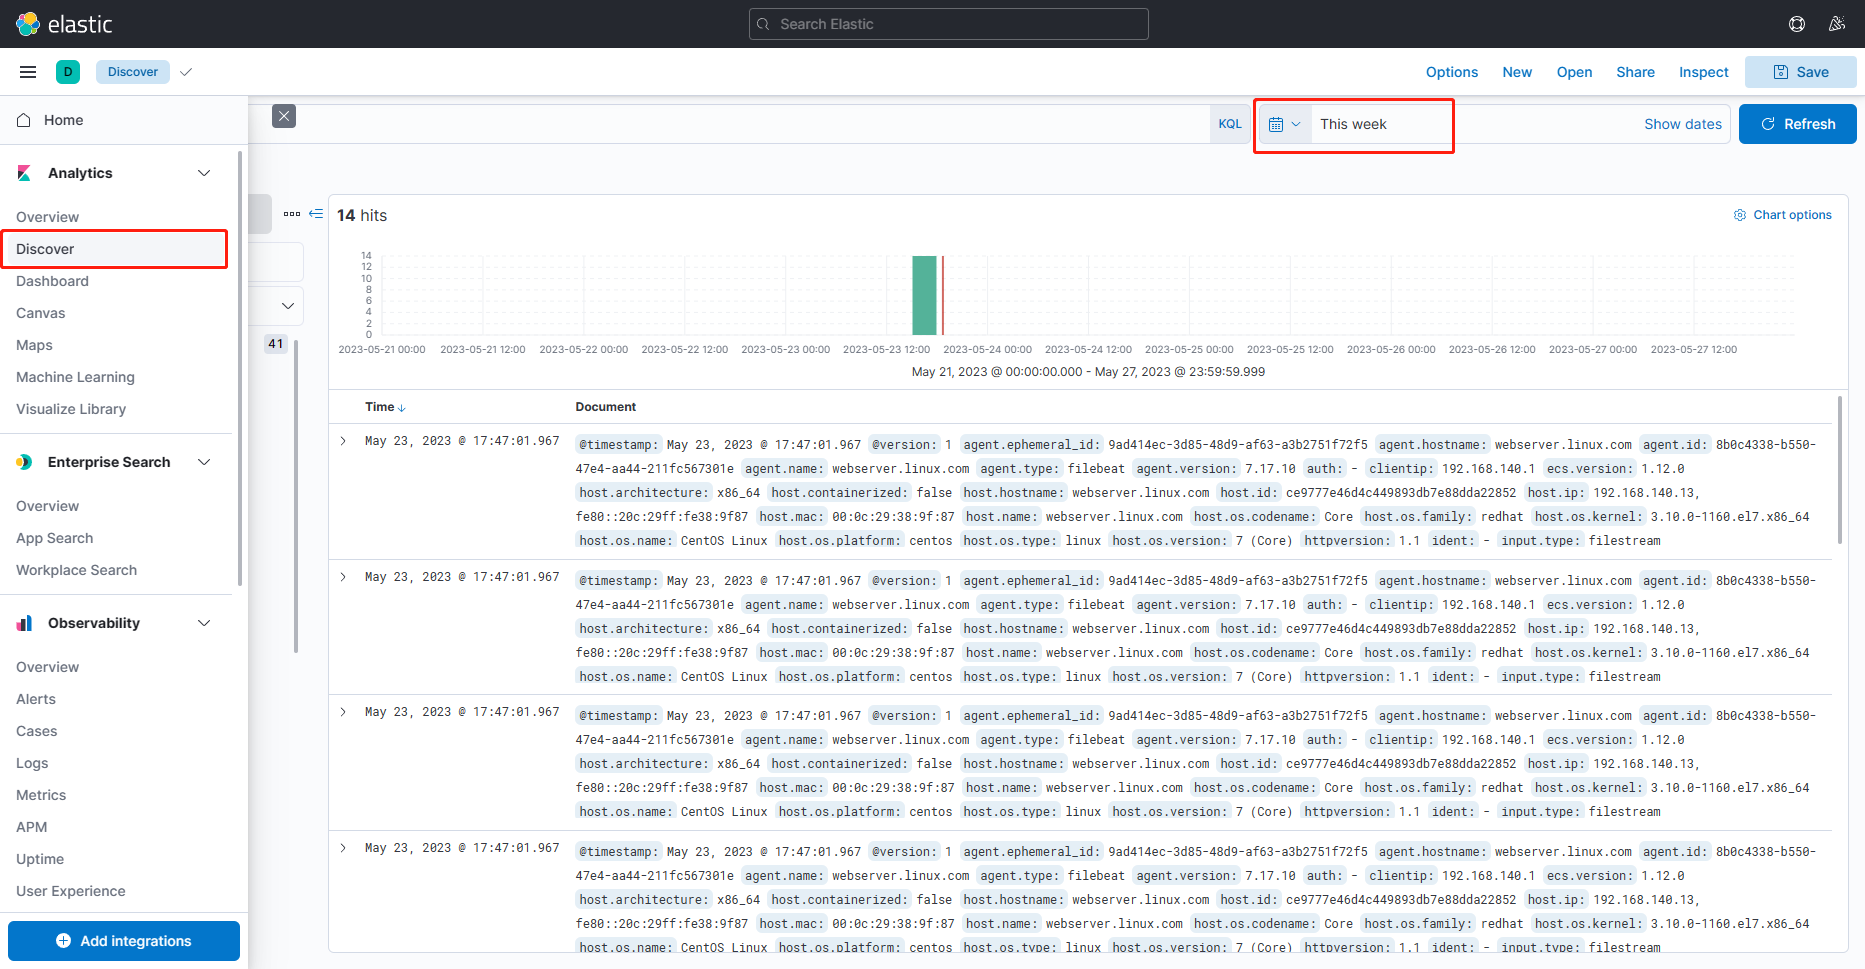
1.查看是否收集到了数据
有索引了
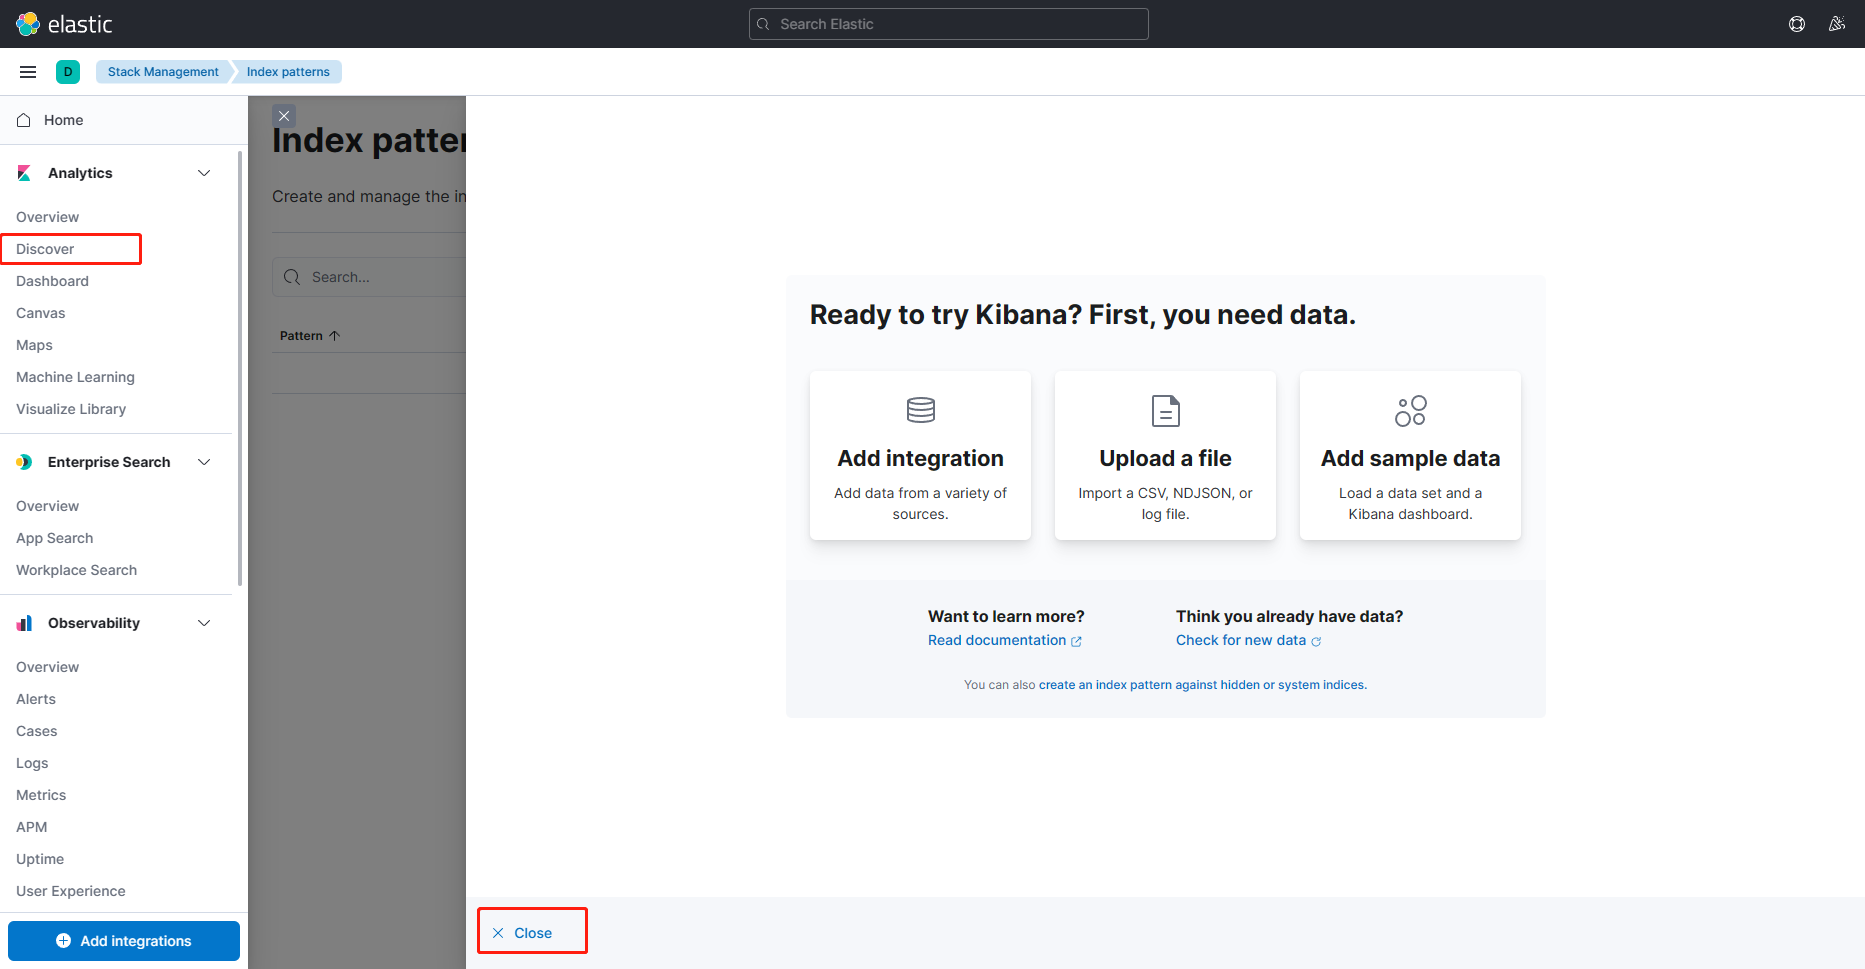
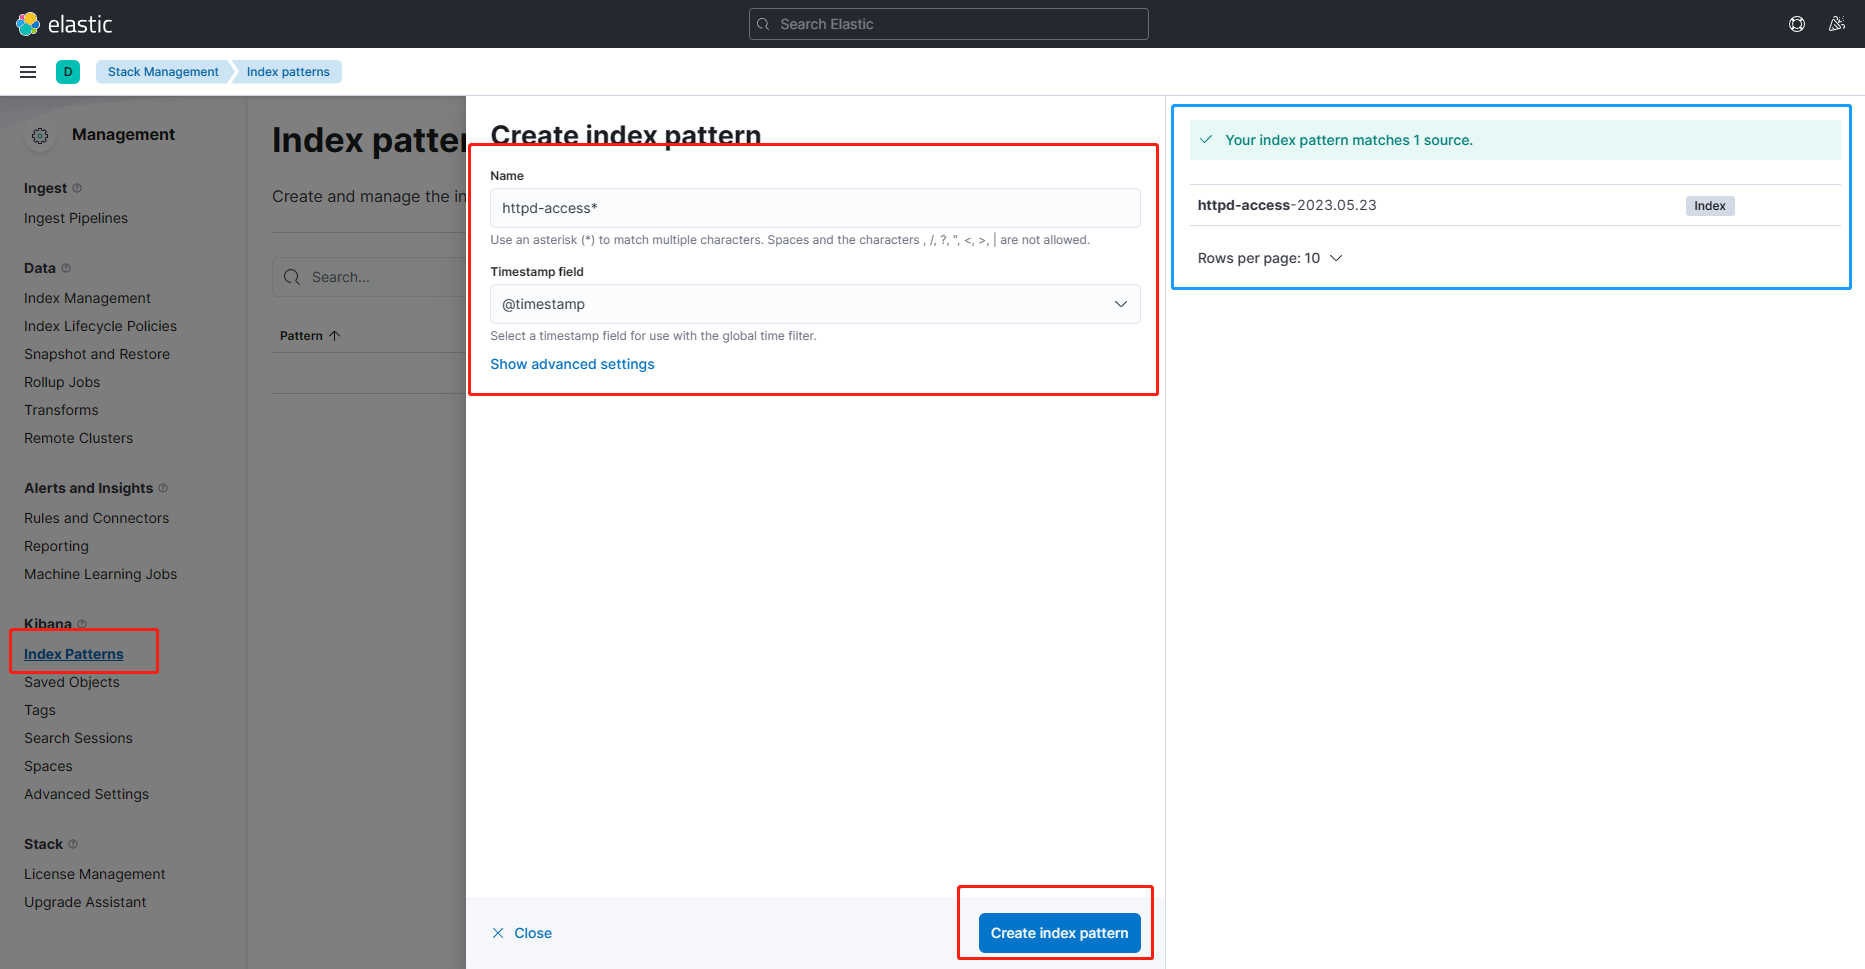
2.创建索引展示数据
3.创建图形web UV
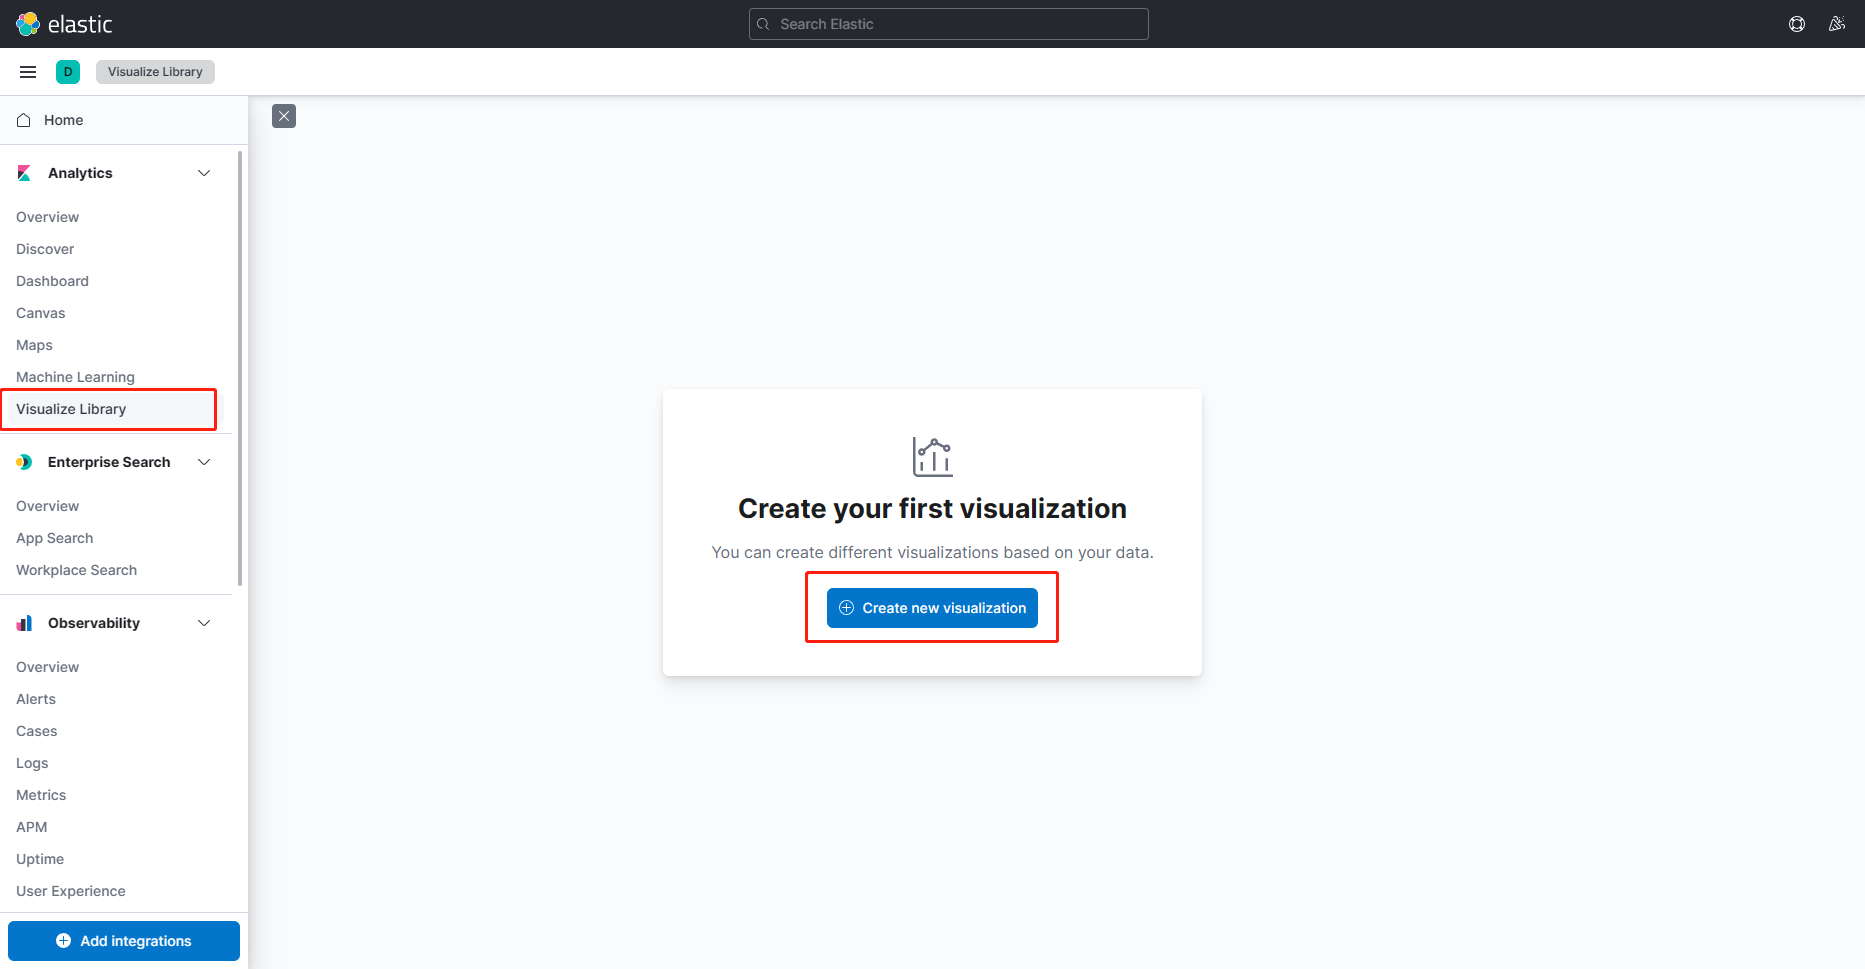

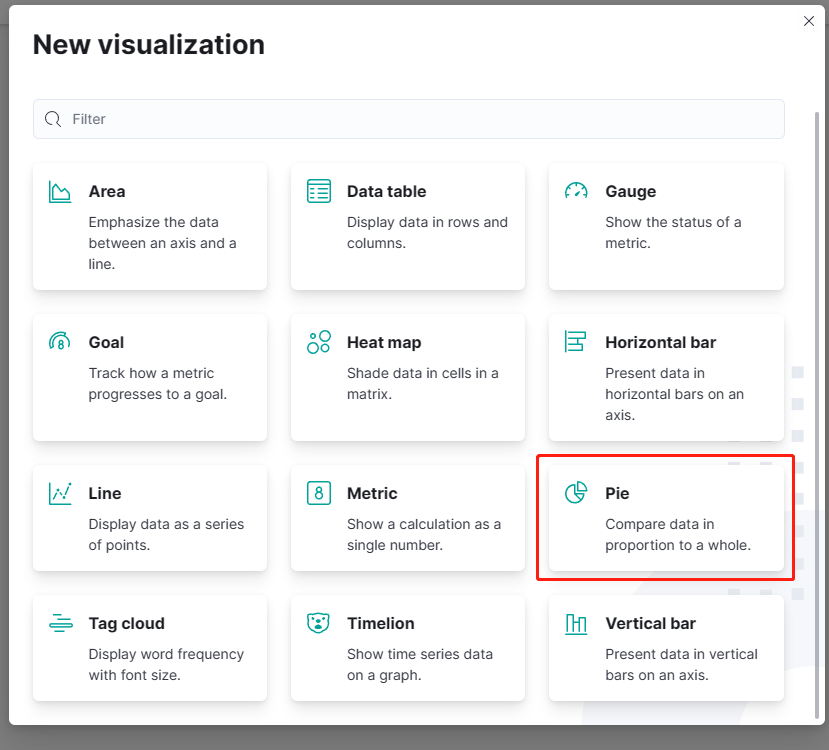

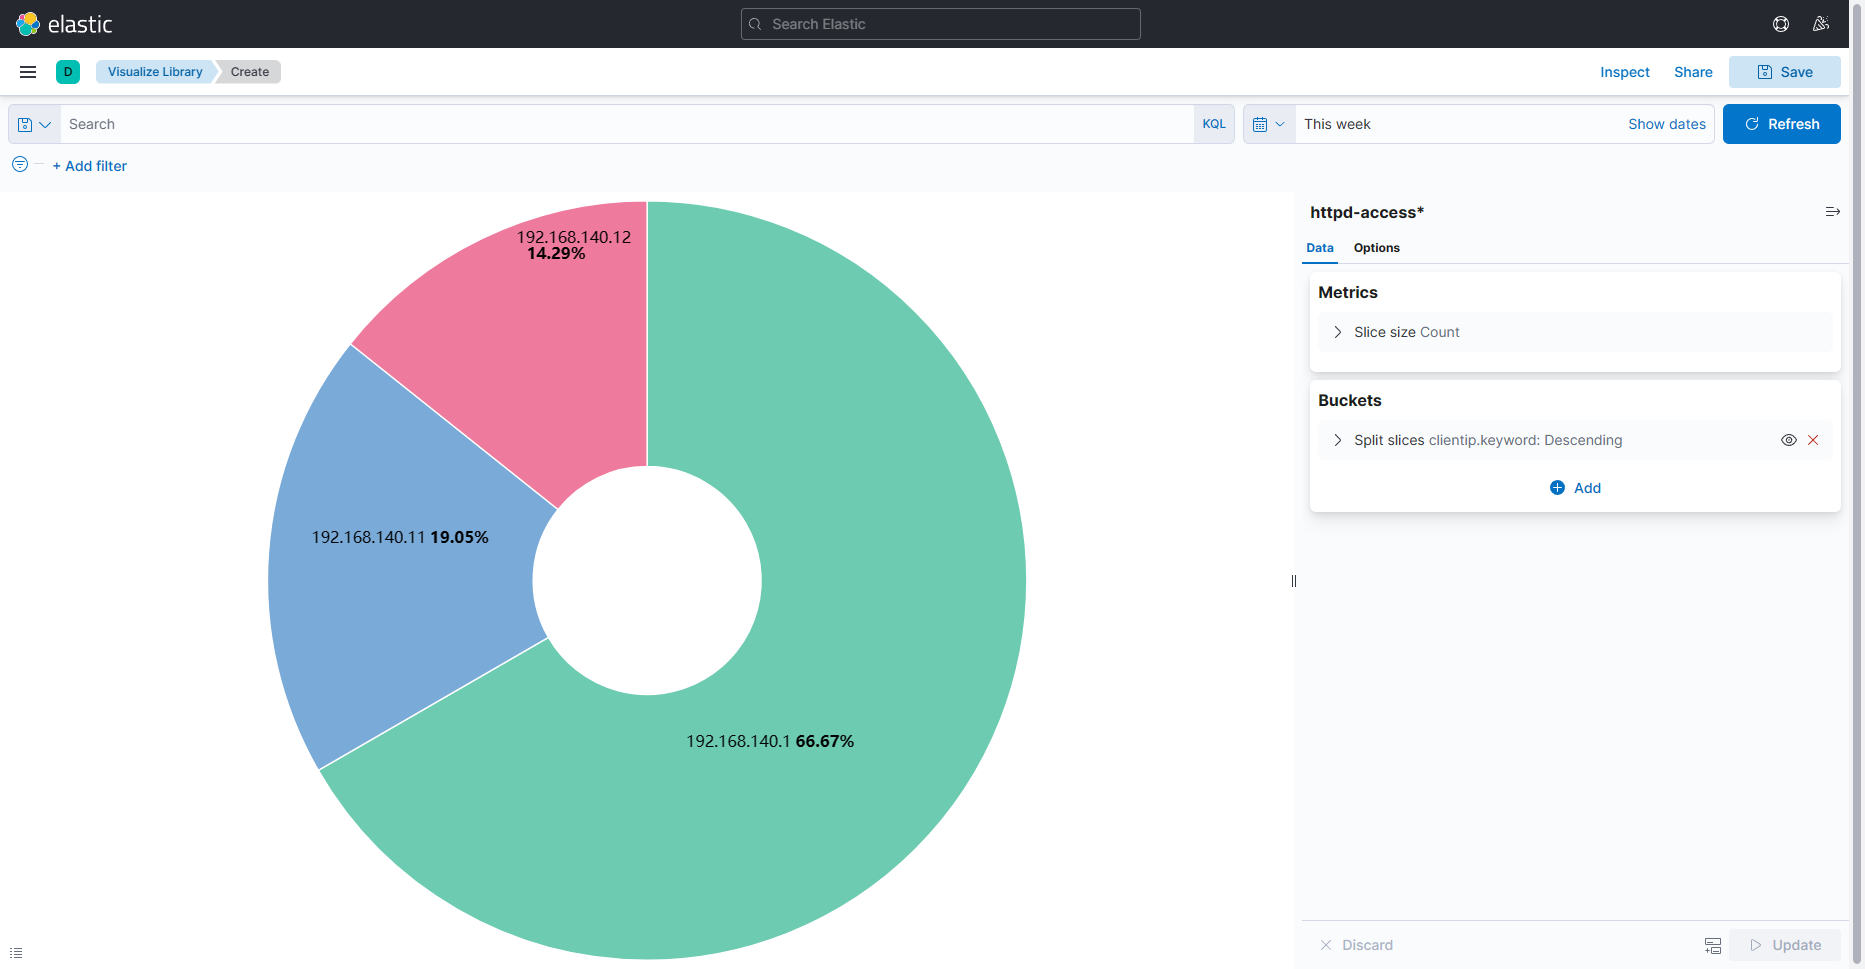
这里拿页面访问比例做图形测试

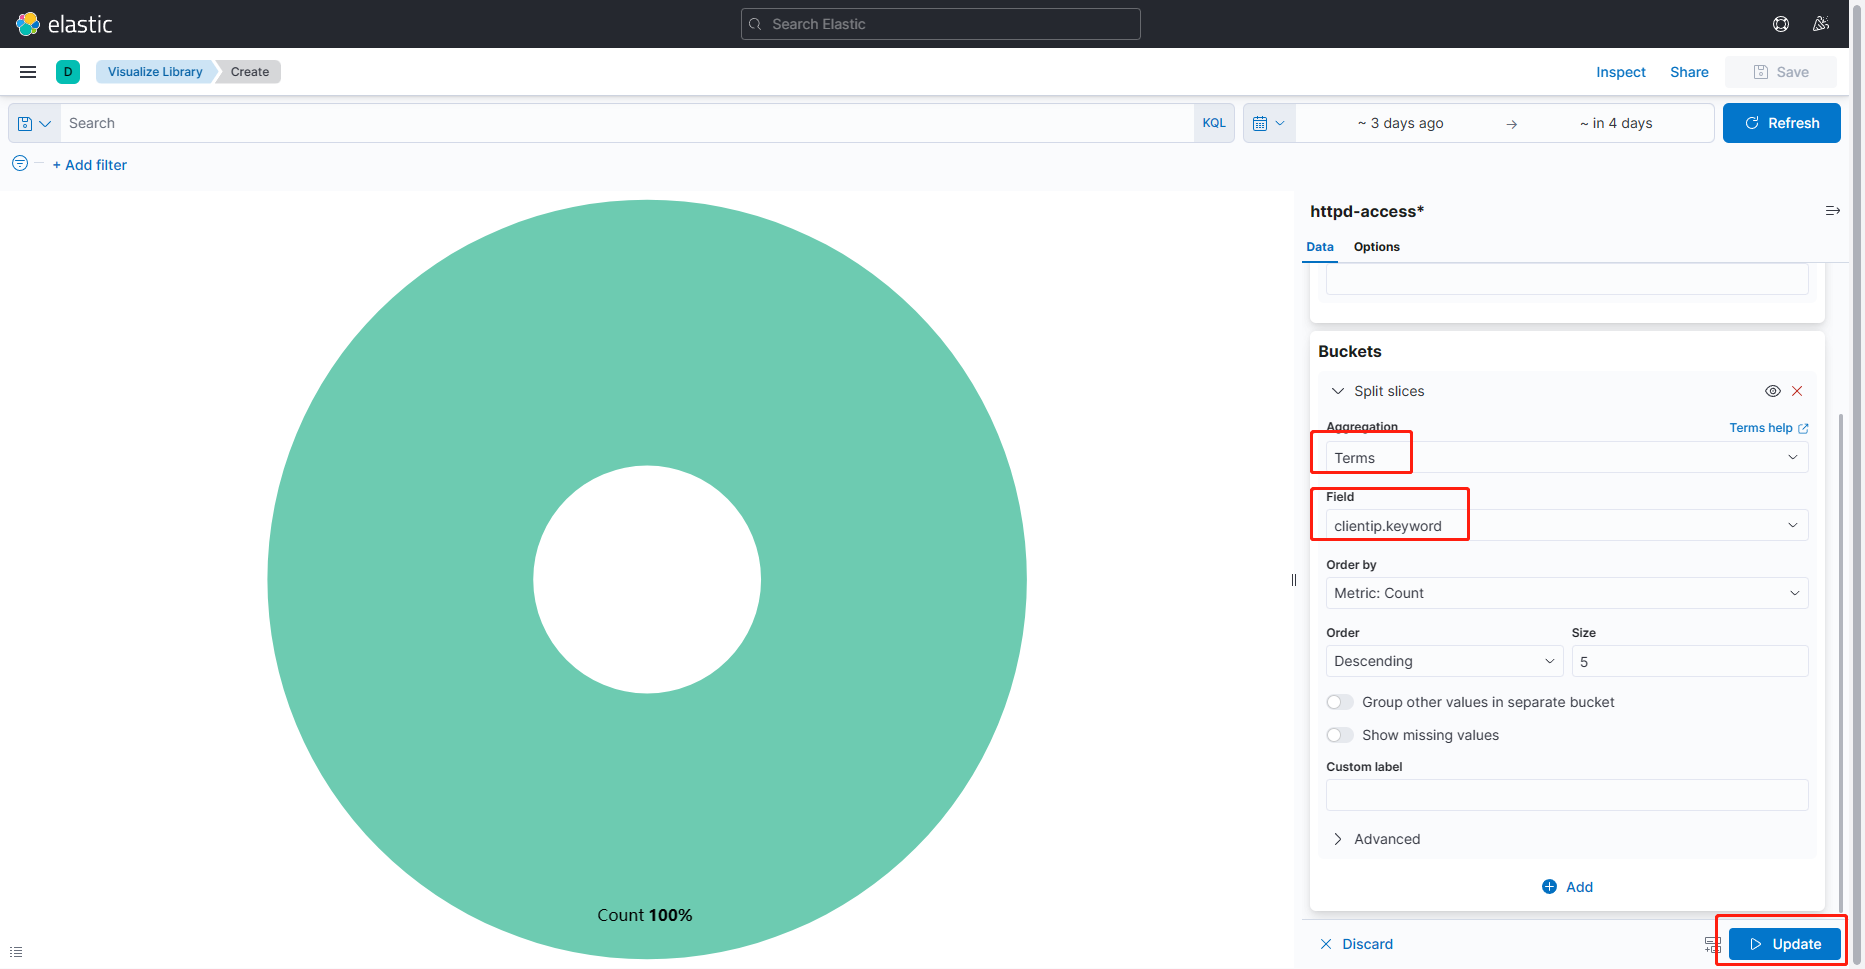
如果没有其他
IP的数据,请自行拿其他虚拟机访问测试
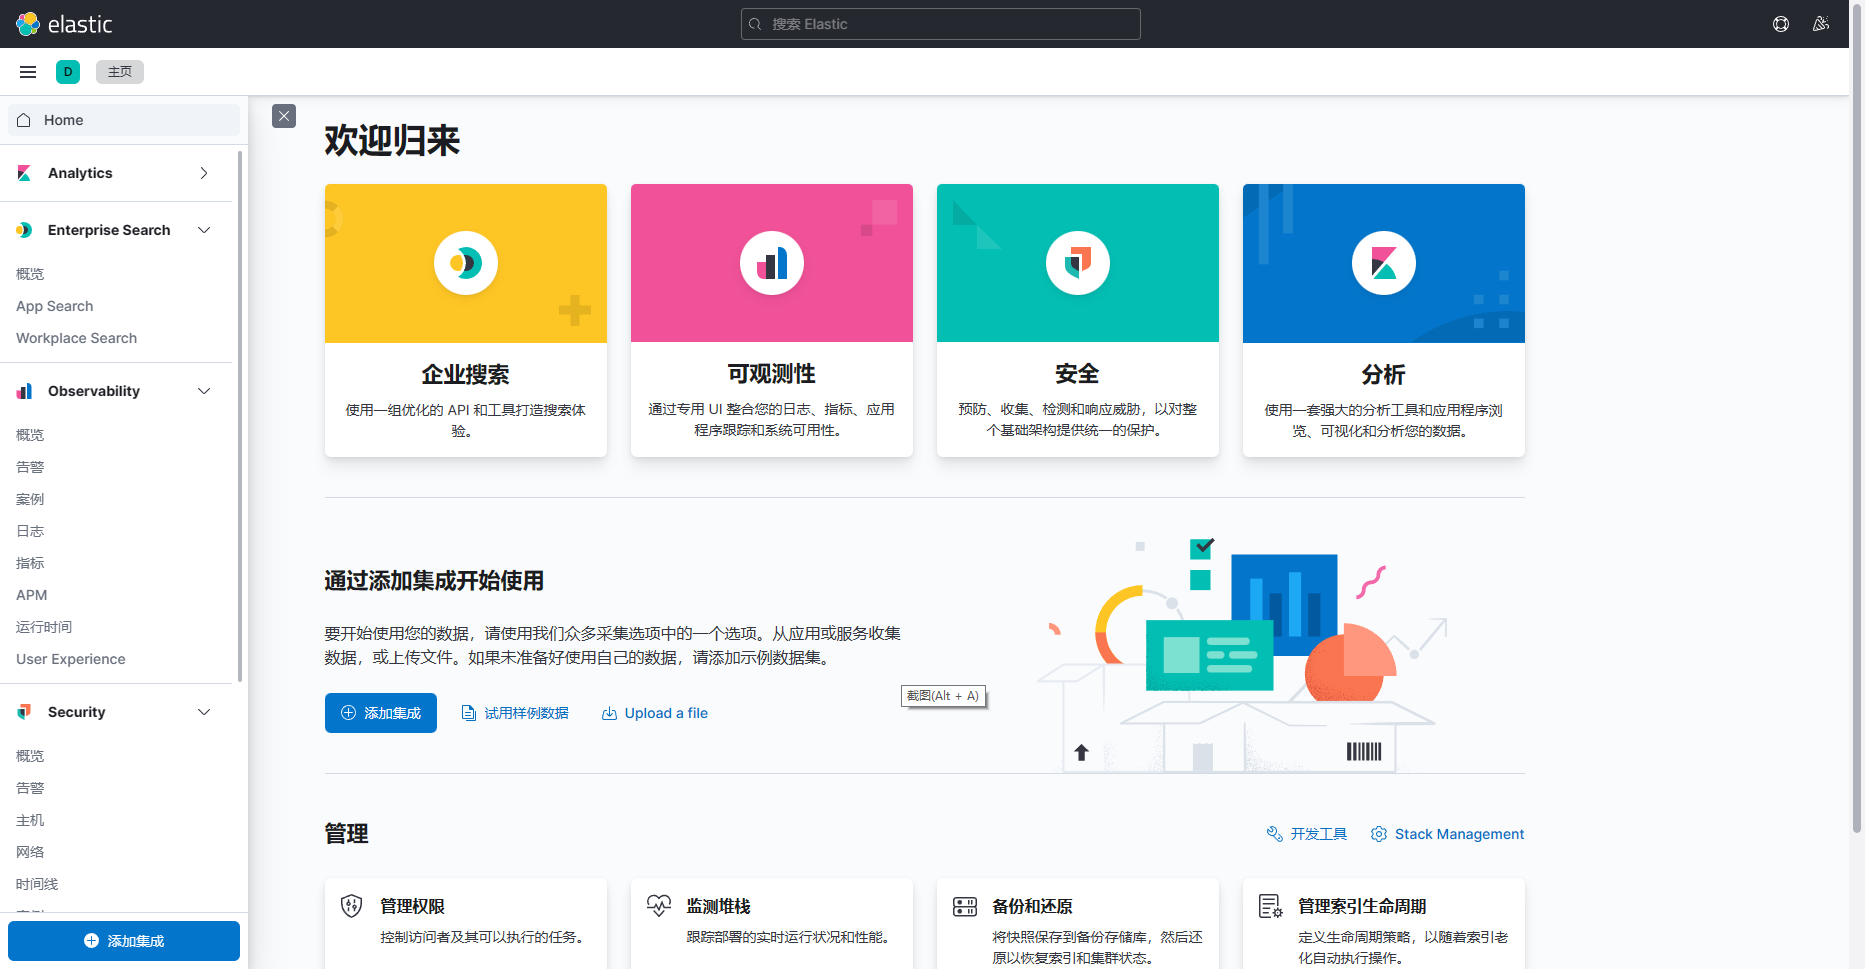
七、Kibana设置中文web UI
官方中文仅支持部分汉化
1.修改配置文件
[elk@es-master ~]$ vim /app/elk/kibana-7.17.10-linux-x86_64/config/kibana.yml
i18n.locale: "zh-CN"	#把默认es英文改正zh-CN中文
2.重启服务
[root@es-master ~]# netstat -tunlp | grep node
tcp        0      0 192.168.140.10:5601     0.0.0.0:*               LISTEN      5283/node
[root@es-master ~]# kill 5283
[elk@es-master ~]$ nohup /app/elk/kibana-7.17.10-linux-x86_64/bin/kibana &
3.访问web UI测试
【Linux应用系列教程】ELK统一日志分析
https://www.wsjj.top/archives/122
评论