

【Linux集群系列教程】HAProxy负载均衡集群
一、关于HAProxy
HAProxy是一个开源的、高性能的、基于TCP和HTTP应用的负载均衡软件,借助HAProxy可快速、可靠地提供基于TCP和HTTP应用的负载均衡解决方案
1.调度器类型
- 四层调度
- 仅能根据
IP地址、端口号进行调度 - LVS, nginx
- 仅能根据
- 七层调度
- 根据应用数据
HTTP协议进行调度 - nginx
- 根据应用数据
2.HAProxy特性
- 可靠性和
稳定性非常好 - 最高可以同时维护
40000–50000个并发连接,单位时间内处理的最大请求数为20000个,最大数据处理能力可达10Gbps - 支持多于
8种负载均衡算法 ,同时也支持session保持 - 支持
虚拟主机功能 - 从
HAProxy 1.3版本后开始支持连接拒绝、全透明代理等功能 HAProxy拥有一个功能强大的服务器状态监控页面HAProxy拥有功能强大的ACL支持
3.HAProxy配置文件结构
- global
- 全局配置、进程数、日志等
- defaults
- 默认参数
- frontend
- 定义虚拟服务、调度算法
- backend
- 定义后端real server
- listen
- 配置监听、用于展示监控页面、用于配置虚拟服务
二、HAProxy配置文件解析
配置文件默认路径:
/etc/haproxy/haproxy.cfg
1.global全局配置
global
	nbproc 1	# 指定haproxy启动的进程数
	maxconn 4096	# 最大连接数
	user nobody	# 指定haproxy进程启动的用户
	group nobody
	daemon		# 后台启动
	pidfile /usr/local/haproxy/logs/haproxy.pid

日志级别:
	debug, info, notice, warn, error, alert, emercy
2.defaults默认配置
defaults
    timeout connect 10	# 连接real server的超时时间,单位毫秒
    timeout client 20s	# 连接客户端的超时时间
    timeout server 30s	# real server连接客户端的超时时间
3.frontend定义虚拟服务
frontend xxxxx	# 定义虚拟服务的名称
	bind IP:port	# 定义虚拟服务监听的IP及端口
	mode {tcp|http}	# 工作模式; http: 七层调度    tcp:四层调度
	option forwardfor	# 后端服务器记录日志时,记录真实客户端地址
	option httpclose	# 优化参数, 高并发场景下,haproxy会自动断开连接时间过长的客户端请求
	use_backend XXX		# 定义后端服务器
	default_backend XXX	# 定义默认后端服务器
4.backend定义后端real server
backend xxxxxxx		# 定义后端服务器的名称
	mode {tcp|http}
	option abortonclose	# 优化参数, 高并发场景下让后端服务器自动结束处理时间较长的请求
	option redispatch	# 前端访问的时候,会检测后端服务器是否挂掉,如果挂掉会强制转向另一个没有挂掉的服务器上
	cookie SERVERID		# 植入cookie的时候,新增主机ID,让客户端访问的时候能找到刚刚访问的服务器
	balance roundrobin	# 调度算法
	server web1 10.1.1.1:80 cookie s1 weight 6 check inter 2000 rise 2 fall 3
	server web2 10.1.1.2:80 cookie s2 weight 6 check inter 2000 rise 2 fall 3
#cookie s1代表我们定义了一个名叫S1的主机ID,将来这个ID会加入到cookie里
#weight权重
#inter 2000 rise 2 fall 3 每2000毫秒,检测一次,如果超过3次无响应,则判定服务器已经挂掉,当服务器上线以后,超过2次回应,再上线服务器
A.支持的调度算法
roundrobin基于权重进行轮询调度的算法
static-rr基于权重进行轮询调度的算法,不过此算法为静态算法,在运行时调整其服务器权重不会生效
source源hash, 将同一个客户端的请求转发到同一个后端服务器
leastconn最少连接
uri此算法会对部分或整个URI进行HASH运算,再经过与服务器的总权重相除,最后转发到某台匹配的后端服务器上
uri_param此算法会根据URL路径中的参数进行转发,这样可保证在后端真实服务器数据不变时,同一个用户的请求始终分发到同一台机器上
B.健康状态检测
server web1 10.1.1.1:80 cookie server1 weight 6 check inter 2000 rise 2 fall 3
	web1	#后端服务器名称
	weight 6	#权重
	check inter 2000 rise 2 fall 3	#定义健康状态检查参数
C.会话保持配置
cookie SERVERID
server ..... cookie server1 .......
服务器在给客户端响应时,要在响应数据中插入事先指定的serverid, 用于实现会话保持
option redispatch
此参数用于cookie保持的环境中。在默认情况下,HAProxy会将其请求的后端服务器的serverID插入cookie中,以保证会话的session持久性。而如果后端服务器出现故障,客户端的cookie是不会刷新的,这就会造成无法访问。此时,如果设置了此参数,就会将客户的请求强制定向到另外一台健康的后端服务器上,以保证服务正常
5.listen配置监听
listen admin_status		# 定义服务名称
	bind 0.0.0.0:9188	# 服务监听的地址及端口
	stats refresh 30s	# 数据刷新的时间
	stats uri /haproxy-status	# 访问监控页面的uri地址
	stats realm Welcome login	# 用户名对话框提示信息
	stats auth admin:admin		# 认证的用户名、密码
	stats hide-version	# 监控页面不显示软件版本信息
三、HAProxy的ACL功能
1.ACL介绍
ACL访问控制列表- 用于匹配
客户端访问请求 - 只能应用在
frontend、listen中 - 作用:
- 访问控制
- 七层调度
2.ACL语法
acl <acl名称> <匹配请求的方法> -i <具体条件>
-i忽略大小写
3.常用ACL方法
- hdr_reg(host)
- 以正则表达式的方式匹配主机名
acl test1 hdr_reg(host) -i www
- hdr_dom(host)
- 精确匹配主机名
acl test2 hdr_dom(host) -i music.linux.com
- hdr_beg(host)
- 匹配主机名以xxx开头
acl test3 hdr_beg(host) -i download.
- path_end
- url以xxxx结尾
acl test4 path_end -i .jpg .jpeg .gif .png
- path_beg
- url以xxxx开头
acl test5 path_beg -i https://
- url_ip
- 匹配数据目的IP
acl test5 url_ip 10.1.1.1
- src
- 匹配数据源IP
- method
- 匹配HTTP请求的方法;GET, POST
acl test7 method POST
示例1:实现七层调度
 acl www_policy	hdr_reg(host)  -i 	^(www.z.cn|z.cn)
        acl bbs_policy		hdr_dom(host)  -i   bbs.z.cn
        acl url_policy      url_sub		   -i       buy_sid=

        use_backend   server_www  if   www_policy
        use_backend   server_app   if  bbs_policy
        use_backend   server_bbs   if url_policy
示例2:实现七层调度
acl  host_www   hdr_beg(host)   -i www
        acl  host_static   hdr_beg(host)   -i img. vedio. download. ftp.

        use_backend  static   if host_static || host_www
示例3:实现数据过滤
 acl forbidden_dst   url_ip  192.168.0.0/16
        acl forbidden_dst   url_ip  172.16.0.0/12
        acl forbidden_dst   url_ip  10.0.0.0/8

        http-request deny if forbidden_dst
示例4:实现数据过滤
 acl  allow_host  src  192.168.200.150/32
        http-request  deny  if  !  allow_host
四、案例1:基于HAProxy实现web服务器调度
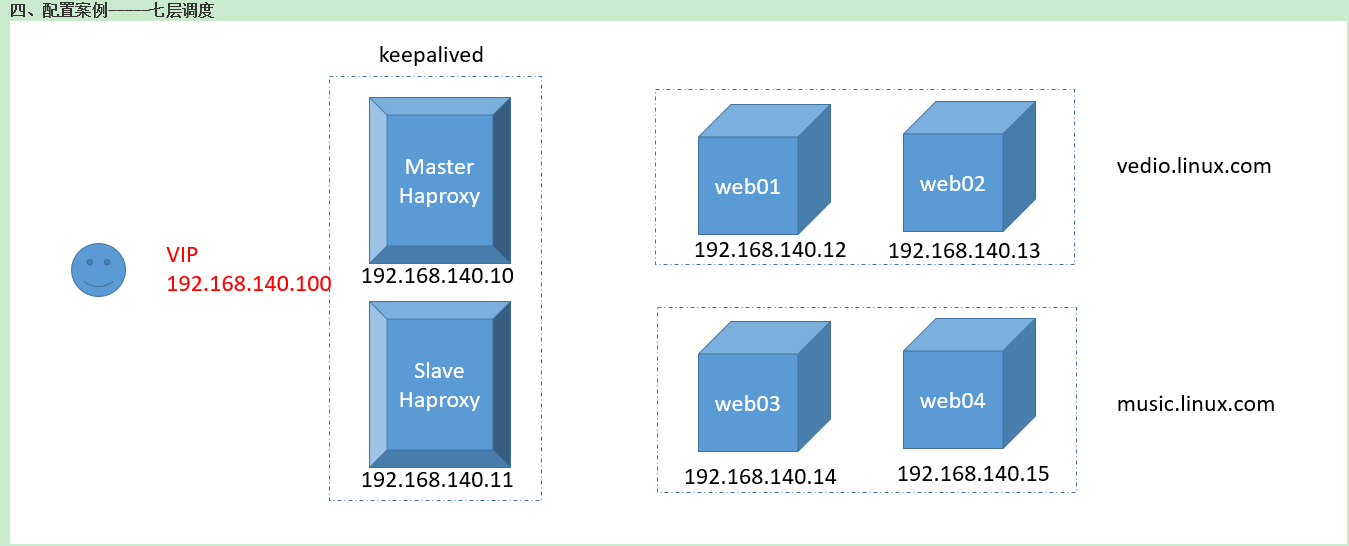
如图所示,需要准备
6台虚拟机
192.168.140.10主调度器
192.168.140.11备用调度器
192.168.140.12,web1服务器,跑着vedio业务
192.168.140.13,web2服务器,跑着vedio业务
192.168.140.14,web3服务器,跑着music业务
192.168.140.15,web4服务器,跑着music业务
1.关闭防火墙和SElinux、设置时间同步!
请务必设置时间同步!防止出现
脑裂现象!
2.配置虚拟网卡和静态IP
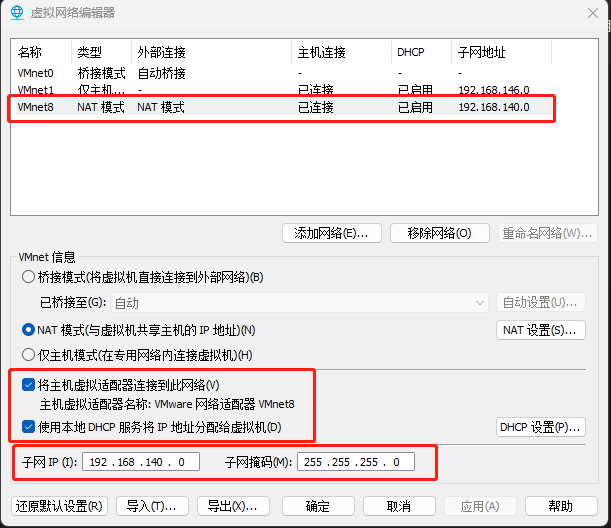
六台虚拟机都要修改网卡模式为NAT,默认NAT模式下使用VMnet8网卡

A.配置静态IP
过程省略
配置网卡教程:https://www.wsjj.top/archives/50
3.配置4台web服务器
192.168.140.12,web1服务器,跑着vedio业务
192.168.140.13,web2服务器,跑着vedio业务
192.168.140.14,web3服务器,跑着music业务
192.168.140.15,web4服务器,跑着music业务
[root@node1 ~]# yum install -y httpd
[root@node2 ~]# yum install -y httpd
[root@node3 ~]# yum install -y httpd
[root@node4 ~]# yum install -y httpd
A.创建index页面
[root@node1 ~]# vim /var/www/html/index.html
<h1>192.168.140.12 vedio</h1>
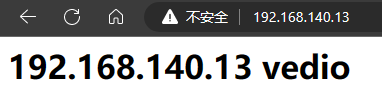
[root@node2 ~]# vim /var/www/html/index.html
<h1>192.168.140.13 vedio</h1>
[root@node3 ~]# vim /var/www/html/index.html
<h1>192.168.140.14 music</h1>
[root@node4 ~]# vim /var/www/html/index.html
<h1>192.168.140.15 music</h1>
B.启动httpd服务
[root@node1 ~]# systemctl enable --now httpd
[root@node2 ~]# systemctl enable --now httpd
[root@node3 ~]# systemctl enable --now httpd
[root@node4 ~]# systemctl enable --now httpd
C.浏览器测试访问


4.配置调度器
A.安装haproxy
[root@master01 ~]# yum install -y haproxy
[root@master02 ~]# yum install -y haproxy
B.在主调度器修改配置文件
[root@master01 ~]# vim /etc/haproxy/haproxy.cfg
global
log 127.0.0.1 local2
chroot /var/lib/haproxy
pidfile /var/run/haproxy.pid
maxconn 4000
user haproxy
group haproxy
daemon
# turn on stats unix socket
stats socket /var/lib/haproxy/stats
defaults
mode http
log global
option httplog
option dontlognull
option http-server-close
option forwardfor except 127.0.0.0/8
option redispatch
retries 3
timeout http-request 10s
timeout queue 1m
timeout connect 10s
timeout client 1m
timeout server 1m
timeout http-keep-alive 10s
timeout check 10s
maxconn 3000
frontend web_service
bind 0.0.0.0:80 #监听地址为所有地址
mode http #使用7层调度
option forwardfor #优化参数
acl vedio_policy hdr_reg(host) -i vedio #配置页面规则,当用户输入的域名包含vedio
acl music_policy hdr_reg(host) -i music
use_backend vedio_server if vedio_policy #匹配到上面的vedio规则,访问vedio服务器
use_backend music_server if music_policy
default_backend vedio_server
backend vedio_server #配置组名vedio
mode http #7层调度
balance roundrobin
server vedio1 192.168.140.12:80 check inter 2000 fall 3 rise 2
server vedio2 192.168.140.13:80 check inter 2000 fall 3 rise 2
backend music_server
mode http
balance roundrobin
server music1 192.168.140.14:80 check inter 2000 fall 3 rise 2
server music2 192.168.140.15:80 check inter 2000 fall 3 rise 2
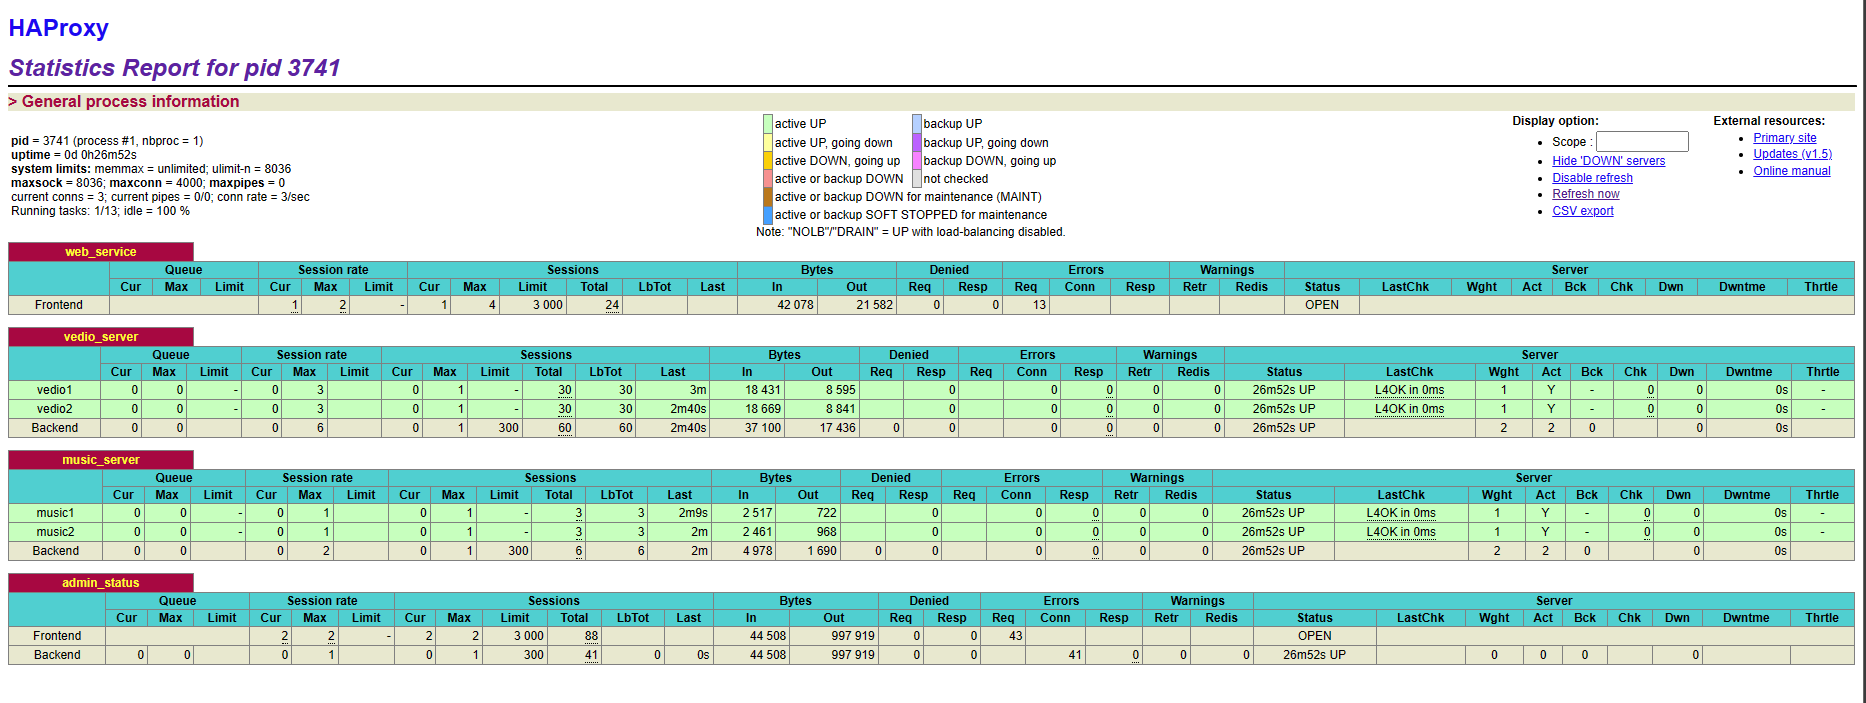
listen admin_status #配置状态页面
bind 0.0.0.0:8888 #配置监听IP和端口
mode http #使用7层调度
stats refresh 30s
stats uri /status #访问路径
stats realm please login #提示语句
stats auth admin:redhat #配置登录的账号和密码
stats hide-version #隐藏版本信息
启动主调度器上的HAProxy
[root@master01 ~]# systemctl start haproxy
[root@master01 ~]# systemctl enable haproxy
C.复制配置文件到备用调度器上
[root@master01 ~]# scp /etc/haproxy/haproxy.cfg root@192.168.140.11:/etc/haproxy/
D.启动备用调度器上的HAProxy
[root@master02 ~]# systemctl start haproxy
[root@master02 ~]# systemctl enable haproxy
5.两台调度器安装keepalived
用于实现
主备的效果
[root@master01 ~]# yum install -y keepalived
[root@master02 ~]# yum install -y keepalived
A.配置主调度器上的keepalived配置文件
[root@master01 ~]# vim /etc/keepalived/keepalived.conf

! Configuration File for keepalived

global_defs {
   router_id haproxy_master
}

vrrp_instance VI_1 {
    state MASTER	#主调度
    interface ens33
    virtual_router_id 51
    priority 100	#默认权重(0-255)
    advert_int 1
    authentication {
        auth_type PASS
        auth_pass redhat
    }
    virtual_ipaddress {
        192.168.140.100
    }
}
启动主调度器keepalived服务
[root@master01 ~]# systemctl start keepalived
[root@master01 ~]# systemctl enable keepalived
B.修改备用调度器上的keepalived配置文件
[root@master02 ~]# vim /etc/keepalived/keepalived.conf

! Configuration File for keepalived

global_defs {
   router_id haproxy_salve
}

vrrp_instance VI_1 {
    state BACKUP	#备用调度
    interface ens33
    virtual_router_id 51
    priority 50		#修改权重
    advert_int 1
    authentication {
        auth_type PASS
        auth_pass redhat
    }
    virtual_ipaddress {
        192.168.140.100
    }
}
启动备用调度器keepalived服务
[root@master02 ~]# systemctl start keepalived
[root@master02 ~]# systemctl enable keepalived
6.浏览器测试访问
A.修改Windows上的hosts文件


B.测试访问


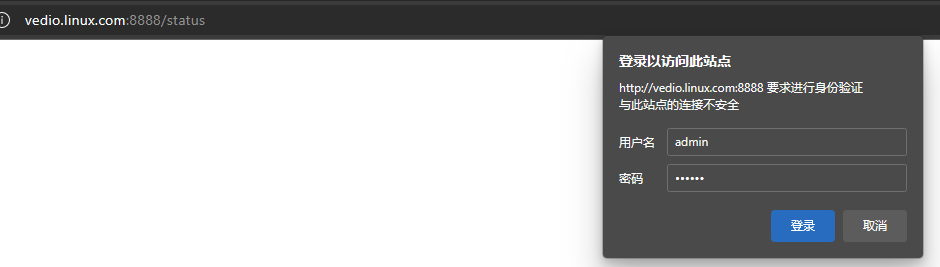
C.测试status页面
随便一个
域名都可以访问,这里的账号和密码,填写我们提前设置好的
五、案例2:基于HAProxy实现MySQL调度
首先准备
2台MySQL服务器
192.168.140.12和192.168.140.13
并且配置数据库互主互从策略
1.安装MySQL5.7
过程省略
MySQL安装教程:https://www.wsjj.top/archives/65
2.配置互主互从环境
过程省略
MySQL主从配置教程:https://www.wsjj.top/archives/76
A.查看两台MySQL数据库双主状态
mysql> show slave status \G;
*************************** 1. row ***************************
               Slave_IO_State: Waiting for master to send event
                  Master_Host: 192.168.140.13
                  Master_User: repluser
                  Master_Port: 3306
                Connect_Retry: 60
              Master_Log_File: master.000001
          Read_Master_Log_Pos: 154
               Relay_Log_File: node1-relay-bin.000002
                Relay_Log_Pos: 361
        Relay_Master_Log_File: master.000001
             Slave_IO_Running: Yes	#IO线程OK
            Slave_SQL_Running: Yes	#SQL线程OK
              Replicate_Do_DB:
          Replicate_Ignore_DB:
           Replicate_Do_Table:
       Replicate_Ignore_Table:
      Replicate_Wild_Do_Table:
  Replicate_Wild_Ignore_Table:
                   Last_Errno: 0
                   Last_Error:
                 Skip_Counter: 0
          Exec_Master_Log_Pos: 154
              Relay_Log_Space: 568
              Until_Condition: None
               Until_Log_File:
                Until_Log_Pos: 0
           Master_SSL_Allowed: No
           Master_SSL_CA_File:
           Master_SSL_CA_Path:
              Master_SSL_Cert:
            Master_SSL_Cipher:
               Master_SSL_Key:
        Seconds_Behind_Master: 0
Master_SSL_Verify_Server_Cert: No
                Last_IO_Errno: 0
                Last_IO_Error:
               Last_SQL_Errno: 0
               Last_SQL_Error:
  Replicate_Ignore_Server_Ids:
             Master_Server_Id: 13
                  Master_UUID: fd95c20c-e40d-11ed-ab10-000c29d2b7fd
             Master_Info_File: /var/lib/mysql/master.info
                    SQL_Delay: 0
          SQL_Remaining_Delay: NULL
      Slave_SQL_Running_State: Slave has read all relay log; waiting for more updates
           Master_Retry_Count: 86400
                  Master_Bind:
      Last_IO_Error_Timestamp:
     Last_SQL_Error_Timestamp:
               Master_SSL_Crl:
           Master_SSL_Crlpath:
           Retrieved_Gtid_Set:
            Executed_Gtid_Set: ee0e03c2-e40d-11ed-b369-000c290f55d2:1-2
                Auto_Position: 1
         Replicate_Rewrite_DB:
                 Channel_Name:
           Master_TLS_Version:
1 row in set (0.00 sec)
mysql> show slave status\G;
*************************** 1. row ***************************
               Slave_IO_State: Waiting for master to send event
                  Master_Host: 192.168.140.12
                  Master_User: repluser
                  Master_Port: 3306
                Connect_Retry: 60
              Master_Log_File: master.000001
          Read_Master_Log_Pos: 454
               Relay_Log_File: node2-relay-bin.000002
                Relay_Log_Pos: 661
        Relay_Master_Log_File: master.000001
             Slave_IO_Running: Yes
            Slave_SQL_Running: Yes
              Replicate_Do_DB:
          Replicate_Ignore_DB:
           Replicate_Do_Table:
       Replicate_Ignore_Table:
      Replicate_Wild_Do_Table:
  Replicate_Wild_Ignore_Table:
                   Last_Errno: 0
                   Last_Error:
                 Skip_Counter: 0
          Exec_Master_Log_Pos: 454
              Relay_Log_Space: 868
              Until_Condition: None
               Until_Log_File:
                Until_Log_Pos: 0
           Master_SSL_Allowed: No
           Master_SSL_CA_File:
           Master_SSL_CA_Path:
              Master_SSL_Cert:
            Master_SSL_Cipher:
               Master_SSL_Key:
        Seconds_Behind_Master: 0
Master_SSL_Verify_Server_Cert: No
                Last_IO_Errno: 0
                Last_IO_Error:
               Last_SQL_Errno: 0
               Last_SQL_Error:
  Replicate_Ignore_Server_Ids:
             Master_Server_Id: 12
                  Master_UUID: ee0e03c2-e40d-11ed-b369-000c290f55d2
             Master_Info_File: /var/lib/mysql/master.info
                    SQL_Delay: 0
          SQL_Remaining_Delay: NULL
      Slave_SQL_Running_State: Slave has read all relay log; waiting for more updates
           Master_Retry_Count: 86400
                  Master_Bind:
      Last_IO_Error_Timestamp:
     Last_SQL_Error_Timestamp:
               Master_SSL_Crl:
           Master_SSL_Crlpath:
           Retrieved_Gtid_Set: ee0e03c2-e40d-11ed-b369-000c290f55d2:1
            Executed_Gtid_Set: ee0e03c2-e40d-11ed-b369-000c290f55d2:1
                Auto_Position: 1
         Replicate_Rewrite_DB:
                 Channel_Name:
           Master_TLS_Version:
1 row in set (0.00 sec)
3.回到主调度器修改HAProxy配置文件
[root@master01 ~]# vim /etc/haproxy/haproxy.cfg		#在配置文件底部新增内容

listen MySQL_service
    bind 0.0.0.0:3306	#监听所有IP和3306端口
    mode tcp	#基于4层调度
    balance source
    server vedio1 192.168.140.12:3306 check inter 2000 fall 3 rise 2
    server vedio2 192.168.140.13:3306 check inter 2000 fall 3 rise 2
4.重启主调度器HAProxy服务
[root@master01 ~]# systemctl restart haproxy.service
可以使用
netstat查看是否启动,如果没有这条命令请安装yum install -y net-tools
[root@master01 ~]# netstat -tunlp | grep 3306
tcp        0      0 0.0.0.0:3306            0.0.0.0:*               LISTEN      3974/haproxy
5.复制主调度配置文件到备用调度
[root@master01 ~]# scp /etc/haproxy/haproxy.cfg root@192.168.140.11:/etc/haproxy
重启备用调度
[root@master02 ~]# systemctl restart haproxy
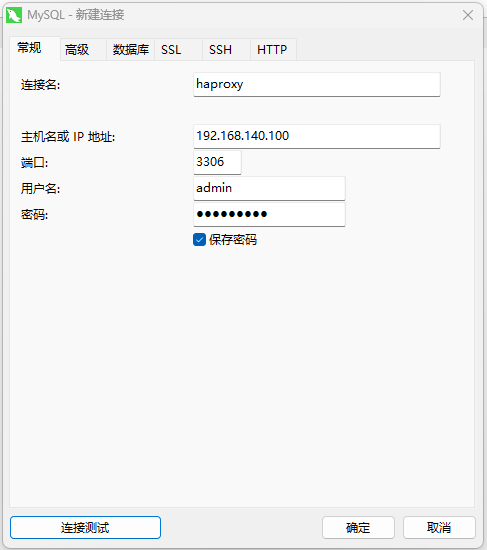
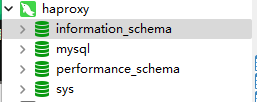
6.访问测试
A.后台MySQL创建授权用户
因为配置了
双主复制环境,所以任意一台数据库都可以!
mysql> grant all on *.* to 'admin'@'192.168.140.%' identified by 'WWW.1.com';
B.Windows测试连接
【Linux集群系列教程】HAProxy负载均衡集群
https://www.wsjj.top/archives/99
评论